Hey Ya'll
Anyone ever add a hatch to the luggage rack area? I was thinking it would come in handy to store more stuff and for better access to rudder control cables if necessary.
Thanks
.........Kepnutz
| Hobie Forums http://www.hobie.com/au/en/forums/ |
|
| Add A Trunk Hatch http://www.hobie.com/au/en/forums/viewtopic.php?f=11&t=7257 |
Page 1 of 1 |
| Author: | kepnutz [ Tue Jul 10, 2007 9:15 pm ] |
| Post subject: | Add A Trunk Hatch |
Hey Ya'll Anyone ever add a hatch to the luggage rack area? I was thinking it would come in handy to store more stuff and for better access to rudder control cables if necessary. Thanks .........Kepnutz
|
|
| Author: | Roadrunner [ Tue Jul 10, 2007 11:27 pm ] |
| Post subject: | |
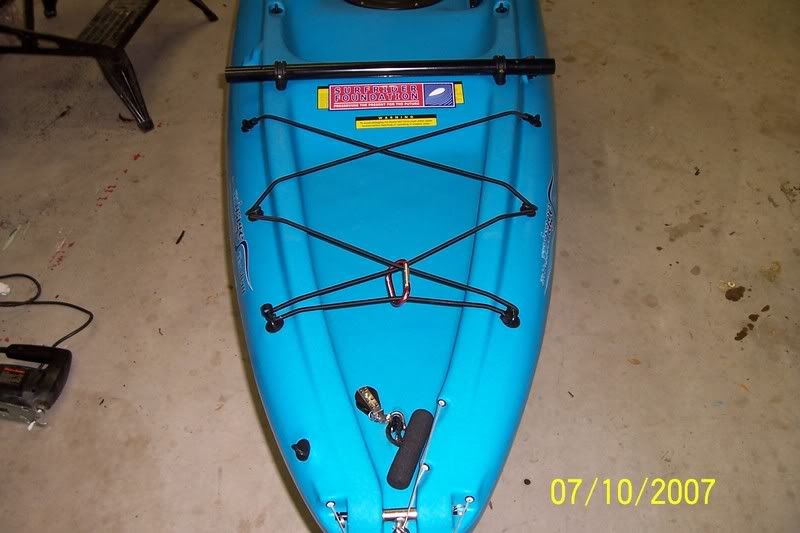
Hi Kep, You've been putting out so many projects lately, you're putting Santa's workshop to shame! The old Tandem (Oasis) had a 5" hatch behind the back seat as pictured here: 
The advantage there is that it sits off the flat deck (my cargo area tends to get pretty wet). I'm guessing the deck dimensions haven't changed on the newer boats. This hatch lid screws on and off and is still available from Hobie. It's not waterproof, but doesn't need to be at that location. On the other hand, the new hatches are supposedly waterproof and could be mounted closer to the stern. I've never added a hatch, but perhaps others have. |
|
| Author: | Apalach [ Wed Jul 11, 2007 10:25 am ] |
| Post subject: | |
Yeah Nutzie and RR—I assume that is the reason that Hobie has not installed hatches on flat portions of the tank wells on the new boats. On the earlier boats with these (non-waterproof) hatches, they were a source of leakage into the hull interior, if not from standing water then from heavy rains pounding on them. I remember taking on a lot of water thru the tightly closed hatch, or underneath the seal on the after deck of my OB when I was trying to get back to shore through a heavy downpour from a thunderstorm. The water was unable to exit thru the scuppers where I was carrying a flat tool/tackle box and cooler that prevented rapid runoff. But even on the modern boats such as the Revo, the hatches are mounted either slightly above the surrounding tank well or deck, or at an angle to try to get around any potential problems in this regard. Note the drainage channels on either side of the hatch, and funneling directly to the scuppers, for example, on the Revo in this pic. However, if you are like most folks in this regard, you will probably be carrying a crate or cooler behind the seat that could likewise block the scuppers and back up water into the well. Hopefully, the new hatches and mounting them further aft, either slightly elevated and/or at an angle, along with the drainage channels will prevent standing water in the tank well. Hobie doesn't miss too much in the design of their boats! 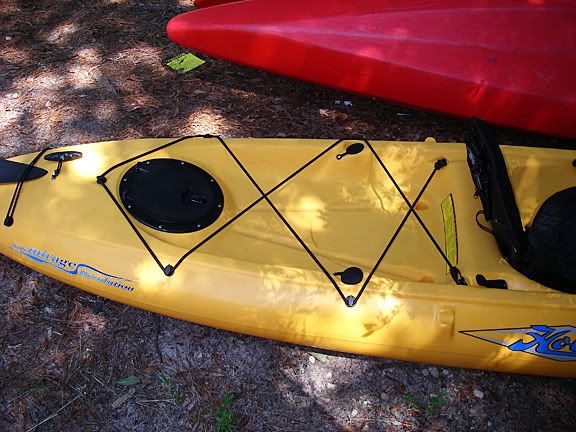
|
|
| Author: | kepnutz [ Wed Jul 11, 2007 9:11 pm ] |
| Post subject: | |
Hey Latch Patch Kid Hey Roadie-Oh Thats a very good point you both made. The hatch in the stern deck would be fairly wet on most trips and could be prone to leaking. I know any time I have seen water in the boat it was from the hatch area. Our boat is always really dry inside the hull even after a long day out and I would not want to see that change for the sake of a fourth hatch. Dont need to open that can o worms.... ................kepnutz 
|
|
| Author: | Roadrunner [ Sun Jul 15, 2007 10:02 pm ] |
| Post subject: | |
We took the Oasis out for some exercise (and a few good wake rides) today... 
and noticed afterward that the rear deck does retain water... 
A hatch there would not only get wet, but would likely be continually sitting in water with any kind of active sea conditions. Leaving that area unbreached is probably a great plan! |
|
| Author: | kepnutz [ Mon Jul 16, 2007 7:41 am ] |
| Post subject: | |
Hi Ya Roadie-Oh That sure looks like fun. Nice to see you both enjoy using your new Tandem Oasis. I thought you would be trying to wear out that new A.I. all the time Yeah I have canned that hatch in the back idea and have been putting the finishing touches on my larger Tandem sailing rudder instead. I went out with a friend on Saturday for a trial run and my new rudder worked much better than the original stock design. For the first time ever I was able to take my hand off the rudder control to put on sunscreen for a couple minutes while the boat mostly kept its course without immediately wibble-wabble wobbling all over the place. I was quite pleased because prior to that I was always making constant adjustments to keep the boat on any course and could never let go of the handle. I did not expect to have this result so that was a very nice suprise. As for sailing in our light breeze that day, 6 to 9 mph, the rudder performed quite well and I was able to milk speed out of the gusts like never before. The boat was moving under sail power alone even up river against a fairly strong current as well as back and forth which was also a suprise. Im no expert Kayak builder by any means, however it is now my humble opinion, based soley on my own limited experience, that the Tandem Oasis and perhaps maybe even the Outfitter too ought to come stock with a larger sail and a larger rudder. As long as Im dreaming I would also add a slightly stiffer mast and a removable boombat in order to improve overall sailing and handling performance given the added weight of boat and two adult passengers . The cost of these changes is minimal and enhances performance significantly..just my .02 cents (actually about $16.95 plus labor) Have fun down there.. ..................Kepnutz 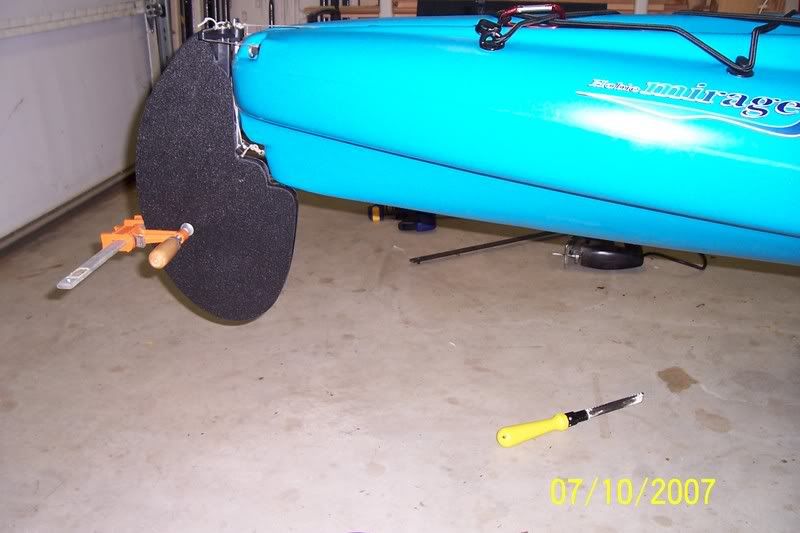
|
|
| Author: | Apalach [ Mon Jul 16, 2007 7:59 pm ] |
| Post subject: | |
Hey (not-so-) Nutz, A very nice-looking, and it sounds like a very functional job, as well. How about retractability of the larger rudder--any problems in that regard? How much bigger is yours compared to the "sailing" rudder now offered by Hobie? Sounds like the Hobie engineers, nautical architects, and designers might need to put their heads together to come up with an optimal rudder design, shape, and size for each "class" or size of yak. Should be an interesting exercise, to say the least. |
|
| Author: | kepnutz [ Tue Jul 17, 2007 7:46 am ] |
| Post subject: | |
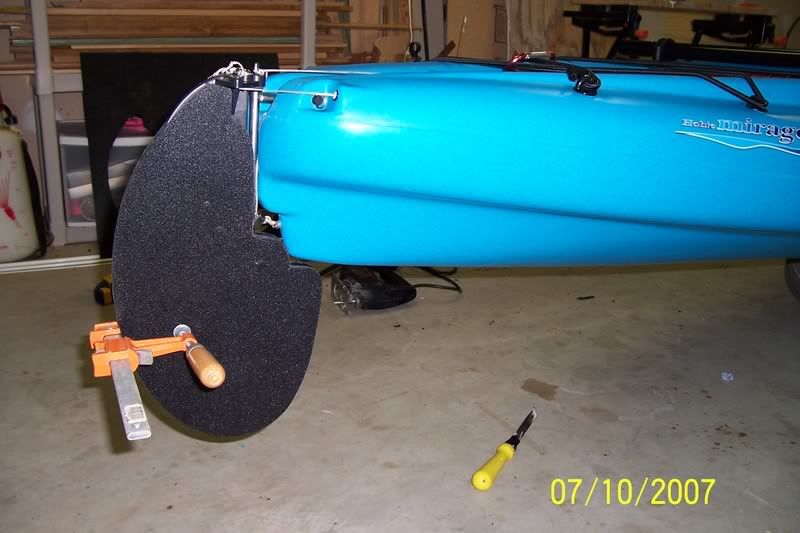
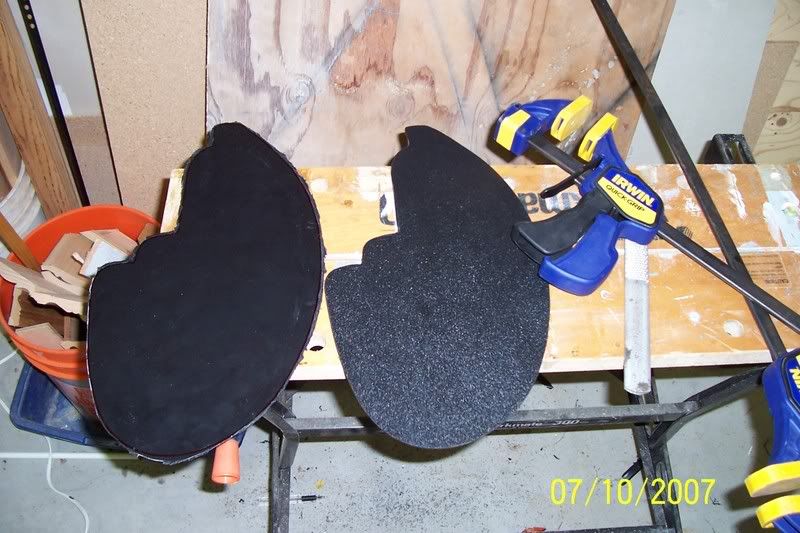
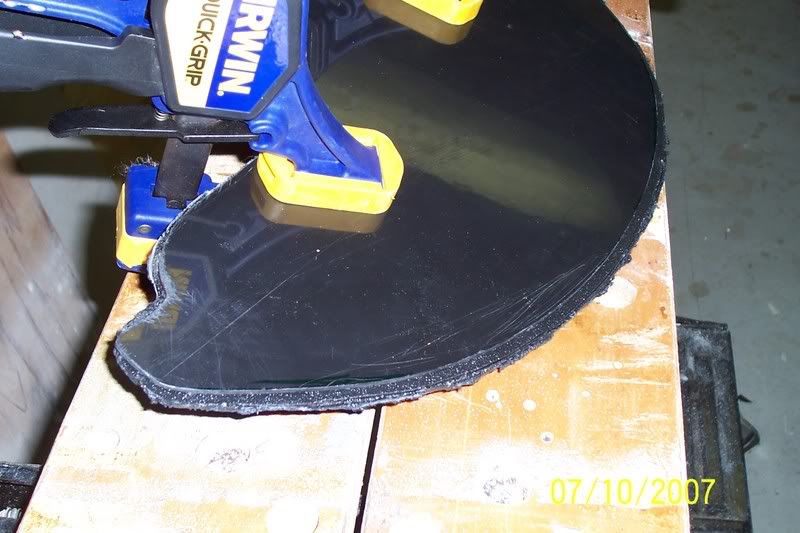
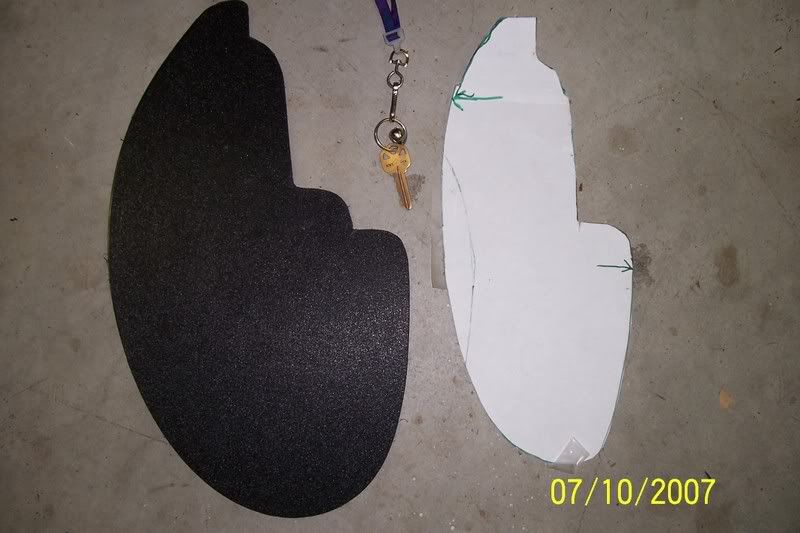
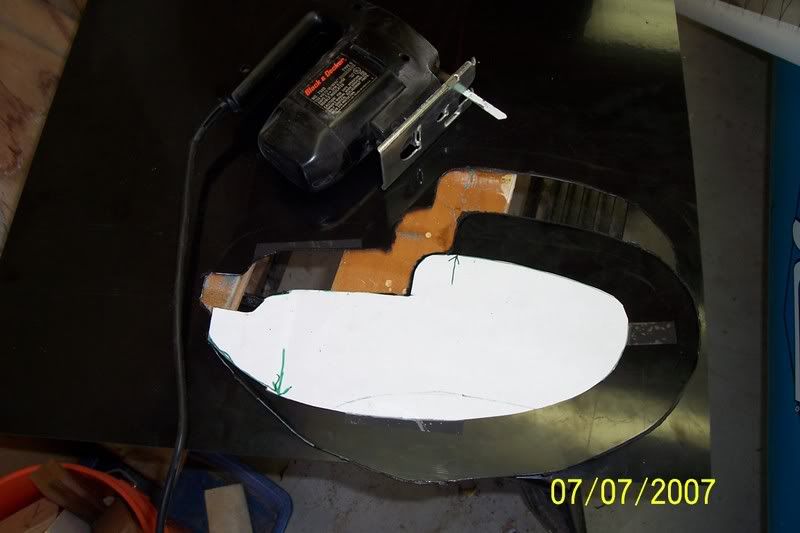
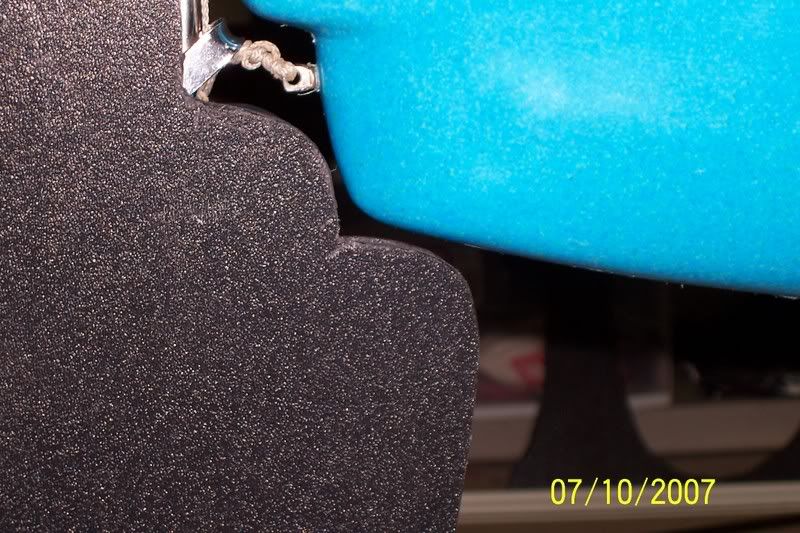
Hey Ya Dune Latch Patch Thank you for the positive feed back. I made this rudder about 2 inches wider all around and 2-1/2 inches deeper and then shaped it a bit. Its basically a clam shell design that I bonded and clamped to the original rudder in order to keep things simple. I added a through bolt/nut and washers up top to keep it secure then clamped and glued it on. The rudder material is 1/8" pvc cut from a 2 foot by 2 foot square that I bought at Tap Plastics for whole $9.20. I then cut the two halves with a jig saw and slapped them on etc. So far I have had no retraction issues and it works better than I hoped.. .........kepnutz 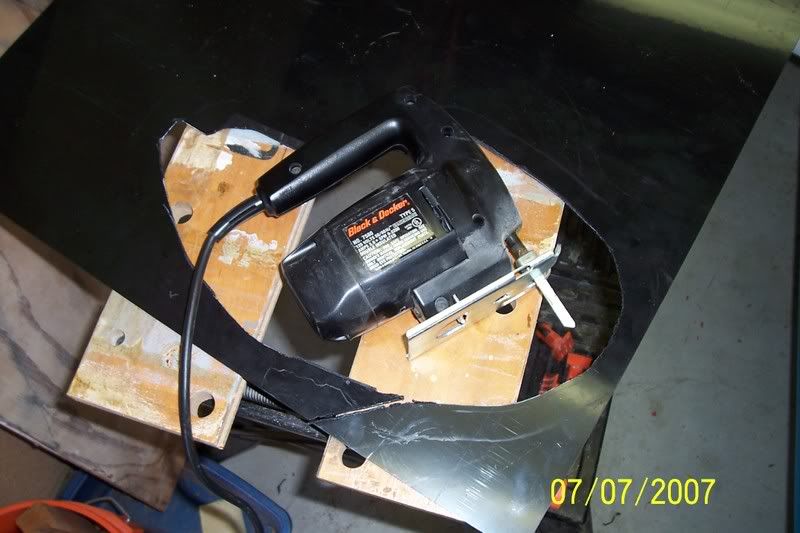
|
|
| Author: | Apalach [ Tue Jul 17, 2007 8:22 am ] |
| Post subject: | |
Yep Nutzie--very clever and simple to boot--I'm a big fan of both concepts! Did you use ordinary PVC cement, or something more high-tech? Thanks for the pics--they're a big help. |
|
| Author: | kepnutz [ Tue Jul 17, 2007 8:57 pm ] |
| Post subject: | |
Hey L-Patch I done up and used a hodge-podge combination of sticky stuff. At first I was not sure if the rudder would work at all so I used a thin film of High Strength Web Spray a waterproof adhesive made by "AERVOE" so that I might try the rudder out first and then still be able to remove it if it did not work out. After I tested the rudder out, I then used a stronger permanent two part adhesive made by Devcon called Plastic Welder that came in a syringe type dispenser plus I also added some Polyurethane glue in places, (AKA Gorilla Glue) then clamped it down and added some small stainless steel rivets to seal the deal. Needless to say its a little overbuilt but the extra layer of adhesive has stiffened up the the pvc rudder material which was a bit flexy at first. Anywho Im ready to go so if you would be so kind as to stop by my house and help me hoist my Big Blue Pig onto the roof of my SUV then we could go out for a pedal/paddle ...Ill be waiting... ........... Kepnutz |
|
| Author: | Apalach [ Tue Jul 17, 2007 9:13 pm ] |
| Post subject: | |
Leave the porch light on. |
|
| Author: | wthoms2000 [ Sun Sep 21, 2014 11:49 pm ] |
| Post subject: | Re: Add A Trunk Hatch |
| Author: | Roadrunner [ Mon Sep 22, 2014 8:28 am ] |
| Post subject: | Re: Add A Trunk Hatch |
Beautiful! |
|
| Page 1 of 1 | All times are UTC - 8 hours [ DST ] |
| Powered by phpBB® Forum Software © phpBB Group http://www.phpbb.com/ |
|