I seemed to come up with a fix for the skeg after removing and inspecting all area's of the skeg and area's that the cord runs for lowering and raising the Skeg I found it is also wearing the inside of the kayak as well where it rubs on hull its self,I also removed the line from the skeg and also found small pieces of plastic or debris on the hole that the cord runs through where it doubles back to the mounting bracket . To fix this problem I used a piece of 1/4" cyn flex air line that is used on DOT airbrake systems as a guide for the cord , I cut a piece about 16" and slid it over the line pushed it through the hull into just past the rear hatch then pushed about four inches through the hole for the skeg and adjusted it so the skeg did not hit it when in the up position and tied the cord directly to the skeg instead of doubling it back to the skeg bracket and it is by far easier to lift and lower with less pull on the cord unfortunately I can not post pictures and I plan to go out this week end to see how it does
I seemed to come up with a fix for the skeg after removing and inspecting all area's of the skeg and area's that the cord runs for lowering and raising the Skeg I found it is also wearing the inside of the kayak as well where it rubs on hull its self,I also removed the line from the skeg and also found small pieces of plastic or debris on the hole that the cord runs through where it doubles back to the mounting bracket . To fix this problem I used a piece of 1/4" cyn flex air line that is used on DOT airbrake systems as a guide for the cord , I cut a piece about 16" and slid it over the line pushed it through the hull into just past the rear hatch then pushed about four inches through the hole for the skeg and adjusted it so the skeg did not hit it when in the up position and tied the cord directly to the skeg instead of doubling it back to the skeg bracket and it is by far easier to lift and lower with less pull on the cord unfortunately I can not post pictures and I plan to go out this week end to see how it does
Once we have announced the line re-route instructions to our dealers we can share it. The area reps have seen the link - but it' won't go public until after all our dealers have been notified, since folks will be contacting dealers to get the kits, they need to be up to speed on it first.
I seemed to come up with a fix for the skeg after removing and inspecting all area's of the skeg and area's that the cord runs for lowering and raising the Skeg I found it is also wearing the inside of the kayak as well where it rubs on hull its self,I also removed the line from the skeg and also found small pieces of plastic or debris on the hole that the cord runs through where it doubles back to the mounting bracket . To fix this problem I used a piece of 1/4" cyn flex air line that is used on DOT airbrake systems as a guide for the cord , I cut a piece about 16" and slid it over the line pushed it through the hull into just past the rear hatch then pushed about four inches through the hole for the skeg and adjusted it so the skeg did not hit it when in the up position and tied the cord directly to the skeg instead of doubling it back to the skeg bracket and it is by far easier to lift and lower with less pull on the cord unfortunately I can not post pictures and I plan to go out this week end to see how it does
I purchased my PA through ACK. Called Hobie and they said go through the dealer for the warranty part. Called ACK and they took down my hull number and said they would be contacting Hobie to request the part today. Looks like a pretty easy do it yourself fix.
_________________ Cory 2015 PA12
Last edited by Cory5129 on Thu Apr 30, 2015 8:57 am, edited 1 time in total.
well this is what i got from the facebook page "hobie pro angler owners" I don't take any responsebility for it's correctness.
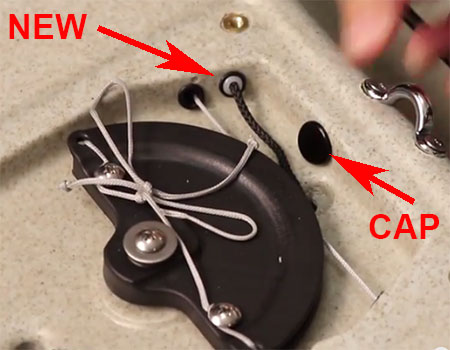
Hobie Cat Dealer Bulletin 2015 Pro Angler 12/14 Tracking Skeg Issue We have discovered a problem with the routing of the tracking skeg’s up-control line in the 2015 Pro Angler 12 and 14. The line has excessive friction at it’s exit point within the steering drum area, under the black plate. We have received some reports of lines cutting into the exit grommet. This affects 2015 model serial numbers ending in 415 as well as A515, B515, C515 and possibly a few boats in D515. The issue was corrected on the assembly line April 2nd. If your boat has this issue you will see the grommet forward of the drum as shown: We have created a kit and instructions for re-routing this line. The video below explains the fix. It should take about 10-15 minutes to complete. Kits should be ordered through warranty.
That said, i got a early 2015 PA12 (snr. 415) and my cable is already on the (new corrected) place ??? th only thing is that i am missing the white liner in the feedthru.
Joined: Tue May 27, 2003 12:44 pm Posts: 15034 Location: Oceanside, California
Quote:
i got a early 2015 PA12 (snr. 415) and my cable is already on the (new corrected) place ??? th only thing is that i am missing the white liner in the feedthru.
I am a bit baffled at why an early boat has the correct location, but the white tube is more durable and should be used there I believe. Any wear showing on yours?
_________________ Matt Miller Former - Director of Parts and Accessory Sales Warranty and Technical Support Hobie Cat USA (Retired 11/7/2022)
Joined: Tue May 27, 2003 12:44 pm Posts: 15034 Location: Oceanside, California
All warranty claims are handled by your dealer... Contact your dealer if you have the following issue.
Not all 2015 boats have this issue, read the detail concerning the differences.
We have discovered a problem with the routing of the tracking skeg's up-control line in some 2015 Pro Angler 12 and 14. The line has excessive friction at it's exit point within the steering drum area, under the black plate. We have received some reports of lines cutting into the exit grommet. This affects 2015 model serial numbers ending in 415 as well as A515, B515, C515 and possibly a few boats in D515. The issue was corrected on the assembly line April 2nd.
If your boat has this issue you will see the grommet forward of the drum as shown:
We have created a kit and instructions for re-routing this line. The video below explains the fix. It should take about 10-15 minutes to complete. Kits should be ordered through warranty.
84610122 PA SKEG LINE KIT The kit contains a 5/16 panel rivet and a short line tube with end grommet.
I'm curious how that location changes much of anything? Its still going to rub the underside of the tank well when tension is pulled on it and that tube aimed out the side with the cord comeing from the front is going to fold pretty hard. Also curious why the 180* turn at the skeg wasn't eliminated? As someone already pointed out including myself, it makes a difference...
My serial number ends in I414 and has the grommet forward of the drum as pictured above..but my serial number doesn't end like any of the ones hobie posted....and I have an issue with the skeg dropping down when deployed....there are more pro anglers with this problem. ..not just the boats with those specific serial numbers. ...
Users browsing this forum: No registered users and 2 guests
You cannot post new topics in this forum You cannot reply to topics in this forum You cannot edit your posts in this forum You cannot delete your posts in this forum