Hobie Forums
http://www.hobie.com/forums/

Jib halyard options (MS paint diagram)
http://www.hobie.com/forums/viewtopic.php?f=13&t=41953
Page 1 of 1

Author:  Daredevil [ Wed Apr 04, 2012 4:27 am ]
Post subject:  Jib halyard options (MS paint diagram)

I'd like to add sister clips to my jib halyard but I'm unsure where the best place to put them is. I think there are basically two options. A or B as shown in the diagram:
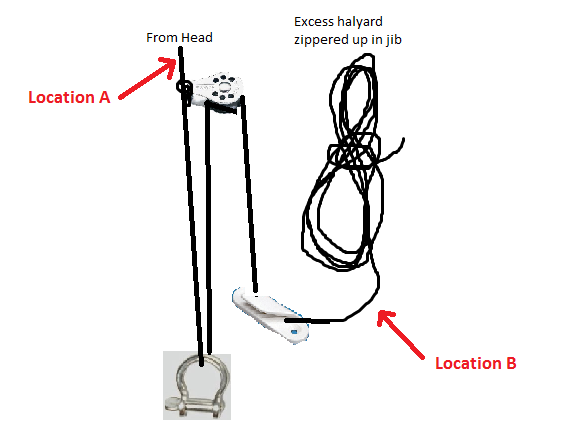
Image

Option A:
At this location I would disconnect the halyard and add a tension line with attached block. I like this best because I struggle getting the block into the zippered jib luff, especially when it's windy. The only issue I see here is the strength of the sister clips under tension. Maybe another type of small quick connector?

Option B:
Is this the intended location for sister clips? It's nice to eliminate coiling the long halyard into the zipper but it doesn’t solve my problem with getting the block into the jib luff...

Author:  Harry Murphey [ Wed Apr 04, 2012 5:03 am ]
Post subject:  Re: Jib halyard options (MS paint diagram)

You don't really need "sister" clips ....

Let's check a few things ....

Attached to your jib halyard on one end is a small shackle ... and on the other is a small block ... correct???

Now the small block has a "hollow" pin in the middle that the shive rotates on correct ....???

Now tied through that "hollow" pin (I use a bowline knot ...) is a short piece of line ... maybe 2-3' long ... (I use 1/8" spectra/vectra ...) .... correct ...???

All Ok to this point .... Yes????

Now I just tie using a "square knot" a long length of 1/8" dia "batten" line to the end of the short piece of spectra/vectra .... no sister clips .... I always tie the other end of this small dia long line to the shackle and only untie it when I attach the shackle to the jib ... (trust me there is nothing no aggrevating then having to turn the boat on it's side to retrieve the jib halyard .... don't ask how I know ...) I remove this line (untie the square knot ...) and store it away, leaving the spectra/vectra still attached to the small block through the pin, for use when I tension the jib halyard ....

Sister clips are nice .... but ... I just don't want the extra possiblity of the sister clips getting caught/hooked when it passes through the jib luff pocket ...

.... I'm also a bit of a "minimalist" .... keep it simple .... when possible ....

Author:  Daredevil [ Wed Apr 04, 2012 5:37 am ]
Post subject:  Re: Jib halyard options (MS paint diagram)

I too am a minimalist and my ultimate goal with the halyard is to reduce rigging time...

I think using a bowline through the sheeve pin is a great idea, simple and effective. Thanks.

Author:  srm [ Wed Apr 04, 2012 6:24 am ]
Post subject:  Re: Jib halyard options (MS paint diagram)

I agree, sister clips are not necessary on the 18 jib halyard. Neither are any pulleys (if you have one of the older wire jib halyards with the small pulley on the thimble, it may be best to cut the pulley off as it has a tendency to hang up on the top of the jib when hoisting).

Here's my jib halyard system, it is very simple and effective...

I leave a length of line tied to the jib tack shackle (the shackle that connects the bottom of the jib to the furler). This line is about 2 feet long, 1/8" or 5/32" diameter and is used as the jib halyard "tensioner".

Hoist the jib using the long thin halyard line (1/12" dia) tied to the wire halyard, leave the last foot or so of zipper un-zipped. Connect the tack shackle to the jib/furler so that the jib halyard tensioner line which is tied to the shackle is on the same side as the halyard cleat on the jib. Take the tensioner line, pass it up through the thimble in the wire halyard and back down to the cleat and cleat it off. Untie the thin halyard line from the wire halyard, coil and stow it in the tramp pouch. Set the desired jib halyard tension and tie off the tensioner line securely. Zip down the last bit of the jib luff.

This system is quick and simple. It gives a 2:1 purchase, which is all you need on an 18 jib.

sm

Author:  jmecky [ Wed Apr 04, 2012 7:00 am ]
Post subject:  Re: Jib halyard options (MS paint diagram)

I use sister clips at location B. Location A would put the clips under stress and I don't think they are designed for that. I think they work great. Yeah you really don't need them but you also don't need all that extra line by the furler when sailing. I used to have a 2 foot line up there to tighten the jib but I already had the halyard there so why ad more line.

And putting the halyard through the pulley eye is fabulous, the pulley no longer gets stuck at the zipper pocket.

Author:  flaco [ Wed Apr 04, 2012 8:27 am ]
Post subject:  Re: Jib halyard options (MS paint diagram)

Now I'm beginning to doubt my setup..maybe it's too simple.
I got rid of the small block and wire halyard altogether.
I have a length of spyderline run through the wire pully, tied off to a shackle that I attach to jib head. On the other end, I've tied off to a sister clip. I just hoist the jib, put some tension on it, cleat the spyderline halyard in the luff cleat, and remove excess line with sister clips.
Am I missing something without using the block and tensioner line? Jib seems plenty tight to me.

Author:  Daredevil [ Wed Apr 04, 2012 8:39 am ]
Post subject:  Re: Jib halyard options (MS paint diagram)

Flaco, you cant get the required tension without the block. The 18 jib is designed to be tightend with a 2:1 purchase.


I've read about people removing the wire halyard and replacing with spiderline, is there any advantage for this?

Author:  flaco [ Wed Apr 04, 2012 8:45 am ]
Post subject:  Re: Jib halyard options (MS paint diagram)

Daredevil wrote:
Flaco, you cant get the required tension without the block. The 18 jib is designed to be tightend with a 2:1 purchase.


Well, my theory is if you overtighten, the halyard will take all of the load when you sheet in tight, causing the wire to potentially break. It's much harder to do this with a 1 to 1. I could be wrong though...

Daredevil wrote:
I've read about people removing the wire halyard and replacing with spiderline, is there any advantage for this?


The main reason for me is I already had some spyderline in my parts bag, and needed to replace the wire. It's much stronger than the wire as well.

Author:  srm [ Wed Apr 04, 2012 8:50 am ]
Post subject:  Re: Jib halyard options (MS paint diagram)

I'm not familiar with what spyder line is. Is that a type of modern low-stretch line like spectra? As long as it is, then it sounds like your system is probably fine.

You have to remember that back in the 70's when the 18 was designed, none of today's high-tech, low-stretch lines were available. The designers needed to use a steel wire for the halyard so there would be very little stretch in order to maintain jib shape. If they had used a line, likely the halyard would stretch when it was loaded and the luff of the jib would become too full.

If your jib luff stays tight enough using the spyder line and the halyard doesn't slip in the cleat, then your system is probably fine.

Also, you are absolutely right about not "needing" a 2:1 or 3:1 purchase (the system was actually originally designed to be 3:1). If you over-tighten the jib halyard, it will break because the mainsheet load will be transferred to the small jib halyard line/wire rather than being taken by the forestay. I personally like having a 2:1 system, but as long as your halyard doesn't slip in the cleat or break, I think a 1:1 would actually work just fine as well.

If you're new to rigging the 18, then you should always pre-tension the forestay using the mainsheet before you apply your final tension to the jib halyard. This way the forestay will be tight and you won't over-tension the jib halyard and risk breaking it.

sm

Author:  Harry Murphey [ Wed Apr 04, 2012 10:16 am ]
Post subject:  Re: Jib halyard options (MS paint diagram)

Hi (again ...),

Mr SRM's last statement/paragraph in his last post is VERY important .... and is overlooked by most ....

I do basically the same thing .... tensioning my jib usually AFTER I have hoisted my mainsail and sheeted the main till I have tension on my forestay. That means sometimes hoisting, pre-tensioning the jib halyard and then furling the jib ... but not tensioning the jib completely until I have hoisted the mainsail later ... ex: I have to go to a "Skipper's Meeting" and still have several hours before leaving the beach and the racing starts .... Note: Sometimes I tension the jib, before hoisting the mainsail, by attaching the main halyard to the boom and sheeting down, thereby tensioning the forstay .... but note, usually I also adjust my rig/side stay tension first and set it, before tensioning the jib halyard .... especially if I'm rigging/setting up alone ....

So basically I tension my jib halyard just before I "push" off .... the last thing I do is check my rudders (cams) and that my hullplugs are in and are snug ...

On my P19MX ... I do use a jib halyard of 1/8" spectra/vectra that passes over a pulley and returns downward to the forestay adjuster and is "pinned" there. But this system is used w/ a jib luff adjustment system on the jib's tack, so the jib luff pivots around the forestay to allow for a better shape and a "clean" entry into the wind. (There is a swivel just below the shackle that hooks onto the jib's tack ....)

But the furler on the H18 precludes this option from being installed on a H18 ....

Page 1 of 1 All times are UTC - 8 hours [ DST ]
Powered by phpBB® Forum Software © phpBB Group
http://www.phpbb.com/