I had some requests for the instructions for building the Modular Quarterdeck so here they are for anyone interested.
Here was the original video for anyone that might have missed it.
[youtube]http://www.youtube.com/watch?v=vbwMbJ-XEh8[/youtube]
Below are the pieces as I have measured them. The pieces are not exactly symetrical but I measured them exactly as they were in my final quarterdeck so that you get the same result. Your welcome to adjust as you like, but the idea is not to but any pressure on the amas or on the bottom of the rod holder holes.
Begin by cutting the following pieces. Label each with the appropriate number to prevent confusion during assembly. Below are the measurement of each piece.
Parts Picture
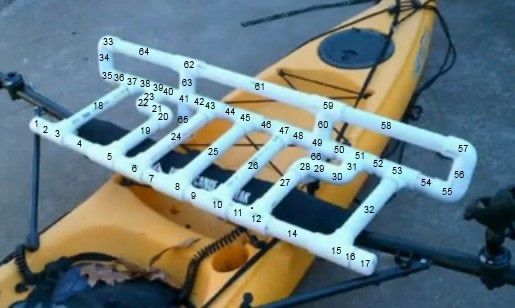
1. 1.25in End Cap
2. 1.25in PVC pipe 2.0 in long
3. 1.25in T connector
4. 1.25in PVC pipe 6.25 in long
5. 1.25in PVC T connector
5.a 1.25in PVC pipe 2.125 in long
6. 1.25in PVC T connector
7. 1.25in PVC pipe 3.5 in long
8. 1.25in PVC T connector
9. 1.25in PVC pipe 3.25 in long
10. 1.25in PVC T connector
11. 1.25in PVC pipe 2.0 in long
12. 1.25in PVC T connector
13. There is no piece 13! It would be bad luck anyway.
14. 1.25in PVC pipe 6.5 in long
15. 1.25in PVC T connector
16. 1.25in PVC pipe 2.0 in long
17. 1.25in PVC end cap
18. 1.25in PVC pipe 11.0 in long
19. 1.25in PVC pipe 7.125 in long
20. 1.25in PVC pipe Right angle
21. 1.25in PVC pipe 2.0 in long
22. 1.25in PVC pipe Right angle
23. 1.25in PVC pipe 2.0 in long
24. 1.25in PVC pipe 11.0 in long
25. 1.25in PVC pipe 11.0 in long
26. 1.25in PVC pipe 11.0 in long
27. 1.25in PVC pipe 7.25 in long
28. 1.25in PVC pipe Right angle
29. 1.25in PVC pipe 2.0 in long
30. 1.25in PVC pipe Right angle
31. 1.25in PVC pipe 2.0 in long
32. 1.25in PVC pipe 10.75 in long
33. 1.25in PVC pipe Right angle
34. 1.25in PVC pipe 2.0 in long
35. 1.25in PVC pipe Right angle
36. 1.25in PVC pipe 3.25 in long
37. 1.25in PVC T connector
38. 1.25in PVC pipe 2.75 in long
39. 1.25in PVC T connector
40. 1.25in PVC pipe 2.0 in long
41. 1.25in PVC pipe 4 way connector
42. 1.25in PVC pipe 2.0 in long
43. 1.25in PVC T connector
44. 1.25in PVC pipe 3.5 in long
45. 1.25in PVC T connector
46. 1.25in PVC pipe 3.0 in long
47. 1.25in PVC T connector
48. 1.25in PVC pipe 2.0 in long
49. 1.25in PVC pipe 4 way connector
50. 1.25in PVC pipe 2.25 in long
51. 1.25in PVC T connector
52. 1.25in PVC pipe 2.5 in long
53. 1.25in PVC T connector
54. 1.25in PVC pipe 3.25 in long
55. 1.25in PVC pipe Right angle
56. 1.25in PVC pipe 2.0 in long
57. 1.25in PVC pipe Right angle
58. 1.25in PVC pipe 12.0 in long
59. 1.25in PVC T connector
60. 1.25in PVC pipe 2.0 in long
61. 1.25in PVC pipe 17.125 in long
62. 1.25in PVC T connector
63. 1.25in PVC pipe 2.0 in long
64. 1.25in PVC pipe 12.0 in long
65. 1.25in PVC pipe 10.25 in long
66. 1.25in PVC pipe 10.25 in long
Now assemble the pieces (but don’t glue yet). Your final width of the quaterdeck should be about 49.5 in on the back rail and 42.75in on the front seat bar. Note that if you are slightly long, less than an inch, once you add glue, the pieces fit into each other better, reducing the overall length. Longer than an inch in the front seat bar and I might cut it down a bit otherwise pieces 1 & 17 may put pressure on the amas.
Once assembled (but not glued!) adjust the angle of the pieces to each other so that when all in place, there is no pressure on the amas. The length of pieces 65 and 66 as well as the roof rack pad covered 1.5in PVC crossbar should prevent prevent breaching of the rod holder holes.
Once your are happy with the quarterdeck, take a permanent marker and make a mark on each piece where it connects to the next. This is critical to achieving the same angles in the final reassembly when gluing the pieces together.
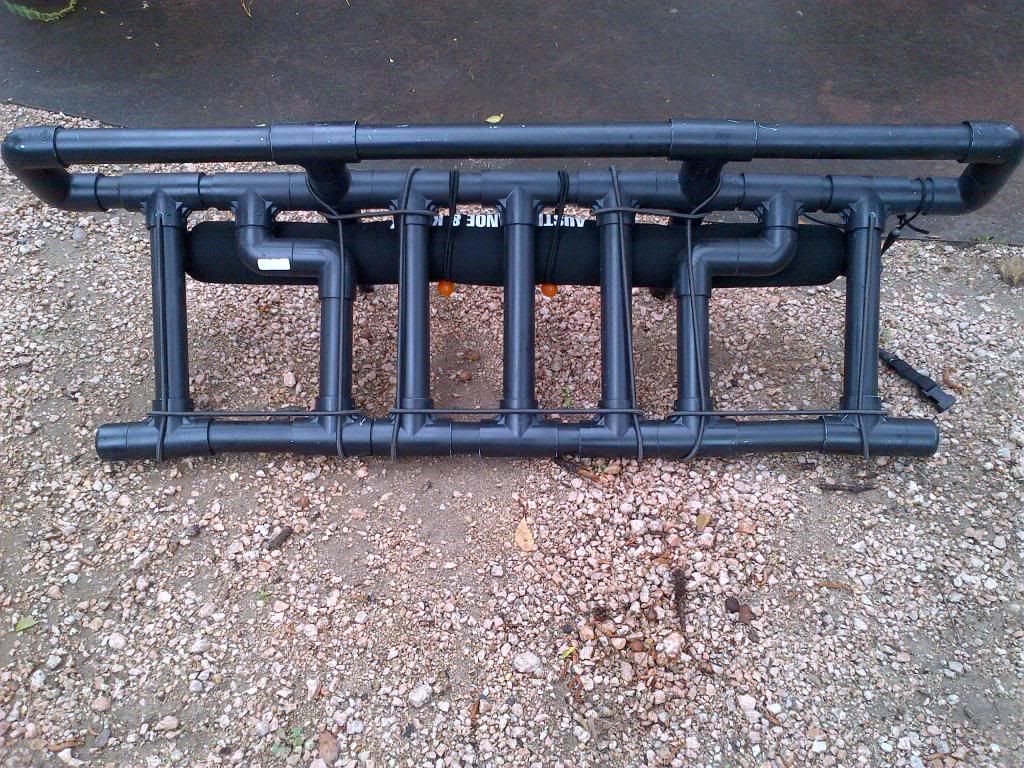
Now I take and separate the quarterdeck into sections and glue them one piece at a time. Check your work carefully as you go. I start with the back lower support first- pieces 35-55 since this needs to be done straight. I created extra support in the section from pieces 35 through 55 buy adding a 1in, 46 inch long continuous PVC pipe inside the assembly as I went. I made sure to keep things straight so that I could slid it in near the end of assembling it (can be a tight fit). I also slid a 48 in steel rod into the 46 in long 1in PVC pipe but I think an aluminum rod would have been a better, lighter choice. If you don’t make this portion straight, you may not be able to get both the 1”PVC and the aluminum rod in. Don’t sweat it, just put the rod in. It is not so much support as it is a safety measure to prevent the Quarterdeck from totally collapsing should pieces separate suddenly while sailing and sending you into the drink. The pieces have not separated on me yet (sailed about 20 times now) and I weigh 220#.
After gluing painting and latching, I attached the roof rack pad covered 1.5in PVC crossbar to the quarterdeck using a bunge.
Here are the roof rack pads that I used...
http://www.austinkayak.com/products/8747/36-in-Extrema-Roof-Rack-Pads.html
Inside this I place a 33in PVC pipe. I also used a T connector in the center but saw no real need for that after having used it. You can skip the T connector.
Here is a less expensive option for roof rack pads if so inclined.
[youtube]http://www.youtube.com/watch?v=H153XyfNXA4[/youtube]
Next I spray painted the the quarterdeck (4 coats)with this…
http://www.homedepot.com/p/Rust-Oleum-Painter-s-Touch-2X-12-oz-Flat-Black-General-Purpose-Spray-249127/202246266?N=apz5Zbm2#.UXB6j7Um0nA
Followed by (4 coats) this…
http://www.homedepot.com/p/Rust-Oleum-Painter-s-Touch-2X-12-oz-Flat-Matte-Clear-General-Purpose-Spray-Paint-249087/100670439?N=apz5Zbm2#.UXB6x7Um0nA
This will give the Modular Quarterdeck the same finish as the akas.
Finally I bought some long black bongee for laching. I drilled one hole in both pieces 18 & 32 where they attach to pieces 37 and 53 respectively where the latching begins and end by passing the bungee through and tying a knot.
Picture of latching pattern…
The type 4 PFD cushions that I recommend are…
http://www.academy.com/webapp/wcs/stores/servlet/Product_10151_10051_12424_-1__?N=581132454
They have just the right amount of support and do not take on water. Can’t beat them.
