Return to Hobie.com
Hobie Forums
It is currently Tue Apr 23, 2024 2:30 pm

All times are UTC - 8 hours [ DST ]


Post new topic Reply to topic  [ 16 posts ]  Go to page 1, 2  Next
Author Message
PostPosted: Thu Jan 29, 2009 10:20 am 
Offline
Site Rank - Admiral

Joined: Thu Apr 26, 2007 9:57 am
Posts: 222
Location: Phuket, Thailand
OK...here we go!

Tools

Image

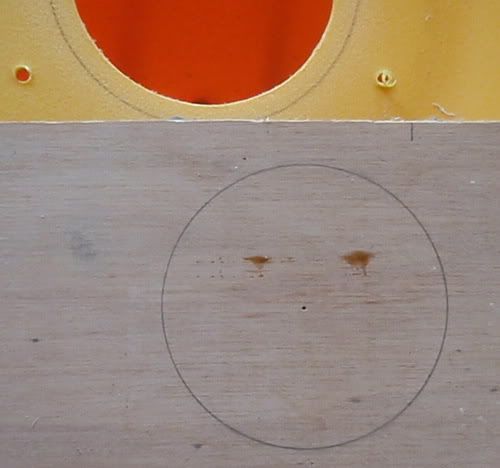
Measure diameter of hole in deck. using compass draw circle of same diameter onto a piece of ply making sure the point of the compass makes a visible pin prick in the centre of the circle, use a 2B pencil so your drawn line is reasonably thick.

Image

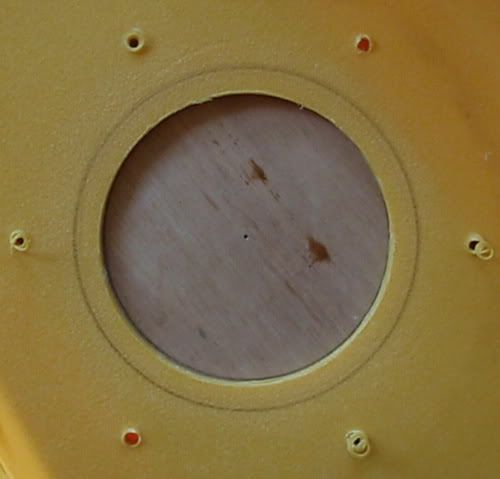
Using a prop to hold it firmly under the deck. Line the ply under the hole inside the deck so the circle youve drawn lies concentric to the hole in the deck. In other words get the holes to line up.
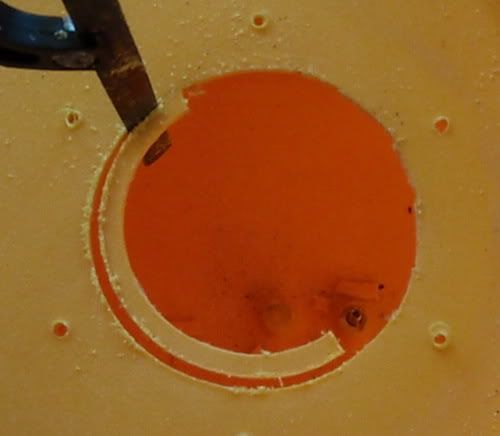
Now using the centre point outline the circle for the new hole onto the deck with your compass.

Image

Before you start to cut the hole in the deck just cut your new hole into a sheet of plastic and slide your receiver through it to check the fit.

Image

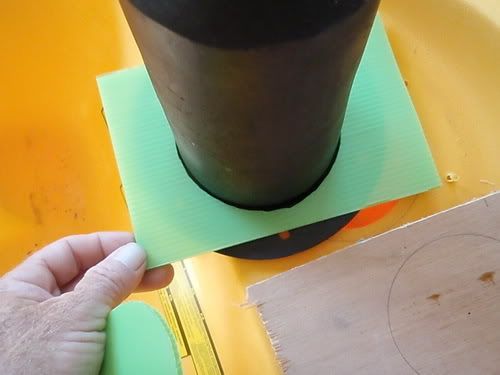
looks like theres some play which is good just in case my centre lines a bit off there will be enough room to fiddle the receiver so all the screw holes line up.


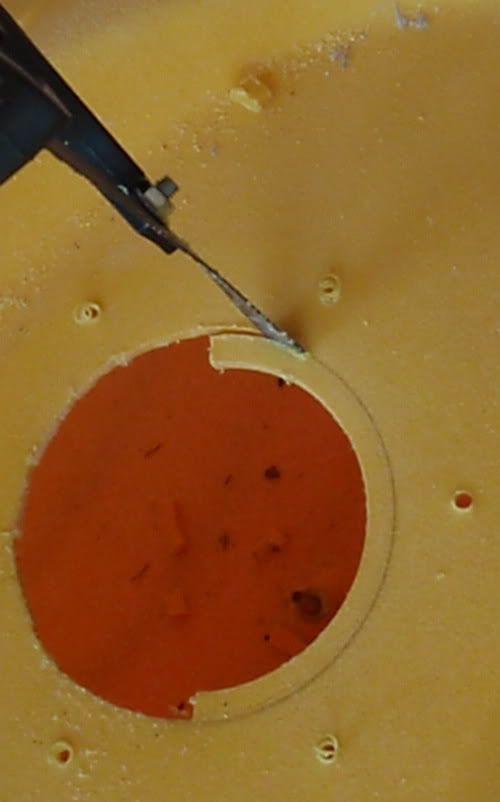
I am going to cut my hole using a hacksaw blade, there are some fantastic hole sawing devices you can mount onto your drill but they are quite expensive for a one off job and, as with any power tool, if you get it wrong...BOY does it ever GO WRONG. Also they all use a centre bit, that would require me to block up the inside of the hole with a big bit of timber. So I am going to go on with this by hand...noones going to see my hole anyway, it will be covered by the flange of the mast receiver.

Cut a slot out to take the width of your blade...this will keep you on the track of your line and keep you on radius, best way to cut the slot is cut outwards from the hole in the deck to your line in 10th" increments until you reach the correct width in my case 1/2", file back the little bits remaining with the edge of a file. Nows the important bit DONT do as I did (to start with) and use that part of the blade thats close to the frame of the saw you wont get enough twist to follow your line, the blade will track off. I soon wised up and just used the end of the blade which really twisted off well.

Image

Image

To prevent the blade binding use silicone spray. Short, rapid, light strokes only apply wrist pressure to maintain blade twist, dont saw too hard, you dont need to

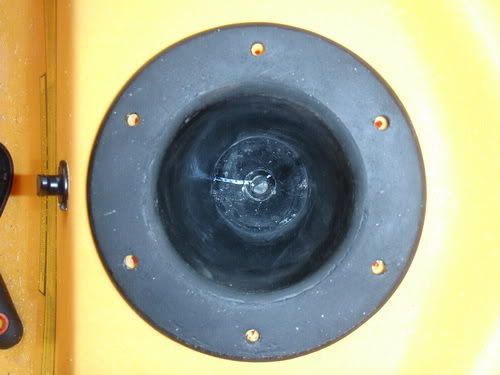
Now I have just put the receiver thru the hole in my deck and the screw holes are all lined up.

Image

However it seems like its not seated tightly into the keel, theres an 1/8th inch gap. My compass fits between the receiver base and the keel

Image


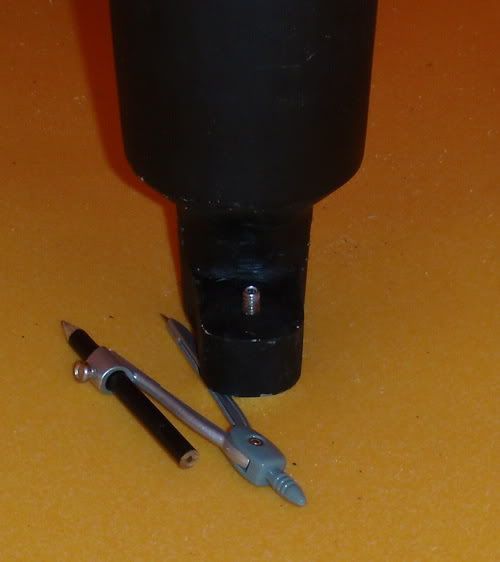
Aloha Dan says neither of his receivers are tight to the keel although they are firmly on the lugs. I think this is because the lugs flare out at the base and prevent the bottom of the receiver sitting firmly in the keel.

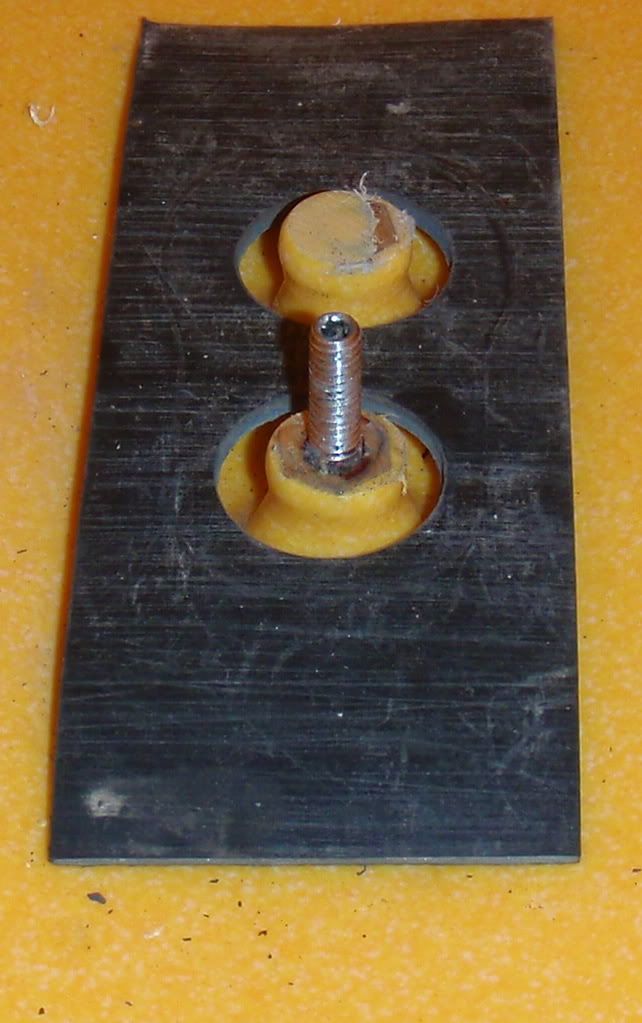
I understand that the V brace will take much of the load but I dont like the idea of everything pushing down on the lugs alone, I want the load spread across the keel so i am going to shim beneath the base of the receiver.

Image

When I removed the receiver from my old hull the hole in the base was badly egged (See photo 'an ounce of prevention' posted Jan 10) as was the hole in the base plate of the V brace and thats stainless.

Image

A lot of this was undoubtedly due to me not checking the tension of the brace nor checking the nut tension at the base of the receiver ... but I also feel (and stand to be corrected if I'm wrong) that had the receiver been hard into the keel the load would have been spread better. However, tightening down the nut still did not bring the receiver base in contact with the keel, it was hung up on the base of the lugs where they join into the keel....same problem as in the new hull.

Anyway now I am done nuts tight down and flush with the bolt on the lug, receiver seated hard on my shim

Image


All thats left is to tweek the brace up so the mast fits OK and hopefully can getting sailing tommorow....its been a while!


Top
 Profile  
 
 Post subject:
PostPosted: Thu Jan 29, 2009 10:23 am 
Offline
Site Rank - Old Salt

Joined: Fri Jan 05, 2007 9:21 pm
Posts: 2498
Location: Central Florida
Nicely done!

Kayaking Bob


Top
 Profile  
 
 Post subject:
PostPosted: Thu Jan 29, 2009 11:24 am 
Offline
Site Admin

Joined: Tue May 27, 2003 12:44 pm
Posts: 15035
Location: Oceanside, California
Agreed... WELL DONE!

_________________
Matt Miller
Former - Director of Parts and Accessory Sales
Warranty and Technical Support
Hobie Cat USA
(Retired 11/7/2022)


Top
 Profile  
 
 Post subject:
PostPosted: Thu Jan 29, 2009 2:02 pm 
Offline
Site Rank - Old Salt

Joined: Thu Aug 16, 2007 2:25 pm
Posts: 2866
Location: Central Coast NSW Australia
Great Work Philip!
Looks like Roadrunner has a competitor! :wink:
I'm guessing the reason for this upgrade?? is that an 09 replacement hull is just a bare hull and you have to fit all your older extra bits?


Top
 Profile  
 
 Post subject: Keep an eye on the nut
PostPosted: Thu Jan 29, 2009 2:53 pm 
Offline
Site Admin

Joined: Tue May 27, 2003 12:44 pm
Posts: 15035
Location: Oceanside, California
Comment from the factory...

The nut is not engaged into the nylock portion.

Thinner shim, grind out inside the base? Something to get it down further so the nut can be fully engaged.

_________________
Matt Miller
Former - Director of Parts and Accessory Sales
Warranty and Technical Support
Hobie Cat USA
(Retired 11/7/2022)


Top
 Profile  
 
 Post subject:
PostPosted: Thu Jan 29, 2009 3:45 pm 
Offline
Site Rank - Old Salt

Joined: Tue Jun 19, 2007 6:14 pm
Posts: 3323
Location: South Florida
Terrific instructions, Philip. Jeah, it seems like RR has trained a lot of foot soldiers. Well done.

Keith

_________________
2015 AI 2, 2014 Tandem

"Any intelligent fool can make things bigger and more complex ... It takes a touch of genius and a lot of courage to move in the opposite direction." A. Einstein

"Less is more" Anon


Top
 Profile  
 
PostPosted: Thu Jan 29, 2009 5:36 pm 
Offline
Site Rank - Admiral

Joined: Thu Apr 26, 2007 9:57 am
Posts: 222
Location: Phuket, Thailand
mmiller wrote:
Comment from the factory...

The nut is not engaged into the nylock portion.

Thinner shim, grind out inside the base? Something to get it down further so the nut can be fully engaged.


The shim moved quite freely below the base it was only tightening the nut that drew the receiver down onto it. I think the problem is the inside of the base but I found a fix that means I dont have to take the whole thing apart again. It was lying there right in front of me!! Dunno what the factory would have to say about it, they will probably cry foul!

Image


Top
 Profile  
 
 Post subject:
PostPosted: Thu Jan 29, 2009 8:34 pm 
Offline
Site Rank - Admiral

Joined: Thu Apr 26, 2007 9:57 am
Posts: 222
Location: Phuket, Thailand
stringy wrote:
Great Work Philip!
Looks like Roadrunner has a competitor! :wink:
I'm guessing the reason for this upgrade?? is that an 09 replacement hull is just a bare hull and you have to fit all your older extra bits?


Hi Stringy,

The replacement hull came with the new style receiver with a pin in the base but I had an old style mast with a pin in the base.

I had 2 choices, either buy a new mast or a new receiver. I took the cheaper option!


Top
 Profile  
 
 Post subject:
PostPosted: Thu Jan 29, 2009 8:51 pm 
Offline
Site Admin

Joined: Tue May 27, 2003 12:44 pm
Posts: 15035
Location: Oceanside, California
Looks goos now!

_________________
Matt Miller
Former - Director of Parts and Accessory Sales
Warranty and Technical Support
Hobie Cat USA
(Retired 11/7/2022)


Top
 Profile  
 
 Post subject:
PostPosted: Thu Jan 29, 2009 9:06 pm 
Offline
Site Rank - Admiral

Joined: Thu Apr 26, 2007 9:57 am
Posts: 222
Location: Phuket, Thailand
He He!!!! :wink: e


Top
 Profile  
 
 Post subject:
PostPosted: Thu Jan 29, 2009 9:10 pm 
Offline
Site Rank - Old Salt

Joined: Thu Aug 16, 2007 2:25 pm
Posts: 2866
Location: Central Coast NSW Australia
Ah yes, I see your problem Philip. It's a shame you couldn't just swap the 07 pin mast base with the 08 but I guess it would be too difficult to remove and replace.
Looks like you've managed to adapt and overcome nicely and thanks to your post I have a better understanding of what's underneath the receiver!
Hope you're back on the water soon! 8)


Top
 Profile  
 
 Post subject:
PostPosted: Thu Jan 29, 2009 9:35 pm 
Offline
Site Rank - Admiral

Joined: Thu Apr 26, 2007 9:57 am
Posts: 222
Location: Phuket, Thailand
Hi Stringy Mast base not available as a seperate part...its the mast or nothing at all!


Top
 Profile  
 
 Post subject:
PostPosted: Thu Jan 29, 2009 10:20 pm 
Offline
Hobie Approved Guru

Joined: Sat Nov 12, 2005 10:46 pm
Posts: 3017
Location: Escondido
Phil, excellent tutorial and nicely illustrated. Doing the test cut and pre-fit on scrap was a great idea!8)


Top
 Profile  
 
 Post subject:
PostPosted: Thu Jan 29, 2009 11:26 pm 
Offline
Site Rank - Old Salt

Joined: Fri Nov 21, 2008 3:39 am
Posts: 858
Location: Bairnsdale, Victoria Australia
Very instructional stuff Phil and well done on the project completion. Just one point re the half nut. I am not sure what load that nut is under, if any, but definately a no-no if it is taking load. Well it is in avaition circles anyway..Anyway I am am filing this away for future reference...Pirate :wink:


Top
 Profile  
 
 Post subject:
PostPosted: Fri Jan 30, 2009 12:02 am 
Offline
Site Rank - Admiral

Joined: Thu Apr 26, 2007 9:57 am
Posts: 222
Location: Phuket, Thailand
Pirate wrote:
Just one point re the half nut. I am not sure what load that nut is under, if any, but definately a no-no if it is taking load.


My thought was that if the base of the receiver is well supported on the keel then the loading will be spread and therefore less tension on the nut...but I am not an engineer!! Maybe one for the tech guys at Hobie!
What was of concern was the repeated removal and reistallation of the receiver and brace. the gasket that the flange of the receiver sits on was starting to look a bit 'tired' after several removals/reinstallations and the brace bears heavily against the bolts on the underside of the deck as you tension it up. I am terrified of stripping a thread.

I think after a few sails things will settle down/loosen a bit and maybe the receiver seat a little deeper on the lugs. if that happens for sure i will go back to the original nut!

Cutting a hole in a brand new boat frightened me too, thats why before sawing into the deck I did the test hole in plastic...just imagine getting it WRONG. :cry:

I have just fitted the mast and taken off a wee bit of tension from the brace so the furling drums free.

In half an hour I am going sailing, theres a 10 knot easterly, the rods are ready. Its going to be SOOOOO good to be back sailing again!!!

Many thanks to you all for the input!

Philip


Top
 Profile  
 
Display posts from previous:  Sort by  
Post new topic Reply to topic  [ 16 posts ]  Go to page 1, 2  Next

All times are UTC - 8 hours [ DST ]


Who is online

Users browsing this forum: No registered users and 2 guests


You cannot post new topics in this forum
You cannot reply to topics in this forum
You cannot edit your posts in this forum
You cannot delete your posts in this forum

Jump to:  
© Hobie Cat Company. All rights reserved.
Powered by phpBB® Forum Software © phpBB Group