Return to Hobie.com
Hobie Forums
It is currently Tue Apr 16, 2024 11:27 am

All times are UTC - 8 hours [ DST ]


Post new topic Reply to topic  [ 10 posts ] 
Author Message
PostPosted: Sun Aug 23, 2015 11:22 pm 
Offline
Site Rank - Captain

Joined: Mon Jun 22, 2015 1:34 am
Posts: 41
Location: Oahu
Aloha,

Took the TI out into Kbay yesterday. I was able to insert the drive, but one side kept unlocking. Made the drive wobble a bit when peddling. When inserting the drive, are the clamp tabs suppose to be closed inward, or pulled backwards?

Thanks,

TC

_________________
I'd rather have a bottle in front of me, than a frontal lobotomy!


Top
 Profile  
 
PostPosted: Sun Aug 23, 2015 11:40 pm 
Offline
Site Rank - Old Salt

Joined: Fri Jan 05, 2007 9:21 pm
Posts: 2498
Location: Central Florida
They should automatically lock forward. Pull them to the rear to release.

If you have an old Mirage Drive, they did made a change to a non-rotating Drum Shaft when they changed to the Click And Go mount system.

If your drive is new, the problem is probably in the Click And Go mount on the side that is releasing.

_________________
Image
Hobie Island Sailing since 2006


Top
 Profile  
 
PostPosted: Mon Aug 24, 2015 7:35 am 
Offline
Site Rank - Captain

Joined: Tue Jul 19, 2005 9:58 am
Posts: 42
I had the same problem on my TI. When I put in the drive, I tip the drive very slightly to the problem side first--make sure it's clicked in, and then click in the other side. I haven't had a problem since.


Top
 Profile  
 
PostPosted: Thu Aug 27, 2015 9:49 am 
Offline
Site Admin

Joined: Tue May 27, 2003 12:44 pm
Posts: 15031
Location: Oceanside, California
You pull the levers aft to release, but...

When inserting the drive... the levers spring open and then close automatically as the drive is fully inserted. There is no other manual lever action required.

You can confirm that the levers are fully closed (forward).

It is possible that you trip a lever open with your heel while pedaling?

_________________
Matt Miller
Former - Director of Parts and Accessory Sales
Warranty and Technical Support
Hobie Cat USA
(Retired 11/7/2022)


Top
 Profile  
 
PostPosted: Mon Apr 12, 2021 11:11 am 
Offline
Site Rank - Admiral

Joined: Wed Jun 24, 2015 6:38 pm
Posts: 199
Location: Pennsylvania - Philly Area
Matt / Fellow Island Sailors...

Need a bit of help.

The Click And Go mount system for my mirage drive in the rear seat of my 2016 TI does not fully lock in as usual.

It appears the spring in the right one of the two click and go mirage drive mount has failed.

Questions:
- ideas to fix / repair
- part number / where to order replacement click and go mirage drive mount
- any tips / videos on how to do the repair.

See photo below.

See video on YouTube showing the failure: https://youtu.be/k0rxUTSpiF4


ImageHobie Mirage Click and mount by Jim Powers, on Flickr

_________________
Jim
Hobie TI 2022 - Offshore rig - Outboard - having fun!
Hobie TI 2021 - Offshore rig - Outboard - sold
Hobie TI 2016 - Offshore rig - Outboard - sold
Hobie Kona 2014
Hobie AI 2015 - sold
Hobie Rev 13 2014 - sold
Hobie Outback - 2008 - sold


Top
 Profile  
 
PostPosted: Mon Apr 12, 2021 3:20 pm 
Offline
Site Admin

Joined: Tue May 27, 2003 12:44 pm
Posts: 15031
Location: Oceanside, California
81602201 SPRING CLICK-N-GO RIGHT $1.39

81602101 SPRING CLICK-N-GO LEFT $1.39

Roadrunner:

Quote:
As Dr.SteelheadCatcher says, a ball head Hex key (3/16" Allenhead) set should help (Harbor freight about $6 or $7 for the set with 20% off coupon) -- it lets you work at an angle. I've always managed with with a regular Allenhead though.
1. Leave the cover in place for now.
2. Disconnect the one Allenhead that you can reach.
3. You should be able to get your wrench into the other screw enough to get a bite and try to wiggle the C&G while twisting. Once you get it started, you can maneuver the loose unit enough to finish the job. It takes a little finesse.
4. When installing the new spring you make the final bend to lock it in place
5. Note the spring can flip either way. Pay attention to the correct direction in the pics above.
6. Install in reverse order. Don't forget to use some Loctite Blue on the threads so they don't back out later!


https://www.youtube.com/watch?v=puV7N2wF52c

_________________
Matt Miller
Former - Director of Parts and Accessory Sales
Warranty and Technical Support
Hobie Cat USA
(Retired 11/7/2022)


Top
 Profile  
 
PostPosted: Mon Apr 12, 2021 8:34 pm 
Offline
Site Rank - Admiral

Joined: Wed Jun 24, 2015 6:38 pm
Posts: 199
Location: Pennsylvania - Philly Area
Thanks Matt for the quick reply.

I have placed an order for the replacement springs.

The video shows replacing the entire Quick-N-Go mounts.

From your comments it looks like all is needed is to replace springs (my current plan).

Do you recommend removing the Quick-N-Go mounts and then working on a bench remove the black covers and replace the springs.... OR .... can you remove the black covers and replace the springs while the QNG mounts remain attached to the TI? Just looking for some tips before I dig in....

_________________
Jim
Hobie TI 2022 - Offshore rig - Outboard - having fun!
Hobie TI 2021 - Offshore rig - Outboard - sold
Hobie TI 2016 - Offshore rig - Outboard - sold
Hobie Kona 2014
Hobie AI 2015 - sold
Hobie Rev 13 2014 - sold
Hobie Outback - 2008 - sold


Top
 Profile  
 
PostPosted: Tue Apr 13, 2021 8:48 am 
Offline
Site Admin

Joined: Tue May 27, 2003 12:44 pm
Posts: 15031
Location: Oceanside, California
Text by Roadrunner recommends removing the click and go and then replacing the spring... follow the text description above.

_________________
Matt Miller
Former - Director of Parts and Accessory Sales
Warranty and Technical Support
Hobie Cat USA
(Retired 11/7/2022)


Top
 Profile  
 
PostPosted: Tue Apr 20, 2021 9:56 pm 
Offline
Site Rank - Admiral

Joined: Wed Jun 24, 2015 6:38 pm
Posts: 199
Location: Pennsylvania - Philly Area
Thanks Matt,

I took a slightly different approach with success....still took a bit of effort.

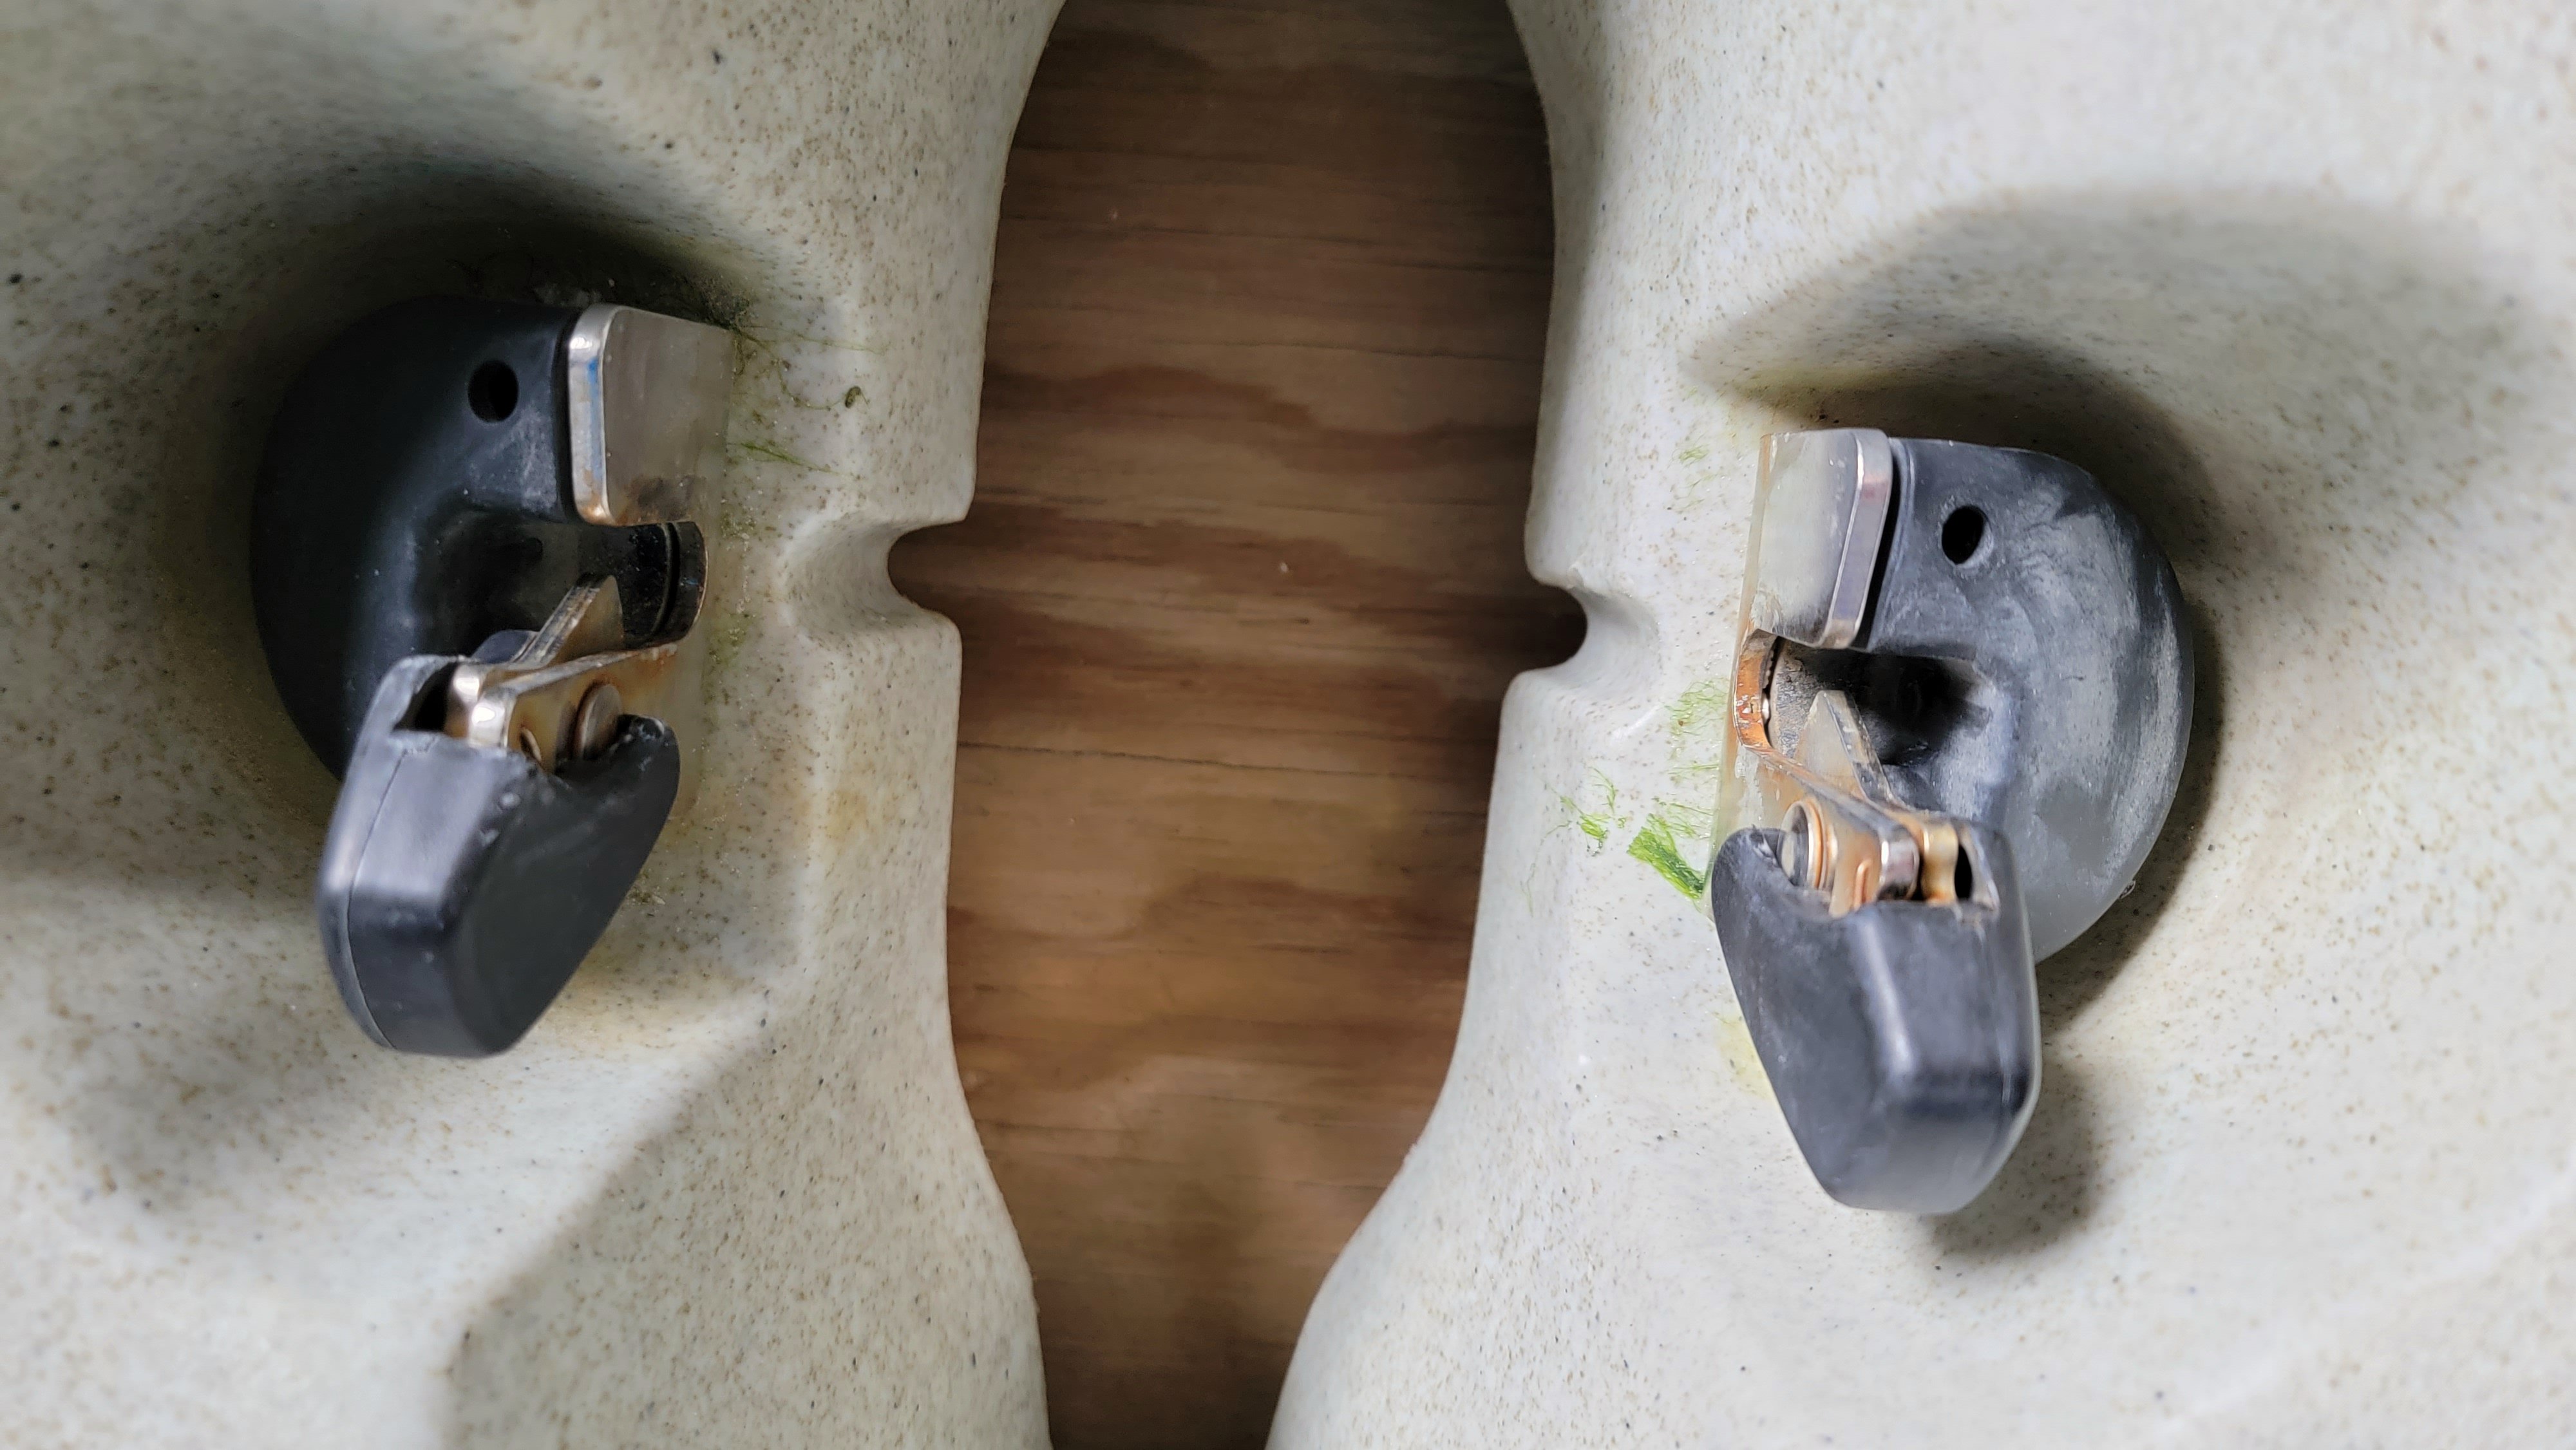
Decided to replace the springs in both the right and left Click and Go mounts.

I used a small and simple offset Philips screw driver to remove the black plastic covers to gain access to the springs. You can access the screw and with many small turns .... many small turns .... you can remove the screws to access the springs without removing the Click and Go mounts.

I replaced the left spring 1st, which was still working, so I could understand the configuration.

The bent ends of the spring proved difficult to pull out, thus I used a wire cutter to remove the spring.

I then moved on to the right Click and Go spring with the actual failed spring and repeated the process. The spring had separated in the right Click and Go. Wire cutters were used to remove the failed spring.

As noted by Matt above, there are different springs, one for the right and one for the left Click and Go mounts.

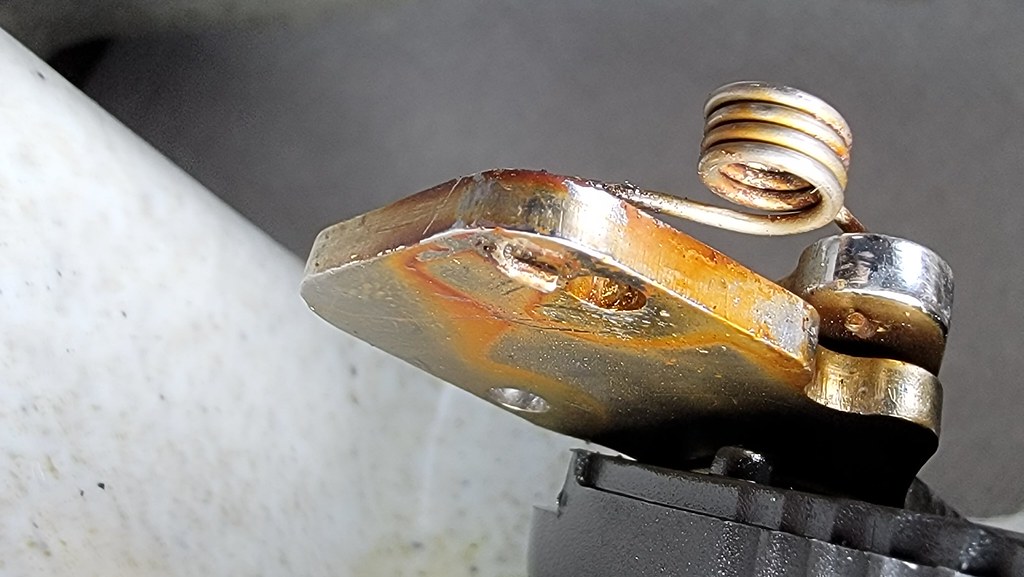
General inspection of the spring condition confirmed salt water corrosion is the most likely source of the failure... Island sailors in fresh water or occasional dips in salt water should have no concern for this type of failure. Sailors who take dips in salt water on a regular basis need to keep an eye on this.... I sail over 50 times a year in salt water.....and after 4+ years....the iron based spring steel gave way. Simple visual inspection for any rust deposits near the Click and Go are all you need to do.....if you see rust....these springs will fail over time.

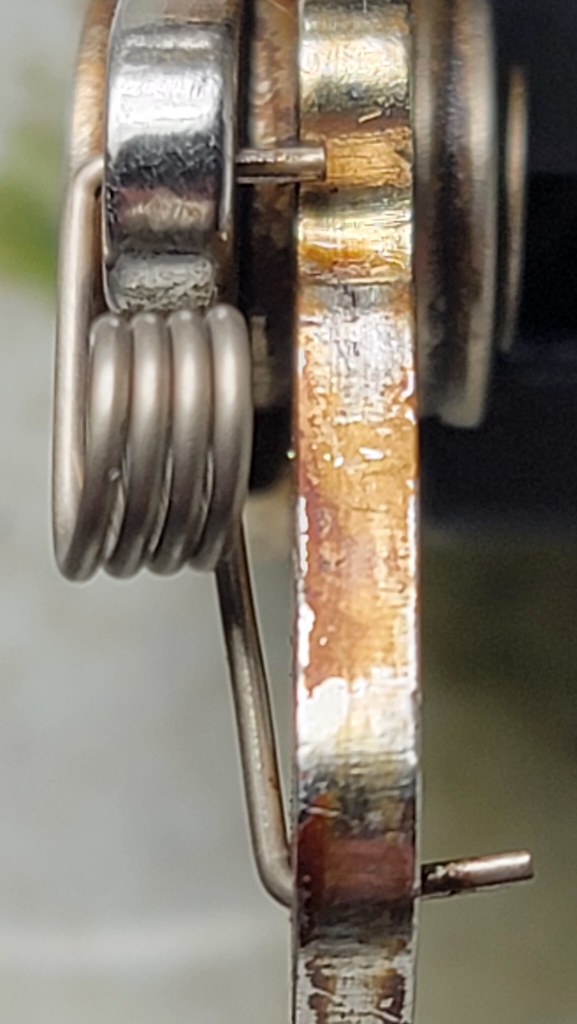
One of the more difficult steps was bending the ends of the spring after they were inserted in the Click and Go. Very tight access on one end of the spring.

See a few photos from this fun repair below and in this flickr album. https://flic.kr/s/aHsmVng6SJ

ImageHobie Tandem Island Click and Go Spring Replacement by Jim Powers, on Flickr

_________________
Jim
Hobie TI 2022 - Offshore rig - Outboard - having fun!
Hobie TI 2021 - Offshore rig - Outboard - sold
Hobie TI 2016 - Offshore rig - Outboard - sold
Hobie Kona 2014
Hobie AI 2015 - sold
Hobie Rev 13 2014 - sold
Hobie Outback - 2008 - sold


Top
 Profile  
 
PostPosted: Sun Oct 24, 2021 9:51 pm 
Offline
Site Rank - Captain

Joined: Sat Jul 24, 2021 8:44 pm
Posts: 44
Thanks!


Top
 Profile  
 
Display posts from previous:  Sort by  
Post new topic Reply to topic  [ 10 posts ] 

All times are UTC - 8 hours [ DST ]


Who is online

Users browsing this forum: No registered users and 2 guests


You cannot post new topics in this forum
You cannot reply to topics in this forum
You cannot edit your posts in this forum
You cannot delete your posts in this forum

Jump to:  
© Hobie Cat Company. All rights reserved.
Powered by phpBB® Forum Software © phpBB Group