Return to Hobie.com
Hobie Forums
It is currently Fri Apr 19, 2024 6:47 am

All times are UTC - 8 hours [ DST ]


Post new topic Reply to topic  [ 6 posts ] 
Author Message
 Post subject: seat wells cracking
PostPosted: Sat Nov 22, 2008 5:25 pm 
Offline
Site Rank - Deck Hand

Joined: Sat Apr 28, 2007 5:01 am
Posts: 19
Location: Ingleside, TX
I'm having a bear of a time with the revolution seat wells cracking/splitting open. I own two revolutions and am on my fifth kayak in less than 2 years. The wells seem super thin/transparent compared with the rest of the kayak. You can put your hand inside the kayak and see your hand when it crosses the wells. If anything I would think the seat area should be thicker, more reinforced than the rest of the kayak. Is Hobie going to address this problem or am I going to go on having problems? They have made changes to the drive well, the other problem area for cracking, when are they going to change the seat so it is more stronger? Love the kayaks but wish they would quit cracking.

_________________
Jim Houle


Top
 Profile  
 
 Post subject:
PostPosted: Sat Nov 22, 2008 7:49 pm 
Offline
Site Rank - Old Salt

Joined: Fri Mar 23, 2007 8:12 am
Posts: 441
Location: Florida
If by seat wells you mean where the seat plugs in:

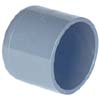
My fix was a 3/4" PVC endcap glued from inside the hull over each of the plugs using 3M Scotchweld.

If by seat well you mean the entire seat cavity, thats a bit more of a problem.

However, to add a little strength I cut a few bullet shaped crab trap floats to create a solid cylinder of dense foam. The foam cylinder gets wedged in the hull to fit snugly between the bottom of the seat and the inside bottom of the hull. That foam block acts to support and absorb the shock of plopping into the seat well. This of course was preventative and obviously won't fix a seat well.

Plus the foam blocks add a safety factor to displace water & keep kayak afloat should it fill with water.

Noboby likes a cracked seat, or :oops: oh never mind.

Sorry to hear the problems.


Top
 Profile  
 
 Post subject: Re: seat wells cracking
PostPosted: Sun Jul 26, 2009 5:56 pm 
Offline
Site Rank - Deck Hand

Joined: Mon Nov 03, 2008 12:48 pm
Posts: 19
Location: Rockport TX
Yackaholic - could you please provide more detail on how you installed a 3/4" PVC cap to repair seat plug crack? It seems the surface is curved, especially on the rear pair of holes. Is the DP8010 viscous enough to fill the void? I also have a similar problem one on the shockcord end screws on the front hatch of my Adventure. Looks like the threading process at factory cut completely through the side wall and it leaks like a sieve.


Top
 Profile  
 
 Post subject: Re: seat wells cracking
PostPosted: Mon Jul 27, 2009 1:34 pm 
Offline
Site Rank - Old Salt

Joined: Fri Mar 23, 2007 8:12 am
Posts: 441
Location: Florida
coastbum wrote:
Yackaholic - could you please provide more detail on how you installed a 3/4" PVC cap to repair seat plug crack? It seems the surface is curved, especially on the rear pair of holes. Is the DP8010 viscous enough to fill the void? I also have a similar problem one on the shockcord end screws on the front hatch of my Adventure. Looks like the threading process at factory cut completely through the side wall and it leaks like a sieve.


Turn kayak upside down so that the seat plug nubs face up, openings face down. All your work is done inside the hull. Reach in the hull and lightly sand the plastic material of the nubs and the surrounding area - light grit & just a little. Wash area with some isopropyl alcohol, let dry. The 3/4" PVC endcap is going to get glued over the seat nub providing a huge amount of reinforcement. The glue used is 3M DP8010, You can even mix it in the PVC end cap, get the cap nearly full. It thickens and dries fast. Gravity should hold the PVC cap in place once pressed on, any glue that oozes out of the cap will also reinforce the area.

You could probable make the repair with glue alone but the endcaps are cheap and provide a sure fire way to enclose the entire seat plug nub. Sorry no pics of the repair as that hull was warranitied by Hobie for other reasons.

Image


Top
 Profile  
 
 Post subject: Re: seat wells cracking
PostPosted: Mon Jul 27, 2009 2:19 pm 
Offline
Site Rank - Deck Hand

Joined: Mon Nov 03, 2008 12:48 pm
Posts: 19
Location: Rockport TX
Thanks Yak! Having never used DP8010 I was just curious if there was a max thickness or if it was ok to simply fill the PVC cap up with it. You are the MAN!! What a great idea. I was not looking forward to trying to get my welder in there :)


Top
 Profile  
 
 Post subject: Re: seat wells cracking
PostPosted: Mon Apr 30, 2012 7:00 am 
Offline
Site Rank - Captain

Joined: Fri Aug 22, 2008 5:28 pm
Posts: 139
coastbum wrote:
one on the shockcord end screws on the front hatch of my Adventure. Looks like the threading process at factory cut completely through the side wall and it leaks like a sieve.
=====================
Thanks Yak! Having never used DP8010 I was just curious if there was a max thickness or if it was ok to simply fill the PVC cap up with it. You are the MAN!! What a great idea. I was not looking forward to trying to get my welder in there :)


How did your repairs turn out? Have they lasted?

I got the DP8010NS finally, and 3/4" caps and sandpaper
I'm about to do the same repair on my 2009 Outback, 2 spots, the bungie attachment point in front of the bow hatch by the webbing strap on the kayak, and the bungie attachment under the hatch itself near the sail mount.

I was going to haul the kayak on my trailer many many miles to a dealer who said bring it in, but
I have it rigged and didn't want to start over rigging a new hull, so I procrastinated until the warranty ran out, but I think I'll fix it myself and just order a hatch liner, Scotty flag and light (to supplement my current flag/light system) and the large sail rudder with the gas money saved.... if the repairs with the PVC and DP8010NS holds up, and since a hatch fitting has less stress than a seat peg fitting, I'm amusing it should, but thought I'd ask.

I'll go ahead and fix mine, and post how it goes some future date..looks like it might rain now, so ...
========

Just got back from the hardware store, the 2 wooden dowels to make your own applicator/dispenser are:
7/8:
and
1/4"
Roadrunner's photo with comparable product
viewtopic.php?f=71&t=33359&p=134482&hilit=scotchweld+mix#p134482
Image


Top
 Profile  
 
Display posts from previous:  Sort by  
Post new topic Reply to topic  [ 6 posts ] 

All times are UTC - 8 hours [ DST ]


Who is online

Users browsing this forum: No registered users and 2 guests


You cannot post new topics in this forum
You cannot reply to topics in this forum
You cannot edit your posts in this forum
You cannot delete your posts in this forum

Jump to:  
© Hobie Cat Company. All rights reserved.
Powered by phpBB® Forum Software © phpBB Group