Return to Hobie.com
Hobie Forums
It is currently Fri Apr 19, 2024 2:21 am

All times are UTC - 8 hours [ DST ]


Post new topic Reply to topic  [ 15 posts ] 
Author Message
PostPosted: Mon Jun 08, 2015 10:30 pm 
Offline
Site Rank - Deck Hand

Joined: Sat Jun 06, 2015 3:31 pm
Posts: 6
Hi all,

Picked up my Adventure Island last week, and after just one sail I decided that I wanted to mod the sail controls to be more suitable for me as I'd grown used to the outback with the port side furler. I hadn't really seen a mod as simple as this for port furling controls (seen a few complicated ones...) so I thought I'd post this up for anyone else who wants to try this. Its really neat, simple and effective.
Apart from regular hand tools, the only materials I ended up needing were as follows:

9/64 Drill bit, very specific but it MUST be that size
8/32 Tap
Four new screws, 1 1/2" long 8/32 thread and washers/nuts to suit (for installing cleats, the original screws are too short)
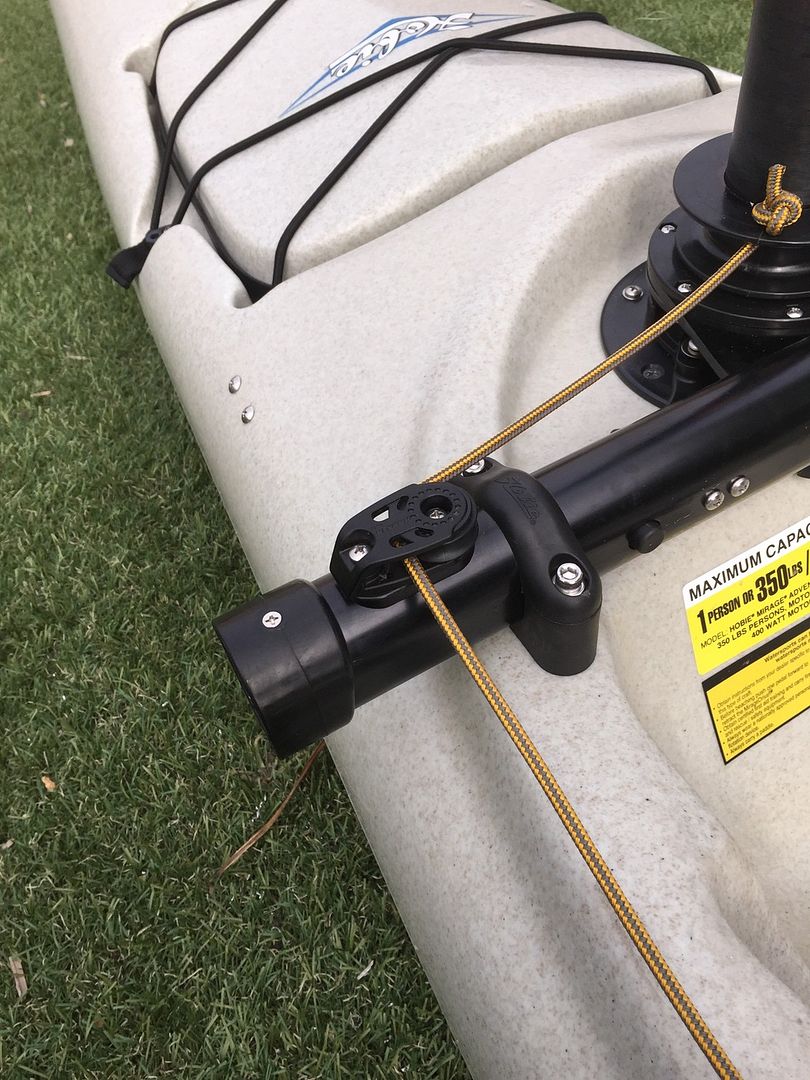
Harken 29mm cheek block (conveniently I had one already located on my outback)

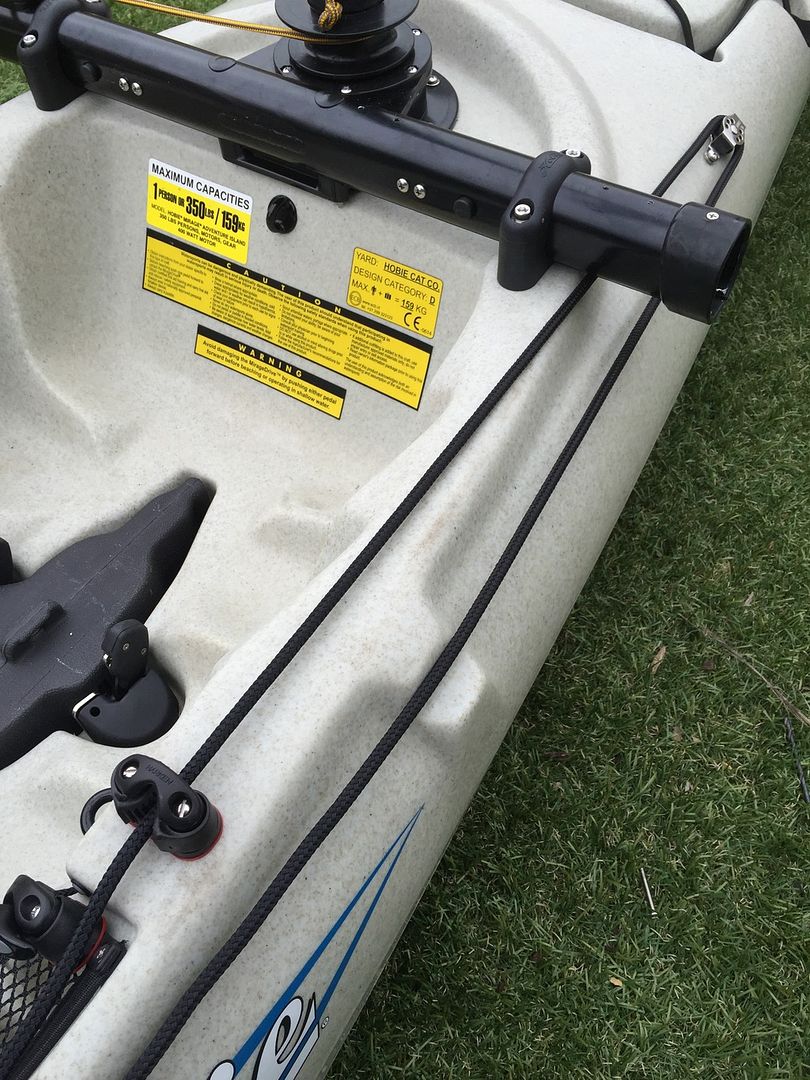
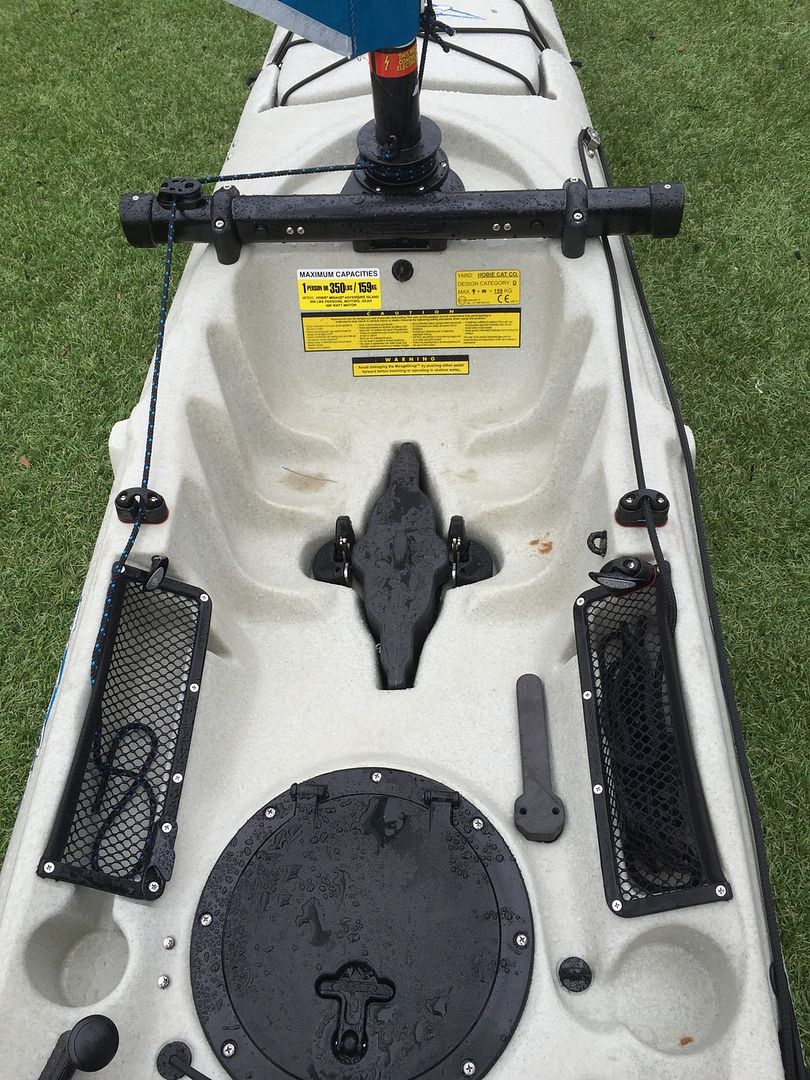
First step first, remove the two cleats from the RHS aka bracket and put them somewhere safe. Keep the curved spacer that was under the main sheet cleat; this will now be used to keep the pulley tight and flat on the aka support bracket. Position the Pulley on the curved spacer and put it between the left side aka mount bracket and the end trim, get it nice and square and drill one hole to 9/64. Take the block away and tap that hole with the 8/32 tap.

Image

Using one of the original cleat screws, screw down the block in this hole gently, then accurately line up your block for the next hole. These holes must be VERY accurate, if not you risk the screws not doing up together. Drill and tap the other hole, and screw the block down using thread locker. Don't go too tight, you don't want to strip threads. You'll also need to cut your screws shorter so they aren't protruding and rubbing on the aka attachment. Once the pulley is installed, the line goes really nicely on and off of the furler drum.

Image

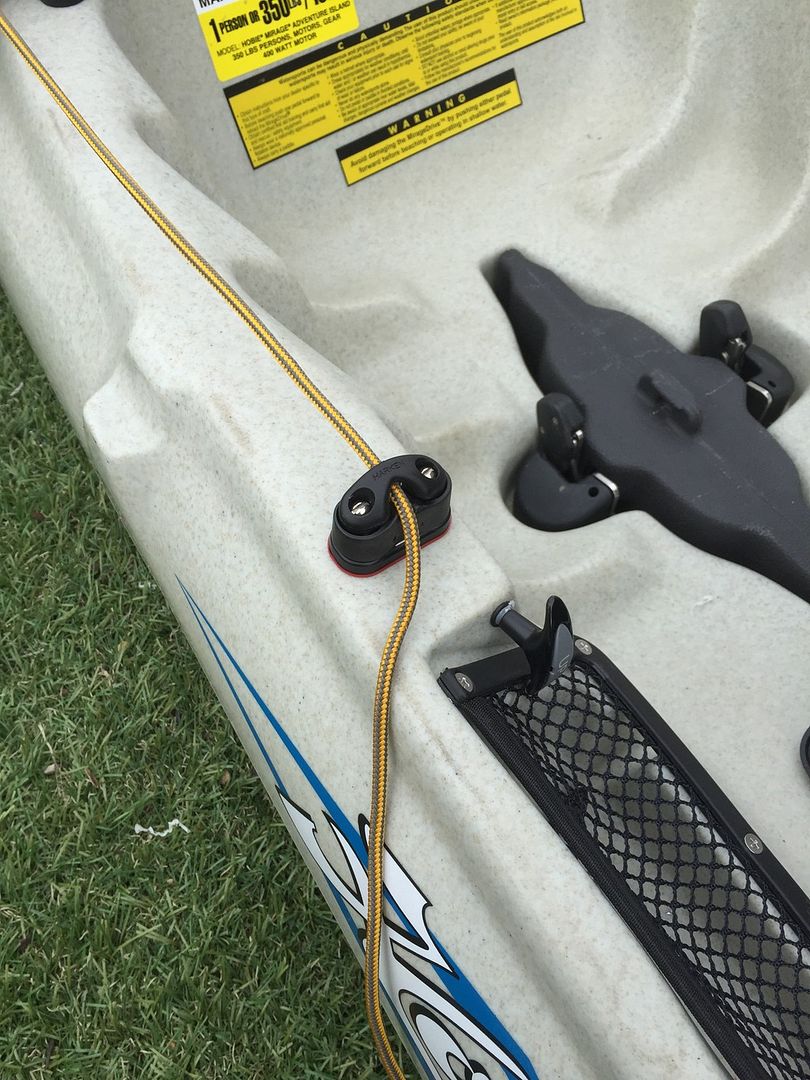
Next step is to move the cleats to the gunwales on the left and right sides, just in front of the mesh pockets. Drill and screw down using the longer bolts, its easy as that. Again, use the 9/64 drill as the screws will cut a nice thread and improve sealing and grip to the hull additional to the nuts grip. If you get lucky like I did, the bolts touch the inner guide tube for the rudder control cables and don't touch the cables at all.

Image

Image

I also replaced the furler line with the rope that came with the outbacks sail kit. Much better rope.

All up I think the mod is fantastic and seeing as it would cost less than $30 bucks I think its well worth it if you like a control line on either side like I do. Yes the left cleat is a bit harder to lock being on a bit of an angle but having said that I think its a good thing cause the furling line doesn't lock itself up in the cleat when pulling hard on the main sheet, and vice versa. When either rope is dangling it can be easily placed in a pocket. Its a good simple system and I hope you all enjoy my modification that cleans up the cockpit greatly, as you can see below.

Image

Thanks for reading,

Dan


Top
 Profile  
 
PostPosted: Tue Jun 09, 2015 6:58 am 
Offline
Site Rank - Old Salt

Joined: Tue Jun 19, 2007 6:14 pm
Posts: 3323
Location: South Florida
Dan, that is a very nice mod. I may do it, but there is a slight complication for me. Like many AI sailors, I've grown used to tying the ends of the main and furler lines together (done it for 8 yrs). That way, you find one, you have the other. With your layout, tying the lines together probably won't work. Still, I like your mod. Maybe I will do it on the starboard side--have my cake and eat it too!

Keith

_________________
2015 AI 2, 2014 Tandem

"Any intelligent fool can make things bigger and more complex ... It takes a touch of genius and a lot of courage to move in the opposite direction." A. Einstein

"Less is more" Anon


Top
 Profile  
 
PostPosted: Tue Jun 09, 2015 12:34 pm 
Offline
Site Rank - Old Salt

Joined: Tue May 18, 2010 2:31 pm
Posts: 3068
Location: Kailua 96734
Great mod for sailing in the missionary position. Not going to work out on the Hakas, though.

Welcome to the forum Dan.

_________________
The Wind Is Your Friend...


Top
 Profile  
 
PostPosted: Tue Jun 09, 2015 12:52 pm 
Offline
Site Rank - Old Salt

Joined: Tue Jun 19, 2007 6:14 pm
Posts: 3323
Location: South Florida
NOHUHU wrote:
Great mod for sailing in the missionary position. Not going to work out on the Hakas, though.

Welcome to the forum Dan.

NOHUHU, you have a wonderful way of describing things. I didn't know what the "missionary position" was, so I googled it. Some of you may not want to do that!

Keith

_________________
2015 AI 2, 2014 Tandem

"Any intelligent fool can make things bigger and more complex ... It takes a touch of genius and a lot of courage to move in the opposite direction." A. Einstein

"Less is more" Anon


Top
 Profile  
 
PostPosted: Wed Jun 10, 2015 4:49 pm 
Offline
Site Rank - Captain

Joined: Wed Jun 10, 2015 4:12 pm
Posts: 52
Thats pretty cool, I have the exact cheek block and misc items for my TI on order to run the furling line to the rear seat position, then i will use the factory setup for the front seat..


Top
 Profile  
 
PostPosted: Wed Jun 10, 2015 6:42 pm 
Offline
Site Rank - Admiral

Joined: Sun Feb 22, 2015 9:58 pm
Posts: 219
Location: SF Bay
Carl M wrote:
Thats pretty cool, I have the exact cheek block and misc items for my TI on order to run the furling line to the rear seat position, then i will use the factory setup for the front seat..


Are you going to run it in the same way as the OP just more aft? Details please!


Sent from my iPhone using Tapatalk


Top
 Profile  
 
PostPosted: Wed Jun 10, 2015 11:38 pm 
Offline
Site Rank - Captain

Joined: Wed Jun 10, 2015 4:12 pm
Posts: 52
I plan on putting the same cheek block in the same location as OP but then I will use pad eyes to move it slightly down and to one side to get around the forward steering lever, my wife and I both like the steering levers with the spacer installed so it's off the hull, then I will install a factory cam cleat on the top of the rear crossbar on the port side, just like the factory cleat for the mainsheet on the starboard side....


Top
 Profile  
 
PostPosted: Thu Jun 11, 2015 9:33 am 
Offline
Site Rank - Admiral

Joined: Sun Feb 22, 2015 9:58 pm
Posts: 219
Location: SF Bay
Carl M wrote:
I plan on putting the same cheek block in the same location as OP but then I will use pad eyes to move it slightly down and to one side to get around the forward steering lever, my wife and I both like the steering levers with the spacer installed so it's off the hull, then I will install a factory cam cleat on the top of the rear crossbar on the port side, just like the factory cleat for the mainsheet on the starboard side....


Thanks for explaining. Sounds like a nice setup. Please post photos when you're done.


Top
 Profile  
 
PostPosted: Sat Oct 10, 2015 9:34 am 
Offline
Site Rank - Old Salt

Joined: Sat May 09, 2015 8:53 am
Posts: 717
Location: Paoli Pennsylvania - East Coast USA
Adventure_dan wrote:
... move the cleats to the gunwales on the left and right sides, just in front of the mesh pockets. Drill and screw down using the longer bolts, its easy as that. Again, use the 9/64 drill as the screws will cut a nice thread and improve sealing and grip to the hull additional to the nuts grip.
Did you use washers under the bolts or fabricate an SS plate?

_________________
2015 AI in "Dune" - "The Grey Pig"
2017 Trailex 450 Trailer
Pre-September 2015 cradles
(anybody want to buy a slightly-used AI SpinKit?)
eMail: [email protected]


Top
 Profile  
 
PostPosted: Sun May 08, 2016 6:12 pm 
Offline
Site Rank - Admiral

Joined: Sun Feb 22, 2015 9:58 pm
Posts: 219
Location: SF Bay
One issue with this mod: when the sail is furled, cleating the line doesn't prevent the sail from unfurling. Short of tying the sail, has anyone addressed this?


Top
 Profile  
 
PostPosted: Sun May 08, 2016 7:35 pm 
Offline
Site Rank - Old Salt

Joined: Fri Jan 05, 2007 9:21 pm
Posts: 2498
Location: Central Florida
scc wrote:
One issue with this mod: when the sail is furled, cleating the line doesn't prevent the sail from unfurling. Short of tying the sail, has anyone addressed this?
Why would you think this? :?

_________________
Image
Hobie Island Sailing since 2006


Top
 Profile  
 
PostPosted: Sun May 08, 2016 8:08 pm 
Offline
Site Rank - Admiral

Joined: Sun Feb 22, 2015 9:58 pm
Posts: 219
Location: SF Bay
KayakingBob wrote:
scc wrote:
One issue with this mod: when the sail is furled, cleating the line doesn't prevent the sail from unfurling. Short of tying the sail, has anyone addressed this?
Why would you think this? :?


Old age? :oops:


Top
 Profile  
 
PostPosted: Sun May 08, 2016 8:45 pm 
Offline
Site Rank - Old Salt

Joined: Fri Jan 05, 2007 9:21 pm
Posts: 2498
Location: Central Florida
scc wrote:
KayakingBob wrote:
scc wrote:
One issue with this mod: when the sail is furled, cleating the line doesn't prevent the sail from unfurling. Short of tying the sail, has anyone addressed this?
Why would you think this? :?

Old age? :oops:
OK, so it's not me this time :)

_________________
Image
Hobie Island Sailing since 2006


Top
 Profile  
 
PostPosted: Mon May 09, 2016 5:48 pm 
Offline
Site Rank - Old Salt

Joined: Sat Jan 14, 2012 8:24 pm
Posts: 780
Location: Houston, TX
"Old age" - now that was funny SCC!

_________________
Greg

2016 AI - Spinn & Jib

“Out of sight of land the sailor feels safe. It is the beach that worries him.”
– Charles G. Davis

Image


Top
 Profile  
 
PostPosted: Mon Jul 19, 2021 8:47 am 
Offline
Site Rank - Admiral

Joined: Fri Jul 13, 2018 9:01 am
Posts: 152
Location: Near Austin, TX
Resurrecting this old thread and based on OP I'm not sure if he's active any more.

I just acquired 2008 AI (properly named her GPJ) and the x-bars on it are different but he did add a cheek block to the port side for the furler and a micro clam cleat to a piece of AL angle stock that he use as a mount on the port gunwale. The difference is that area of the 08 xbar could be a bit thicker gauge and it's fine to have the bolt thread through further because the aka doesn't insert like the 2013. Both the previous owner of the 08 AI and I never really like the stock Hobie main/furler routing. Now I've found a companion AI which is a 2013 and I have some questions:

1. For the port cheek block, there's not a lot of taping stock in the AL x-bar. Will furling put too much force on the block and possibly pull out the block? I think instead of using the plastic curved footer I could fabricate a piece of teak and both fasten it with 8-32 tapped screws and a smear of black 3M 5200 to the underside of the contoured teak block to the AL x-bar.
2. I sort of like the idea of moving the stbd main sheet micro cam cleat from the top of the port x-bar further aft on the stbd gunwale. Just curious if this would be an easier main sheet handling vs further fwd on top of the x-bar. My only thinking here is captain seat position (higher more contusive to higher x-bar cleat and lower/stock seating maybe lower on the gunwale)?
3. I don't plan to really do a lot of hiking out, but if I do couldn't I just maintain control of the one main sheet and release it if in a high wind/gust situation? Let the main sail flap?
4. The only thing I don't like about this setup is fastening the micro cam cleat just forward to the rudder up/down controls. I know the OP said it doesn't interfere with these lines rudder up/down lines, I would think a fabricated AL angle platform/deck wherein the cam cleat is screwed into it and the platform is pop-riveted in 3 places on the gunwale (two on top and one on the side) is better?

_________________
Thank you,
Roy Niswanger


Top
 Profile  
 
Display posts from previous:  Sort by  
Post new topic Reply to topic  [ 15 posts ] 

All times are UTC - 8 hours [ DST ]


Who is online

Users browsing this forum: No registered users and 2 guests


You cannot post new topics in this forum
You cannot reply to topics in this forum
You cannot edit your posts in this forum
You cannot delete your posts in this forum

Jump to:  
© Hobie Cat Company. All rights reserved.
Powered by phpBB® Forum Software © phpBB Group