Return to Hobie.com
Hobie Forums
It is currently Fri Aug 22, 2025 3:00 pm

All times are UTC - 8 hours [ DST ]


Post new topic Reply to topic  [ 26 posts ]  Go to page 1, 2  Next
Author Message
PostPosted: Mon Sep 27, 2010 3:39 pm 
Offline
Site Rank - Captain

Joined: Tue Sep 14, 2010 11:20 am
Posts: 55
I promised pictures - here they are !
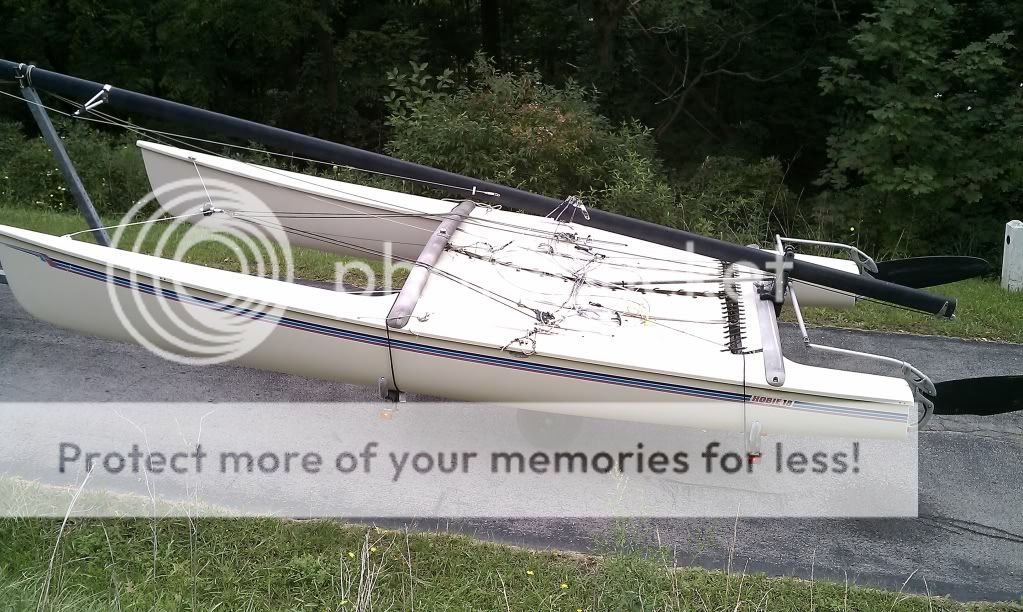
My new boat !!!!! :D :D
Image

Clean, original condition hulls..
Image

Leaving original owner's house..first picture of new boat
Image

Other hull..
Image

Stupid pop-out hatches - cracks - need to get the screw type.
Image

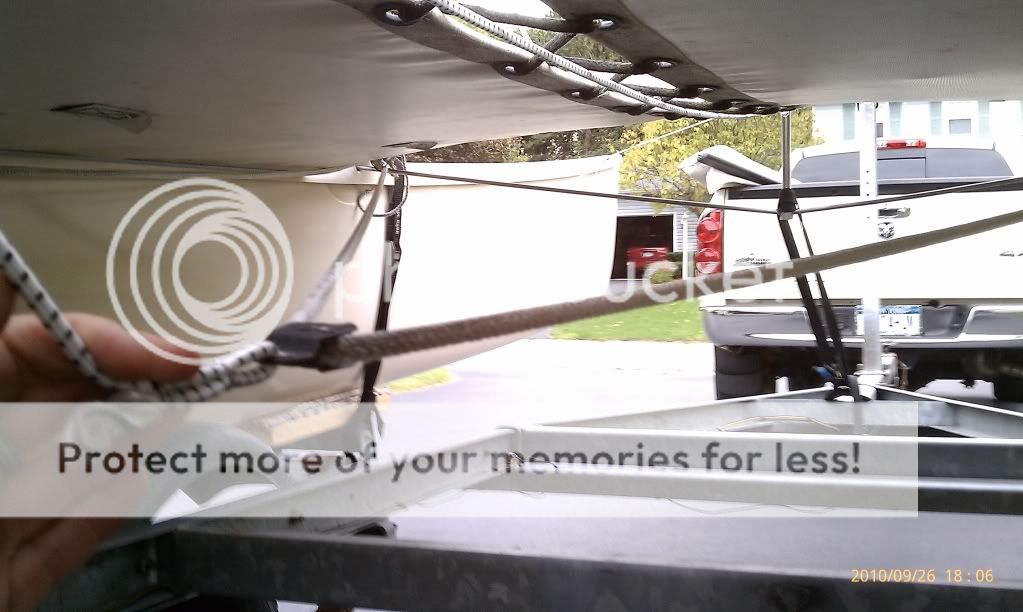
I replaced shock cord on righting line - how do i use these ?
Image

Port hull rudder - both sides have excessive play between pivot pin and upper casting - so much slop that it seems there might have been bushings in there ?
Image

This is looking up under port side deck at stay mount location. Are these cracks normal or ?
Image

Another pic bottom of hull near daggerboard - i have the "old" style box that needs epoxy sucked in to prevent leaks..
Image

Front of daggerboard box - is this wear normal ? Need to be fixed ?
Image

Um, i'm thinking this needs to be replaced..
Image

Wish i had gotten familiar with this before i tried to lower the main for the first time...
Image

These rudders will not "pop up" - they are very difficult to raise because the pin seems to be stuck - need to jerk up on the crossbar very hard to release.
Image

Any thoughts/assistance with what i need to do appreciated.

I didn't take a picture but the outhaul car inside the boom has both wheels on front axle missing. Can't find them for sale anywhere.

Also, i have the original separate 3-pulley system on boom - what is the best to replace with - and why does everyone replace with a single block ?

Hope i did the pictures right ?!?!?

Thanks !!

Mike B

Western NY :D :D :D


Top
 Profile  
 
PostPosted: Mon Sep 27, 2010 4:28 pm 
Offline
Site Rank - Admiral

Joined: Wed Aug 12, 2009 5:25 pm
Posts: 163
Location: New Port Richey Fl.
Congrats on your new boat!!! Boat looks in good condition overall!!! First off if you do not know how old the standing rigging is I would replace it all. Nothing can ruin a day of sailing quicker than a broken shroud. Kind of expensive to replace it all but new standing rigging will last for many years to come. Also replace the shroud anchor pins. As far as the cracks under the lip these are more common than not in my experience. What you need to do is add anchor plate kits to the crossbars that do not have one. Both inner and outter on front x-bar and the outer rear x-bar, part # 64100001 in the hobie parts catalog. You need to replace the port hole covers with the newer screw in type. The dagger wells need repaired, use some thickened epoxy with white coloring agent added so the repair will blend. As far as the mast hook goes, you need to grind off the end of the pin that holds the "flapper" and remove it. The flapper only causes headaches especially when trying to lower the main. You need a new mast bearing kit, part 01-4045 from Murrays. Murrays also has the outhaul car bearings and pins, Part # 60250000 & 60240000. As far as the rudders go, I would get a large screwdriver one just smaller than the white tension adjusting screw, heat it up with a torch and make a deeper slot in the crew let it cool and remove and replace the screw after cleaning and greasing it up. Murrays has a rudder tightining kit, part # 01-2283. As far as the mainsheet block system goes if yours is functioning properly they do not neccesarily need to be replaced. Sailors replace it to a 7:1 or 8:1 in order to get more purchase and allow eaisier sheeting. Again, congrats and welcome to the site. Another source of info is www.thebeachcats.com. Hope this helps, Jim.

_________________
ADDICTION
1989 HOBIE 18 SE/sx wings
HOBIE ALTER SIGNATURE MODEL


Top
 Profile  
 
PostPosted: Mon Sep 27, 2010 4:39 pm 
Offline
Site Admin

Joined: Tue May 27, 2003 12:44 pm
Posts: 15090
Location: Oceanside, California
Nice boat!

Be sure to lubricate the hatch O rings.

If you capsize... you grab the line that is over your head (hulls on their sides - upper hull) and lean back. The shock cord allows the line to extend to a fixed point which should be with your body out at about 45 degrees.

Yes, older gudgeons had bushings pressed or welded in place. You would have to replace the gudgeons.

View from below is at one of the crossbar connection points. Cracks are somewhat normal under the lip, but could be sign of a bigger issue too. Some hulls failed at the front crossbar connections. These plates should be replaced with the same plates as at your shroud anchor points to spread the load down the side of the hull. We also recommend an internal fiberglass patch on the inboard side for strength. 84 and later models till about 1989 should add these items.

Add a carpet or neoprene pad at the front of the well so the boards can rub as they go up and down without removing gel coat.

Yep... replace the bearing for sure. Will damage the mast base as is.

Remove the "flopper" from the halyard hook. Much better without. See the FAQ section on sail hoisting without it.

You MUST get the rudders to unlock better and raise them manually if heading to the beach or these castings will break... no longer available, so you would have to upgrade to more recent type. Break the pin roller loose and lubricate. File the little indent that the pin makes in the casting flat. It gets hooked on the indent and if the rudders hit the beach, the casting will push straight forward and break the lower casting at the cam hinge pin point.

Outhaul car rollers (listed in the catalog) are available from a Hobie dealer.

_________________
Matt Miller
Former - Director of Parts and Accessory Sales
Warranty and Technical Support
Hobie Cat USA
(Retired 11/7/2022)


Top
 Profile  
 
PostPosted: Mon Sep 27, 2010 5:57 pm 
Offline
Site Rank - Captain

Joined: Tue Sep 14, 2010 11:20 am
Posts: 55
Jim - thanks for the reply - and all the part numbers !

Matt - you wrote "If you capsize... you grab the line that is over your head (hulls on their sides - upper hull) and lean back. The shock cord allows the line to extend to a fixed point which should be with your body out at about 45 degrees."
What i meant was - i thought the righting lines were supposed to come across the top of the upper hull AND if there are two people, where do we each pull from ? I'm guessing that i'll figure it out quick when the time comes.
Image

I'm an engineer and have access to a machine shop - should i just make new bushings for the top of the rudder pins or is there an easier fix ?

Thanks


Top
 Profile  
 
PostPosted: Tue Sep 28, 2010 7:01 am 
Offline
Site Rank - Old Salt

Joined: Wed May 17, 2006 7:49 am
Posts: 1053
Location: North Carolina
the righting system appears to go to pulleys left and right at the front x bar, does the line extend to the rear of the hull? If so, once capsized you grab the line from the hull which is above you. Its usually easiest to grab it at the rudder where it should be tied on. You will pull the line extending the bungee in your picture until the line is tight, This will give you and your crew enough to hang on too. I find my crew and I need to be close together to get the boat to right. Once the boat is coming over be sure and grab it somewhere to keep it from rolling over again and to keep it from sailing away without you.


Top
 Profile  
 
PostPosted: Tue Sep 28, 2010 9:33 am 
Offline
Site Admin

Joined: Tue May 27, 2003 12:44 pm
Posts: 15090
Location: Oceanside, California
Righting line on an 18 and many models are easier to use straight from the underside of the tramp... not over the hulls.

Reach up to the line running from the rear to the front crossbar. This makes a long loop that two crew can hold side by side.

Image

_________________
Matt Miller
Former - Director of Parts and Accessory Sales
Warranty and Technical Support
Hobie Cat USA
(Retired 11/7/2022)


Top
 Profile  
 
PostPosted: Wed Sep 29, 2010 7:14 am 
Offline
Site Rank - Captain

Joined: Tue Sep 14, 2010 11:20 am
Posts: 55
Ahhh, got it. Thanks Matt !

Does anyone have pictures of the front crossbar attachment repair - for "redline" boats ? I've searched and read all i can find but can't find pictures of the finished job.
I thought i understood what was involved but read another post and i'm confused now. A picture is worth a........ I would appreciate most a picture of the bracket installation with glass-work complete. Would like to find a set of wings so i think i need to do the upgrade for sure.

Another question - i would like to strengthen the hulls at the rear crossbeam connection points with the same brackets. So i need 4" curved hatches. How far back from the crossbeam should the hole start ?

Thanks !


Top
 Profile  
 
PostPosted: Wed Sep 29, 2010 9:22 am 
Offline
Site Rank - Old Salt

Joined: Mon May 09, 2005 10:25 am
Posts: 4267
Location: Jersey Shore
mboyer68 wrote:
Another question - i would like to strengthen the hulls at the rear crossbeam connection points with the same brackets. So i need 4" curved hatches. How far back from the crossbeam should the hole start ?

Thanks !


You can put the port hole in the deck anywhere between the rear crossbar and the transom. There are no internal supports in that area, just a loose piece of foam flotation block. Make sure you put it close enough to the rear crossbar that you can reach all the way inside. I would say about 1 foot. A 5" diameter port will be easier to work in that a 4".

However, before you go cutting holes in your boat, you should first look under the flange and see if there is any visible damage at any of the hull connection points. If there isn't then you're probably not gaining anything by installing the brackets back there. If there are cracks that are anything more severe then thin hairline cracks, then yes, you need to repair. It should be obvious. Also keep in mind that there is less space in the aft anchor points. It can be considerably tighter than the front crossbar. Verify that the brackets fit before cutting and drilling (the brackets were designed for the front crossbar and shroud anchors).

sm


Top
 Profile  
 
PostPosted: Wed Sep 29, 2010 11:31 am 
Offline
Site Rank - Captain

Joined: Sun Jun 04, 2006 7:09 pm
Posts: 117
Location: Buffalo, NY
Congrats on the boat! Where in WNY are you? I'm in the same area and might be able to assist with some issues. Well at least before the snow flies that is.

t-bone


Top
 Profile  
 
PostPosted: Wed Sep 29, 2010 12:44 pm 
Offline
Site Rank - Captain

Joined: Tue Sep 14, 2010 11:20 am
Posts: 55
Thanks T-bone

I'm in Rochester sailing on Keuka Lake and Lake Ontario. I'll be sailing tomorrow - rain or shine - unless thunder or no wind.

Planning on joining Lighthouse Beach Cat Club and keeping boat there next year.

Where are you ?

Mike B


Top
 Profile  
 
PostPosted: Wed Sep 29, 2010 2:45 pm 
Offline
Site Rank - Captain

Joined: Sun Jun 04, 2006 7:09 pm
Posts: 117
Location: Buffalo, NY
Mike,

Located in Buffalo. Bought the 18 5-6 years ago. Sailed a 16 for years before I took the plunge and found a 18 in storage for over 20 years. What a nice ride and powerful boat. Tons of information on this forum and really great people. I really learned so much about the boat by not only sailing it but asking here.

Listen to the answers above: replace the old rope covers with screw in covers and yes, lube the o-rings! The outer ring won't match the existing holes, so fill them in and make sure to seal the outer ring before installing. I used rivets to maintain a tight fit.

The flopper on the top of the mast....get rid of it. I almost lowered my mast the first summer trying to get the main down due to the flopper. It's a nice concept but it's just not 100%.

t-bone


Top
 Profile  
 
PostPosted: Sat Oct 09, 2010 3:13 pm 
Offline
Site Rank - Admiral

Joined: Mon Oct 01, 2007 4:21 pm
Posts: 192
Location: Chilliwack, BC
just a small note on the righting system...... loose it~

a single line (class rules say 14') attached to the dolphin striker under the mast then passed up on the tramp side of the crossbar at the base of the mast and stored in the tramp pockets works just as well....Use any line that dosn't retain water and is flexable enough... i use nylon webbing, like on the ratchet tiedowns... put a couple of loops in it for hand holds along the lenght and you're good to go...

paul


Top
 Profile  
 
PostPosted: Sun Oct 10, 2010 3:00 pm 
Offline
Site Rank - Captain

Joined: Tue Sep 14, 2010 11:20 am
Posts: 55
Thanks Paul.

I think i know what you mean. My friend has a setup like that. He has a line that looks like a windsurfing line for raising the mast - looks like a big fat long scrunchy.

Do yo have any pictures of the setup ?

Mike


Top
 Profile  
 
PostPosted: Mon Oct 11, 2010 1:27 pm 
Offline
Site Rank - Admiral

Joined: Sun Jun 21, 2009 6:10 pm
Posts: 253
I just bough a 1984 Hobie 18 so this is a great thread for me too. does anyone know what size those inspection ports are and if they are the concave or curved ports?

_________________
Floyd
00 Tiger
http://www.HobieFleet33.com
10 Mile Surfside, Texas
Join us on our Facebook group: Surfside Sailing


Top
 Profile  
 
PostPosted: Mon Oct 11, 2010 2:10 pm 
Offline
Site Rank - Old Salt

Joined: Thu Sep 24, 2009 5:50 am
Posts: 378
Fa1321tx wrote:
I just bough a 1984 Hobie 18 so this is a great thread for me too. does anyone know what size those inspection ports are and if they are the concave or curved ports?


Welcome! Hobie sells different sizes and "styles" (screw in or twist-and-seal) all of which are flat. As a direct replacement for the old "pop-out" style, I believe you want the 6" size.


Top
 Profile  
 
Display posts from previous:  Sort by  
Post new topic Reply to topic  [ 26 posts ]  Go to page 1, 2  Next

All times are UTC - 8 hours [ DST ]


Who is online

Users browsing this forum: No registered users and 2 guests


You cannot post new topics in this forum
You cannot reply to topics in this forum
You cannot edit your posts in this forum
You cannot delete your posts in this forum

Jump to:  
© Hobie Cat Company. All rights reserved.
Powered by phpBB® Forum Software © phpBB Group