Return to Hobie.com
Hobie Forums
It is currently Wed Sep 10, 2025 5:48 am

All times are UTC - 8 hours [ DST ]


Post new topic Reply to topic  [ 8 posts ] 
Author Message
PostPosted: Sun Mar 13, 2011 5:42 am 
Offline
Site Rank - Admiral

Joined: Fri Jan 22, 2010 4:38 pm
Posts: 244
Location: Pittsboro NC
Image

I have recently purchased this 16 for parts and had not considered repairs to this transom since I was looking for rigging tramp, mast etc primarily. Now being the inveterate tinkerer that I am and also being spectacularly bad at fibreglass work :D I figured I would solicit feedback from the forum on likely effort to repair this damage. As you can see from the pic, the upper gudgeon has been blown out and a small access hole was drilled to start repairs.

Would love to know if this is a fixable situation and the likely cost/effort to do so

_________________
1985 Prindle 16


Top
 Profile  
 
PostPosted: Mon Mar 14, 2011 5:25 am 
Offline
Site Rank - Admiral

Joined: Tue Oct 12, 2010 8:50 am
Posts: 207
Location: Lititz, PA/Somers Point, NJ
i bought a basket case last fall an have been working on it over the winter. My transom at some point took on water and from the looks of things froze and split out the transom at the corners and the wood was rotting.
Image

I cut it out and found the alluminum block with a fair amount of electrolisys. I cleaned everything up:
Image

Cut some new wood to fit (I did encapsolate it in poly resin before final install)

Image

and wrapped her back up with glass:
Image

_________________
'73 hobie 16 restored 2011
'00 Seaswirl fishin boat


Top
 Profile  
 
PostPosted: Mon Mar 14, 2011 9:05 pm 
Offline
Site Rank - Captain

Joined: Fri Mar 11, 2011 5:39 am
Posts: 30
Location: Dare County, NC
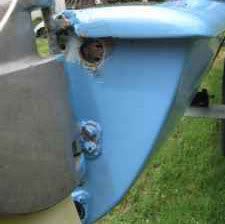
It can be done but the picture is vague. Can you take the rudder off and post some better pictures?

West System epoxy is the way to go. You can use epoxy resin on polyester but not polyester resin on epoxy. How close are you to a West Marine? They usually carry a small epoxy repair kit in a clear plastic clamshell package. Judging by your first picture, it should do what you want.

Tip time.

You want a box of rubber gloves, plastic mixing buckets(glue doesn't stick to plastic after it kicks off therefore reusable), scrap pieces of plywood, a puddy knife, Bondo type squegee, heavy plastic, blue 3m tape, duct tape, acetone, orbitalsander/sanding block, sand paper(40, 60, 80, 120, and then finer), 5200 by 3M, and WD-40.

Prep the area with ductape and trim with 3M tape. That will keep the drips or stray glue under control.

About west system it comes in kick off times. Fast, slow, tropical(xtra slow),etc. The hotter the air temperature, the slower the resin. Stay out of the sun and glue around 10am; the boat's surface will have warmed up by then. That way, after you are done, the night air doesn't restrict curing time. It'll stay tacky. The additives to the resin is glass filler(chopped fiber glass for fill) and tiny glass bubbles(for sanding/fairing). You mix the resin and hardener(easy ratio to mix) then mix in the additive. It should mix up to thick enough that you can work but not dry. Spread it on a scrap piece of plywood and apply using a puddy knife and a squeegee. Keeping the spread low will keep it from kicking off. If it does, you'll smell it. If you use it then, it will have tiny holes after it cures and will be weak. If you smell it, drop it. It gets very hot.

It will work just like mudding drywall. Use the filler mix to just fill the hole leaving a small divot. You can clean it up with acetone soaked on a rag. Acetone or laquer thinner cleans up epoxy. After that cures, scratch it with heavy grit sandpaper. Mix up a batch of epoxy with, this time, glass bubbles and a little bit of filler to hold shape. Think of Marshmellow cream. The more filler you have in it the harder it will be to sand. Touching up with acetone will make sanding easier. Gluing is easy. Sanding is a Bi!*&.

After fill, one night cure, glass bubble spread, and one night cure, you should be ready to sand. Orbital sanders work great but don't stay in one spot. Keep it moving; side-side, up-down,etc.

You can lightly mist it with black spray paint for a guide coat. Sand with 120, 220, fine as you want to go. When the black paint is gone, it should be smooth/fair enough. Take the tape off.

Paint or gel coat happens here. After the glue has cured, it's hard as a rock and you should have no problem drilling pilot holes for gudgeon screws. Coat the screw with 5200 and screw gudgeon on. Cleaning up 5200 is a snap. What doesn't WD-40 do? WD-40 and a paper towel will do fine.

If you need to use fiberglass cloth, lay it on clear plastic and drizzle straight epoxy spreading with a brush. Paint a little epoxy where you are going to apply then, pick the cloth up, and put it on. Squeegee off the air bubbles. Grind it smooth after curing overnight and use the glass bubble mix for fairing.

Est time:
Prep area 30 mins
mix couple of mins
apply 10-15 mins
wiping a few mins
clean up 5 mins
cure time 8 hours+
Sand a little bit with 60 grit 15 mins
Glue with glass bubbles same amount of time
Guide coat less than 2 seconds
Saaaannnnddddiiinnnggg coarse, medium, fine, a handful of hours.
You get the picture...

I've worked with fiberglass more days than I would like to say so if you need clarification let me know. If not, I know who to call. But I don't have enough practice with gel coat. Can't help you with that.

From one Carolinian to another, Good luck!


Top
 Profile  
 
PostPosted: Tue Mar 15, 2011 12:01 am 
Offline
Site Rank - Old Salt

Joined: Wed Jul 21, 2004 7:46 pm
Posts: 1457
Location: Santa Cruz
I'd use polyester resin if it were mine. And, I probably wouldn't use 5200 to glue in the screws. I'm fairly certain that I'd want to be able to remove the screws someday.

You've got to dig in there and see what's going on first.

It looks like the alu plate just gave up the threads. A little forensic study will answer the question. If that's the case, the fix should be fairly simple. Instead of removing the plate, I'd try to tap it to a larger size.

The lip damage is non structural, and a lot of people cut them out.

Get the grinder out and see what's going on in there.

_________________
Sail Revolution
Join us on our new FB Page!


Top
 Profile  
 
PostPosted: Tue Mar 15, 2011 3:38 am 
Offline
Site Rank - Admiral

Joined: Fri Jan 22, 2010 4:38 pm
Posts: 244
Location: Pittsboro NC
Thanks for all the responses folks, this truly is a great place to learn. After reading the suggestions, I think I may plan to leave the lip cut out and just focus on the hole. If the plate is good I will fill the hole as described and then retap the gudgeon screws one size up.

Thanks again

_________________
1985 Prindle 16


Top
 Profile  
 
PostPosted: Sun Jun 21, 2015 6:58 pm 
Offline
Site Rank - Captain

Joined: Tue Jun 11, 2013 10:16 pm
Posts: 28
This is most likely a stupid question but my experience in fiberglass is nil. I'm facing the exact same problem. An extractor made a mess out of a sheared off gudgeon screw. I've been able to drill out what was left of the screw after drilling in the glass around the screw. I'm just wondering now how I go about filling yet preserving a route to the original holes in the plate that I plan on using to through bolt the gudgeons so I don't have to tap blindly?

_________________
Andrew
'88 Hobie 16


Top
 Profile  
 
PostPosted: Mon Jun 22, 2015 8:00 am 
Offline
Site Rank - Old Salt

Joined: Wed May 25, 2011 3:15 pm
Posts: 611
Location: Buffalo, NY
I agree with Sail Revolution, Polyester is the way to go. That way you can put gel coat over the repair, either now or down the road. If you use epoxy, you're stuck leaving it bare or just using paint, which is also not preferred.

To JePense, how bad is it? If it's small and you wanted to just secure the gudgeon back in place, I suppose you could just glob a punch of epoxy into the hole and basically use it to glue the gudgeon to your transom. However, your only good solution would be to move the whole rudder & gudgeon over, or repair the area completely and then re-drill the hole through the new fiberglass repair. There's just no way to fill in the area while preserving what was the original hole without making a mess.

Luckily, fiberglass repair isn't difficult once you know what to do. Here's an excellent ~half hour long tutorial in 3 parts: https://www.youtube.com/watch?v=i9hfpOCnzEs

He's got another couple videos about gel coat repair too, if you want to cover up the fiberglass patch.

In your case, I'd say you'll just need to taper down from the outside, rather than both sides. I'd also try to keep from going completely through, as then you'll need a backing piece to the repair. However, it may be easiest to cut a hole in the deck for access to the inside of the transom, and then putting a 4" access port in the deck afterwards. I'm sure this is a little more involved than you had hoped, but that's how to repair it properly. The materials are readily and cheaply available (in fact, west marine - or any other sailing supply store - sells a fiberglass repair kit for $40, and a gel coat repair kit for $30, which include everything you need except perhaps gloves, masks and sandpaper), and the entire repair shouldn't take you more than a weekend to complete. I completed my first fiberglass & gelcoat repairs (hole in the side and bottom job) with the same supplies and information, so it's certainly doable!

_________________
Mike
Image
'79 H18 standard 'Rocketman II' sail #14921 RIP
'78 H18 (unnamed) sail #14921
'08 H16 sail #114312
'97 H21SC sail #238


Top
 Profile  
 
PostPosted: Mon Jun 22, 2015 8:09 am 
Offline
Site Rank - Captain

Joined: Tue Jun 11, 2013 10:16 pm
Posts: 28
Thanks Mike! Here's a picture before I got the screw out.


Image

_________________
Andrew
'88 Hobie 16


Top
 Profile  
 
Display posts from previous:  Sort by  
Post new topic Reply to topic  [ 8 posts ] 

All times are UTC - 8 hours [ DST ]


Who is online

Users browsing this forum: No registered users and 2 guests


You cannot post new topics in this forum
You cannot reply to topics in this forum
You cannot edit your posts in this forum
You cannot delete your posts in this forum

Jump to:  
© Hobie Cat Company. All rights reserved.
Powered by phpBB® Forum Software © phpBB Group