Return to Hobie.com
Hobie Forums
It is currently Fri Sep 12, 2025 2:51 am

All times are UTC - 8 hours [ DST ]


Post new topic Reply to topic  [ 5 posts ] 
Author Message
PostPosted: Tue Jun 22, 2010 11:36 am 
Offline
Site Rank - Deck Hand

Joined: Wed Apr 29, 2009 7:38 pm
Posts: 15
I'm still new and still on my first (very old) boat. It has two port holes (access ports) located about one foot forward of the front pylon. They're symmetrical and like I said, I'm new and they've always been there so I just assumed they were supposed to be there. After reading the This Old Hobie article on pylon shoe repairs it occurred to me that maybe Hobie's aren't born with access ports (the article suggested putting them behind the front pylon, not ahead) and maybe they were put in for a reason.

So after opening them up and shoving a camera in there, this is what I saw, and based on the article, not what I would like to see???
Image
Image
Now maybe I'm just being paranoid but I do hear creaking sometimes, I just assumed it was a loose bolt somewhere. Thoughts, concerns, should I practice swimming long distances?

you should be able to zoom in here:
http://picasaweb.google.com/lh/photo/hztMy8OjhB4EFtn1Nyq0-jV12sFfSfrD_zuqXAypqwo?feat=directlink
http://picasaweb.google.com/lh/photo/I5_dFsaMAPKTK5RZYuoiUDV12sFfSfrD_zuqXAypqwo?feat=directlink


Top
 Profile  
 
PostPosted: Tue Jun 22, 2010 11:46 am 
Offline
Hobie Approved Guru

Joined: Mon Jul 14, 2003 7:11 pm
Posts: 5198
Location: Detroit, MI
Is that the aluminum pylon that's broken in the first photo? Or some coating on the pylon?

Second photo, I don't see anything particularly wrong - it's a messy, sloppy hull/pylon join that's 35+ years old. That's what they look like.


Top
 Profile  
 
PostPosted: Tue Jun 22, 2010 12:16 pm 
Offline
Site Rank - Deck Hand

Joined: Wed Apr 29, 2009 7:38 pm
Posts: 15
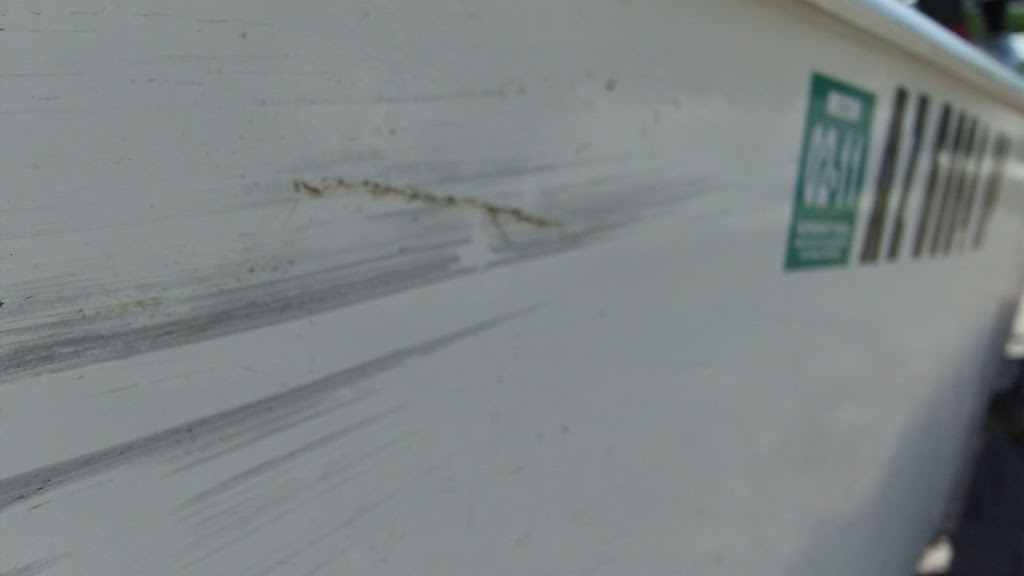
I'm not sure so I went and grabbed a hold of it. Appears to be some sort of hard candy shell. You can see a small piece that broke off lower left.
Image

So your saying I'm all good? I'm already in the process of repairing a damaged hull from a jetski incursion so I'm glad nothing else is wrong.

While we're on the topic, I posed this question to someone else but the more input the better.
Thanks.


Originally the damaged area in question looked like this.
Image

After some sanding it looked like this.
Image
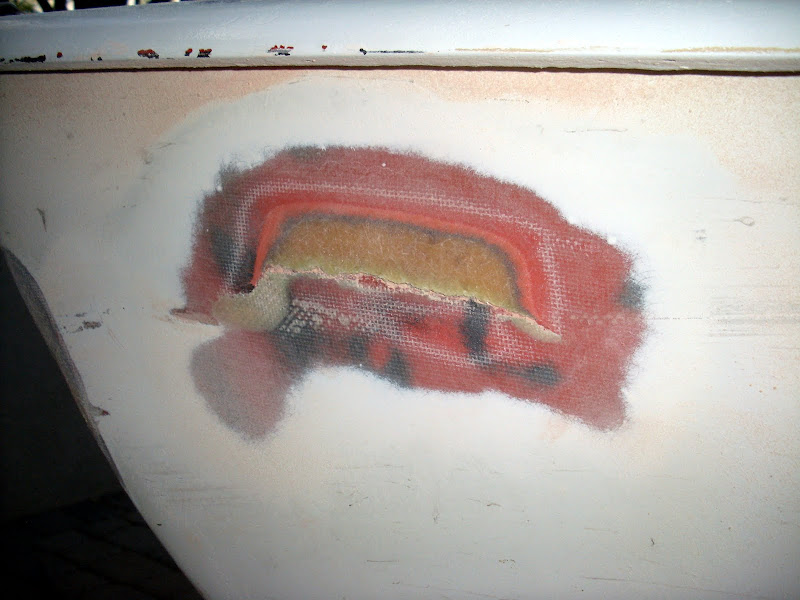
which begs the question, was this the site of previous damage or a delam? The mat is clearly missing and looks like chopped strand? Sanded heavy as if it were pure resin or mostly resin.

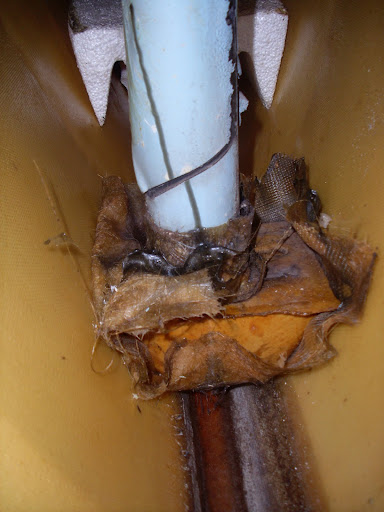
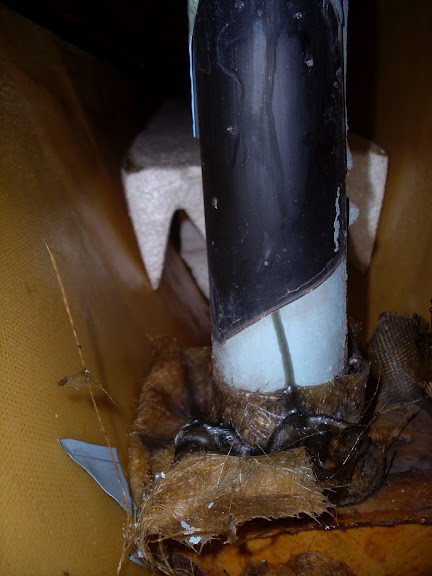
After I got to the foam, and removed the foam but careful not to hit the inner layer, per suggestion so that maybe i would not have to reinforce inside. This it where it's at.
Image

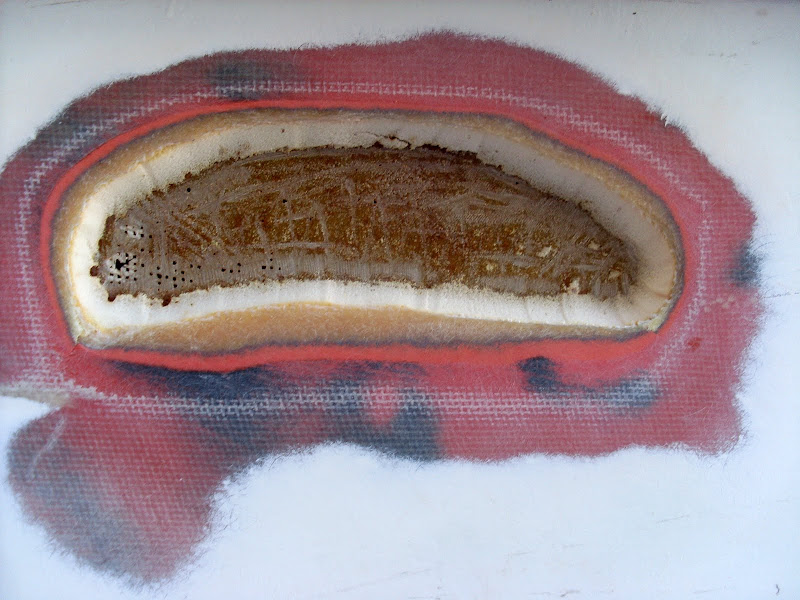
So this basically raised a few questions on the best way to proceed.
1. The inner layer feels quite flexible. Is it normal to be just one layer of glass thick and still be flexible?
2. Not only does it appear quite thin, as you can see in the photo, in some areas it's permeable to the interior of the hull. I was quite careful in removing the foam using a dremel with a cable attachment and fairly certain I didn't "thin" it any (using DA for most work).
3. Most of the inner layer and foam are adhered to each other but about 20% (at the top of repair area), the inner layer can be flexed away from the foam.

So how do you think I should proceed? My concern with completely removing all layers, is that I can not reach this are from port hole since it is too far forward and my concern with stopping here, resining in new foam and building from there is a lack of overall strength in the repair.

Any help is greatly appreciated.


Top
 Profile  
 
PostPosted: Tue Jun 22, 2010 12:33 pm 
Offline
Hobie Approved Guru

Joined: Mon Jul 14, 2003 7:11 pm
Posts: 5198
Location: Detroit, MI
It looks like someone laid a single layer of fiberglass cloth over the gelcoat (orange) as a repair and then re-shot the whole boat with gel.

Weird.

Brush some thickened resin against the inner skin and make sure it wets out against the foam. For this, I'd use epoxy to get a good chemical bond. Build up the repair with layers of glass cloth and resin until the hole is nearly flush. Sand the surface with a coarse grit, and fair out with a polyester filler (Bondo). Sand smooth, shoot with new gel (or whatever the boat's painted with).

It won't be 100% pretty, but it should hold up for the remaining life of the boat.


Top
 Profile  
 
PostPosted: Tue Jun 22, 2010 12:53 pm 
Offline
Site Rank - Deck Hand

Joined: Wed Apr 29, 2009 7:38 pm
Posts: 15
Thanks for the info.

Use epoxy instead of vinylester resin to reinforce the interior layer? Just the interior layer, do layup with vinylester?

Some have suggested replacing the layer of foam, even in the "Mayor Fiberglass Repair" article, but from what I understand of materials, this would not make for a stronger repair. Sandwiching fiberglass with a foam core just increases thickness without the increased weight of 3/8" of fiberglass and since fiberglass derives it's strength under tension, not compress, thicker is better. So I'm okay to skip foam layer and layup with glass?

Last but not least, my plan was to sand the entire hull, fair with Formula 27 and gel coat. This boat is new to me and I have no idea what's going on either but the current finish is dull and contains a great deal of containments so I'm using this repair as an excuse to do a "bottom job" and reshoot the whole hull.

I want the boat fixed right and I enjoy the learning process so I don't mind a few extra steps if need be.

Thanks.
--Brynn


Top
 Profile  
 
Display posts from previous:  Sort by  
Post new topic Reply to topic  [ 5 posts ] 

All times are UTC - 8 hours [ DST ]


Who is online

Users browsing this forum: Google [Bot] and 2 guests


You cannot post new topics in this forum
You cannot reply to topics in this forum
You cannot edit your posts in this forum
You cannot delete your posts in this forum

Jump to:  
© Hobie Cat Company. All rights reserved.
Powered by phpBB® Forum Software © phpBB Group