Return to Hobie.com
Hobie Forums
It is currently Sun Jun 29, 2025 1:46 am

All times are UTC - 8 hours [ DST ]


Post new topic Reply to topic  [ 22 posts ]  Go to page 1, 2  Next
Author Message
PostPosted: Sat Jul 02, 2011 11:57 pm 
Offline
Site Rank - Old Salt

Joined: Wed Jun 01, 2011 8:37 pm
Posts: 543
Location: Vancouver Island, Canada
Let's see if this works

http://s1199.photobucket.com/albums/aa4 ... 0AI%20pix/

be well
Trinomite

_________________
Always looking for ways to make good things 'Gooder'


Top
 Profile  
 
PostPosted: Sun Jul 03, 2011 2:26 am 
Offline
Site Rank - Old Salt

Joined: Fri Dec 05, 2008 2:32 am
Posts: 1807
Location: Terrigal NSW, Australia
Got it Trinomite. I'm not familiar with Photobucket, but I clicked on the link you posted, then clicked on one of the individual photos, then, on the page that came up, clicked on the box labelled IMG code. That copied the necessary info to the clipboard. Then I just pasted into this reply and voila!

Image

I'll leave it to you to post the rest of the pics.

_________________
Image


Top
 Profile  
 
PostPosted: Sun Jul 03, 2011 7:14 am 
Offline
Site Rank - Captain

Joined: Sun Jan 27, 2008 11:49 am
Posts: 43
Location: Morristown, NJ
Very nice job.. and clean looking. Would be interested in more pics of the Barton pulley system in action. There is a steep incline where I launch sometimes and it's a bear bringing the AI back after an outing - was even thinking of a battery operated winch system but haven't made much progress!


Top
 Profile  
 
PostPosted: Sun Jul 03, 2011 10:14 am 
Offline
Site Rank - Admiral

Joined: Sat Feb 20, 2010 12:34 pm
Posts: 252
Nice mods. Compass in the drink holder keeps the deck clear and the compass safe from the occasional bash.

edit: Helped by adding the photo. Image

_________________
Image


Top
 Profile  
 
PostPosted: Sun Jul 03, 2011 12:15 pm 
Offline
Site Rank - Old Salt

Joined: Wed Jun 01, 2011 8:37 pm
Posts: 543
Location: Vancouver Island, Canada
Thanks chrisj
I've rarely ever used Photo Bucket other than to dump pixs.
Let's see if we can get all 13 pixs to upload
Trinomite

_________________
Always looking for ways to make good things 'Gooder'


Top
 Profile  
 
 Post subject: test
PostPosted: Sun Jul 03, 2011 12:31 pm 
Offline
Site Rank - Old Salt

Joined: Wed Jun 01, 2011 8:37 pm
Posts: 543
Location: Vancouver Island, Canada
test

_________________
Always looking for ways to make good things 'Gooder'


Last edited by Trinomite on Sun Jul 03, 2011 2:37 pm, edited 1 time in total.

Top
 Profile  
 
 Post subject: test2
PostPosted: Sun Jul 03, 2011 1:20 pm 
Offline
Site Rank - Old Salt

Joined: Wed Jun 01, 2011 8:37 pm
Posts: 543
Location: Vancouver Island, Canada
test2

_________________
Always looking for ways to make good things 'Gooder'


Last edited by Trinomite on Sun Jul 03, 2011 2:41 pm, edited 1 time in total.

Top
 Profile  
 
PostPosted: Sun Jul 03, 2011 2:03 pm 
Offline
Site Rank - Old Salt

Joined: Wed Jun 01, 2011 8:37 pm
Posts: 543
Location: Vancouver Island, Canada
Woohoo! Got this silly program to work, :-)

Image

The starboard RailBlaza Starmount is used with a hook to hold the tip of one of my rods. The port side can be a hook or an eyelet for anchoring purposes or to hold the tip of the other rod. The Barton pulley system is comprised of 2 double pulleys and 375' of 1/4" doublebraid nylon. Due to the steep rise from the beach to my house, the rock strewn last 75' demanded a better system that to wreck my back. This works well (4 to 1 mech advantage)

Image

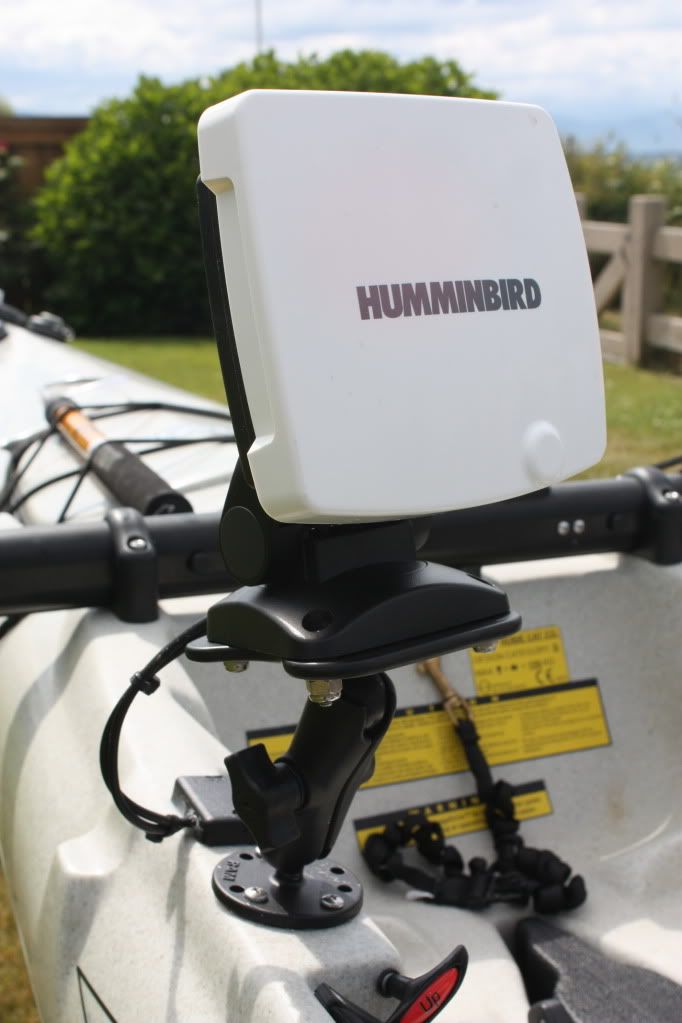
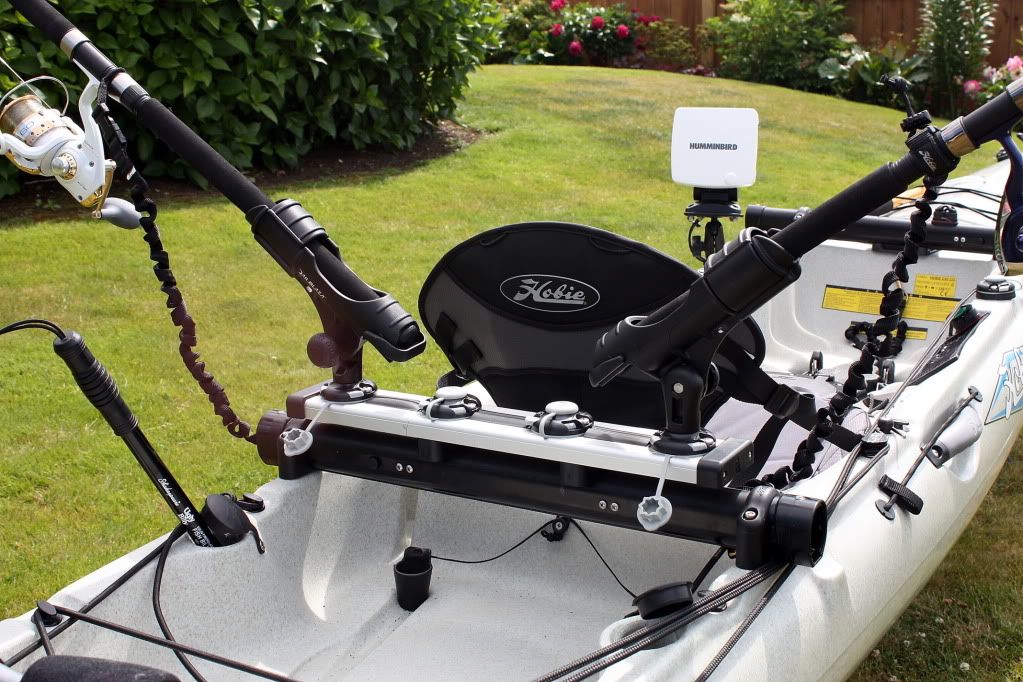
RAM mount holding a Humminbird 385ci (kayak edition)
I could have used the Railblaza http://www.railblaza.com/products/view/ ... orm/33/59/ Yet I need the ability to see close (getting old sucks)

Image

Starport mount to hold my Standard Horizon HX851
The RailBlaza Mobi unit gives the VHF or any other portable unit a sweet solid rubber hug. Check out this radio. It is incredibly powerful in it's features. It is also way cheaper than a VHF and an EPIRB. http://www.standardhorizon.com/indexVS. ... Archived=0

Image

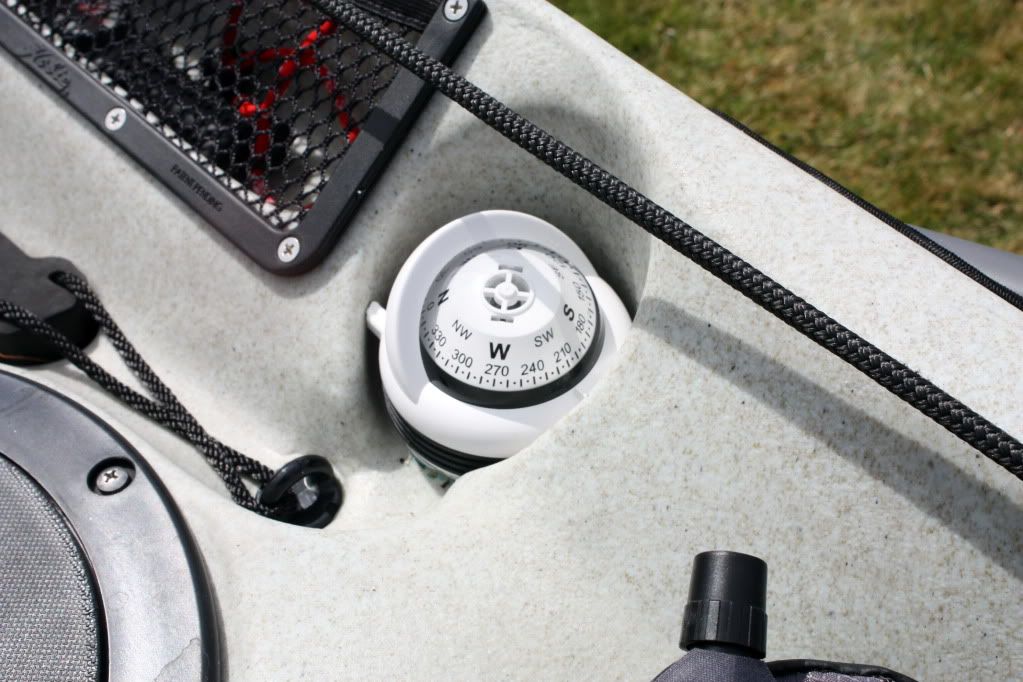
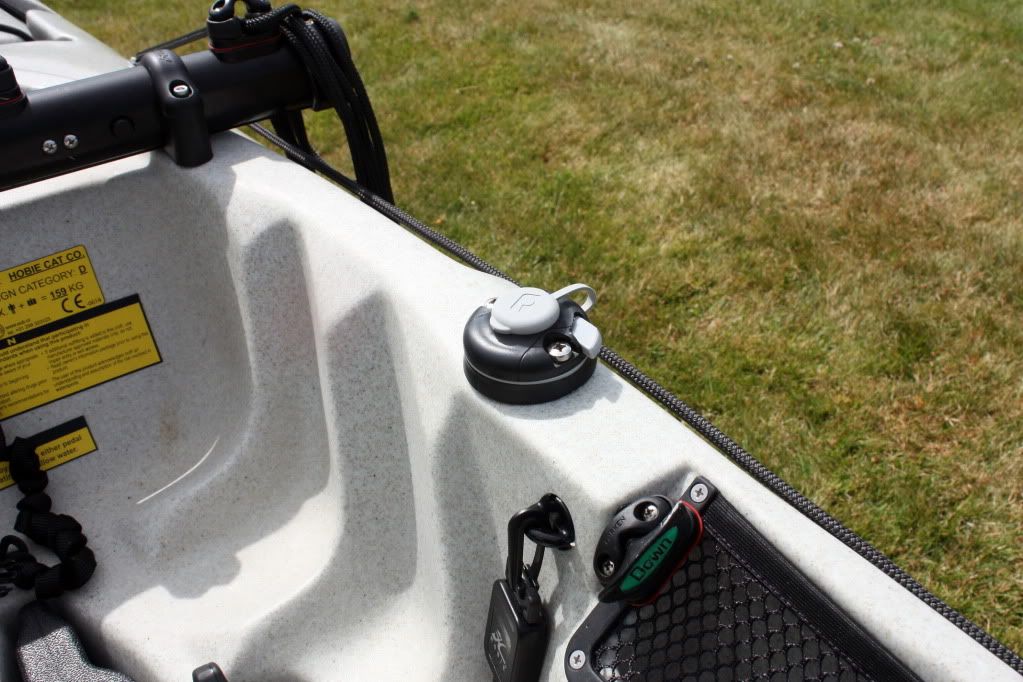
Richie Compass fitted to the drinkholder
TR-31W - Trek (Bracket Mount). I used a dremel tool to grind the case down for a solid fit with a glob of Marine glue on the bottom. (works well). Hint: make sure that your compass is true to your magnetic area of the globe before glueing it into your craft
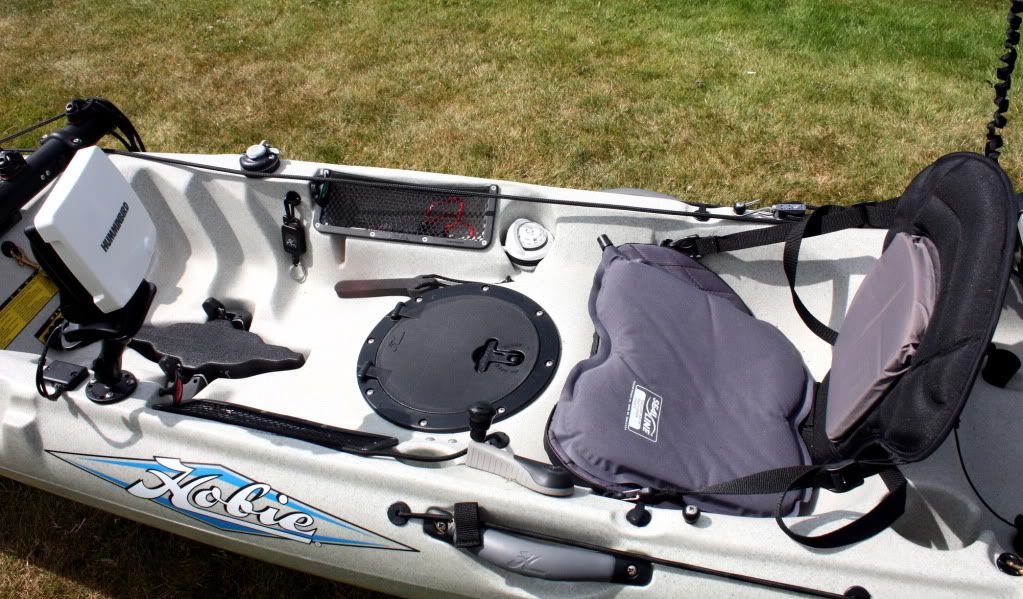
Image

The Cockpit
Added a Sealine air cushion seat (same material as the lumbar support) Having chronic back issues, that has to be a winner for creature comfort (HIGHLY recommened). Attached with very solid velcro (supplied). I also added the knob to the steering. Way better control and less wrist fatigue over the long rides. Careful, it's like power steering at high speed :)

Image

Der 'Shaft'
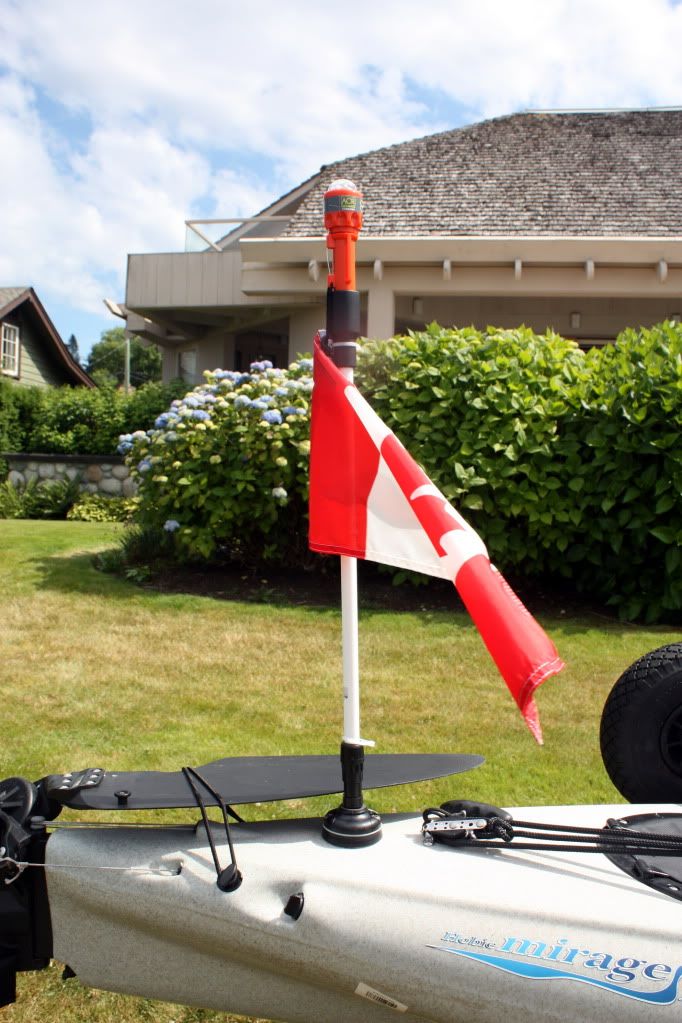
This mod needed a lot of thought and care. This is a Scotty Strobe light/nav light mast retro'd to accept a RailBlaza mount. I did not want a 4 bolt (Scotty mount) in an area that has all the rudder control lines. I ground down the top of a RailBlaza Adaptor added a 2" 1/4" bolt mounted with 5 rubber grommets with a 1/4" nut mounted between grommet 4 and 5. It works like a charm. The strobe is an http://www.acrelectronics.com/products/ ... ith-c-clip (this unit can be switched out to a standard steady rear white beam to allow the fish to 'see' you) lol (The Canadian flag is optional unless you are a Citizen...otherwise we'd have to send you back to the US) ;-)

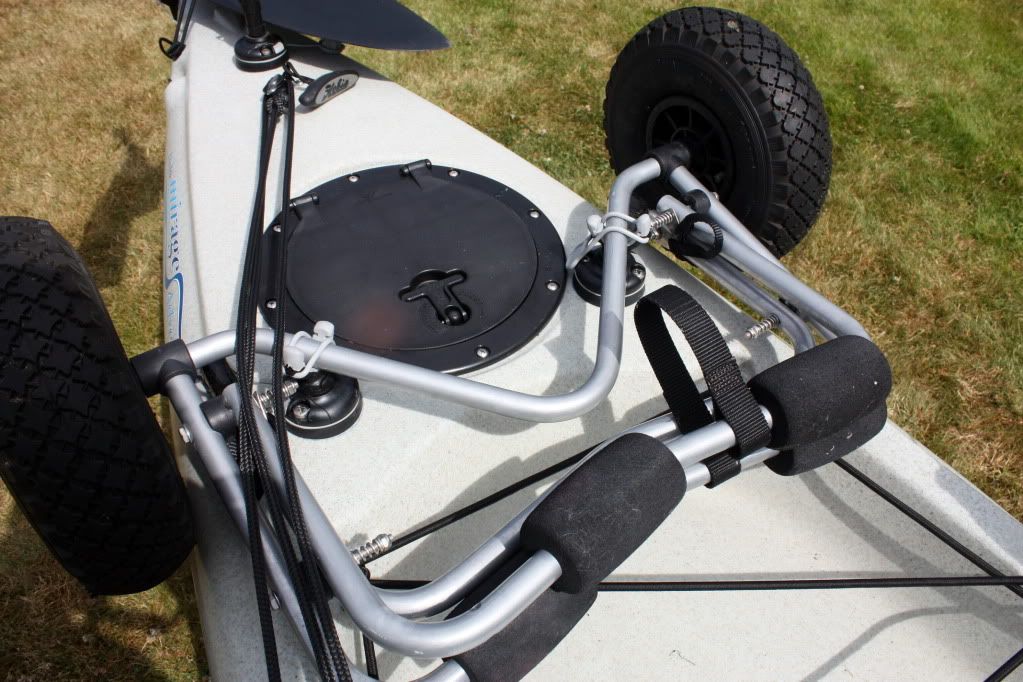
Keeping the wheels from falling overboard
This is the G-Hold 25: http://www.railblaza.com/products/view/g_hold35/26/59/ st I've tested it in 15 knot winds. No worries. It holds down the heavy duty wheels with very little movement. As the orientation of these fittings can be rotated, (and solidly locked) This would allow you to mount other 'tubular' gear

Image

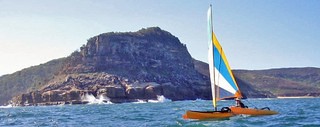
keeping as much weight to the rear has helped me from 'submarining'. It stands to reason if you look at the overall effect as the hull tries to plane, it is not going to happen as the hull does not have the ability to do this (study up on deep V hull designs). As the speed increases the bow has no choice but to start nose diving at max designed hull speed. The only solution is to shift weight to the stern to keep the bow above water (or start reefing) Gawd forbid.

Image

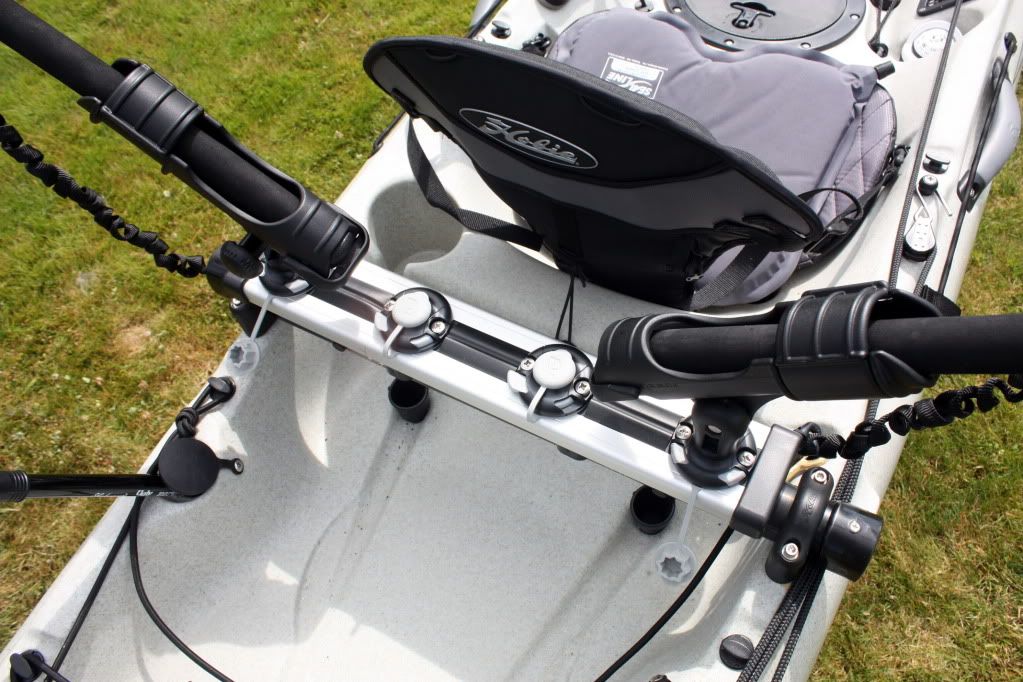
The TracPort Dash 500 mounted to the rear crossbar
the product is: http://www.railblaza.com/products/view/ ... 00/170/59/ The bottom rail mounts had to be ground down with a 1.5" diameter drum sander to contour the shape of the rear crossbar. It is held in place with 4 #12 self tapping screws. It is solid as hell. Again because this rail has the ability to be almost a Swiss Army knife, it can be used for a large number of chores. The most important chore for me is to keep my rods out of my cockpit. In that degree it serves that purpose perfectly!

Image

Thanks for looking
Trinomite

_________________
Always looking for ways to make good things 'Gooder'


Top
 Profile  
 
PostPosted: Sun Jul 03, 2011 3:21 pm 
Offline
Site Rank - Old Salt

Joined: Wed Jun 01, 2011 8:37 pm
Posts: 543
Location: Vancouver Island, Canada
fishman-rd wrote:
Very nice job.. and clean looking. Would be interested in more pics of the Barton pulley system in action. There is a steep incline where I launch sometimes and it's a bear bringing the AI back after an outing - was even thinking of a battery operated winch system but haven't made much progress!


Thank you M8
I goofed on the brand of pulleys I used for the 4 to 1 system:
It is Lewmar,not Barton. :oops:

http://www.lewmar.com/products.asp?id=7906&lid=24697

The blue button near the shackle can also be used to keep the block from swiveling which keeps the long lines from twisting up on themselves

Just measure the distance and multiply it by 5 to get the right length of rope. I used 1/4" double braid nylon (22 cents a foot).
I tried a 12V winch. It's noisy, slow and only had 20' of wire rope.
Next time I use the system I'll send you a pic.

This almost ruins my day after a great day sailing
Image

Hope that helps
Trinomite

_________________
Always looking for ways to make good things 'Gooder'


Last edited by Trinomite on Mon Jul 04, 2011 1:45 am, edited 1 time in total.

Top
 Profile  
 
PostPosted: Sun Jul 03, 2011 4:06 pm 
Offline
Site Rank - Deck Hand

Joined: Wed Sep 08, 2010 4:23 pm
Posts: 20
Nice setup. I just spent last weekend doing a tidy-job on the TI. I also went for the Railblaza Starport mounts for rods and accessories and I must say that so far I am very impressed by their versatility and build quality.

Thanks for all the pics and links. I like the look of the VHF/GPS unit :mrgreen:

Cheers
Paul


Top
 Profile  
 
PostPosted: Sun Jul 03, 2011 6:45 pm 
Offline
Site Rank - Old Salt

Joined: Thu Feb 11, 2010 12:07 pm
Posts: 1041
Location: Ontario, Canada
I like the compass in the extra drink holder. I'd buy that if Hobie had made it already. I'm currently strapping one on my front hatch lid. I had to add a small length of rope on each tap to fasten the factory strap. I've got a picture somewhere, but I don't know where it is right now. Long story short, it's a pain to get into that hatch without taking off the compass. If I could have fit it securely in my drink holder, that would have been great. I do like having it straight in front of me as it's easy to navigate when you can see your heading, and your bow, in the same glance, but your system is smart too.

_________________
Image


Top
 Profile  
 
PostPosted: Sun Jul 03, 2011 10:15 pm 
Offline
Site Rank - Old Salt

Joined: Wed Jun 01, 2011 8:37 pm
Posts: 543
Location: Vancouver Island, Canada
riddo wrote:

Thanks for all the pics and links. I like the look of the VHF/GPS unit :mrgreen:

Cheers
Paul


Thanks Riddo. You're very kind.

Regarding the GPS enabled VHF. You will have to contact your government to get a DCS number to unlock that ability of the VHF to use the 'Panic Button'. This will allow you to be located by the Coast Guard or the Military via your GPS location transmitted by the radio if you are unlucky to have an SOS. The fact that it has 6 watts of output (as opposed to 5) makes this item highly valued. It's also a backup to the Humminbird Chart plotter/Sonar.

I used to work as a volunteer Ski patroller, Rock climbing Instructor, High angle rescue co-ordinator on the weekends and have been blessed to be able to sail for many years.

I've learned 1 solid fact: Life is more important than anything else.
Safety will always be Numero Uno.

Fred

_________________
Always looking for ways to make good things 'Gooder'


Top
 Profile  
 
PostPosted: Sun Jul 03, 2011 10:43 pm 
Offline
Site Rank - Old Salt

Joined: Wed Jun 01, 2011 8:37 pm
Posts: 543
Location: Vancouver Island, Canada
HIyas AugAug

It might be helpful if you can give me the model number of your compass. I assume you are talking about the middle hatch as the front hatch is obscured by the mast. (Again, I am assuming)
I almost bought the Hobie Ritchie vertical flush mount but I have long legs and my vision would have been obscured. My Catalina 27 had a Port side flush mount compass and I got used to a 30 degree compensation over the years when I was a on a starboard tack.
The cup holder also protects this last Nav resort if I drain the battery and should be protected at all costs.
But you are correct, using your compass line of sight with dead reckoning of a land mass beyond the bow is the right way to go (if you can). This method can be handy to manualy check your amount of drift from your set course.


Fred

_________________
Always looking for ways to make good things 'Gooder'


Top
 Profile  
 
PostPosted: Mon Jul 04, 2011 6:15 am 
Offline
Site Rank - Old Salt

Joined: Thu Feb 11, 2010 12:07 pm
Posts: 1041
Location: Ontario, Canada
I use the Seattle Sports Sea Rover Deck Compass ($25.00 CDN at MEC) And I do mount it on the front hatch. I used a little science to avoid running into the problem that you mentioned of having it blocked by the mast. Use the photo below as a test.

- Look at the picture,
- Close one eye, and run your finger across your field of vision, halfway between your eyes and your computer screen
- You will lose sight of the entire kayak
- Now repeat the process with both eyes open,
- You will never completely lose sight of the kayak

Because the mast is so narrow, and our eyes are spread far enough apart, you really don't do much leaning around the mast to see your heading. You just have to trust your eyes, and not the logic that says that there is something in the way. I don't have any pictures of me sailing with this compass in place, but they wouldn't show you how you don't lose sight of the compass, because a camera only has a single lens, it's like looking at it with only one eye.

So here's my set up. Great for kayaking, plenty accurate for sailing, just a bit difficult to get into the hatch because you need to unclip the compass first. As I thought about things last night, it's probably more accurate to have the compass where I do, using the mast and bow of the boat as reference points within my field of vision, as opposed to looking down to the cup holder. Either way, I like your setup too.

Image
(EDIT: The caption would be more accurate if it explained that the rope was tied through the outer hole on the black tab that is used to secure the bungees)

Image

_________________
Image


Top
 Profile  
 
PostPosted: Mon Jul 04, 2011 7:58 am 
Offline
Site Rank - Old Salt

Joined: Wed Jun 01, 2011 8:37 pm
Posts: 543
Location: Vancouver Island, Canada
Ok I see friend

Sorry, I was trying to get a mental picture in my head of your layout.
I see now.

You've got a lovely compass for the price. It's half of what I paid for mine without spending an hour hacking it up to fit my mount, (and your's looks way bomber.). I need to know if there are any rivets or any obstructions on the bottom of the compass before the following method will work.

Hmm.Have you considered gluing the compass to the center of your mid hatch?

Tools:
Measuring Tape, ruler and an optional chalk line.
Small Box cutter or #11 Xacto knife
Clear Marine Silicone Seal (tube)

(Caution, if you have a battery, iron or steel, or electronics under or near your mid hatch, they will have to be moved due to possible magnetic interference)

If you wish to continue, take a #11 Xacto knife (or a very small and sharp box cutter and remove all the stiching very carefully?.

Find the center line of your middle hatch right down the center line of your craft making sure to avoid the latch mechanism. Find the centers of your compass base using the center of the top of the compass ball and mark the rubber with a pen or pencil. (the most important is Bow to stern)

Glue the rubber base to the hatch cover with clear Silicone sealant. Spread a liberal amount of silicone seal on the entire bottom of the compass base about the thickness of 1/16". Remember the hatch cover is textured.

Line up the center line of the base logo and the down arrow above it to the center line you have already marked on the hatch.

Press the compass down and squish it slightly by moving the base very slightly up and down. You'l want a solid fit with no air in your seal (It's the same game as mounting a sonar transducer to the inside of your hull).

If any silicone squishes out at the edges, just take your thumb around the entire edge to 'dress' it. Once you are sure the position is correct, commit yourself with duct tape to hold the compass in place during the 24 hours curing time.

Pro: You are in line with the center of your craft.
Con: You'll have to cross your past references of your line of sight with your compass to the bow or mast. Possible damage if you step on it...

If you want to mount it to one of the drink holders pls let me know. I have a method worked out.

Take Care Aug
Fred

_________________
Always looking for ways to make good things 'Gooder'


Top
 Profile  
 
Display posts from previous:  Sort by  
Post new topic Reply to topic  [ 22 posts ]  Go to page 1, 2  Next

All times are UTC - 8 hours [ DST ]


Who is online

Users browsing this forum: No registered users and 2 guests


You cannot post new topics in this forum
You cannot reply to topics in this forum
You cannot edit your posts in this forum
You cannot delete your posts in this forum

Jump to:  
© Hobie Cat Company. All rights reserved.
Powered by phpBB® Forum Software © phpBB Group