Joined: Fri Mar 13, 2015 5:56 pm Posts: 20 Location: East Texas
Do I need to have a local Hobie dealer contact Hobie to order a repair kit? is there a part number associated with the kit? I just called the local hobie dealer where i just moved to and they arent aware of a kit. I am not really in any rush to get it, but im going by the dealer to buy a larger rudder and sail kit and figured i would just get this done at the same time.
_________________ _____________________ Derrick Daniels 2015 Hobie ProAngler 14' ~let pure air and sunshine invigorate you~
Joined: Tue May 27, 2003 12:44 pm Posts: 15036 Location: Oceanside, California
mmiller wrote:
All warranty claims are handled by your dealer... Contact your dealer if you have the following issue.
Not all 2015 boats have this issue, read the detail concerning the differences.
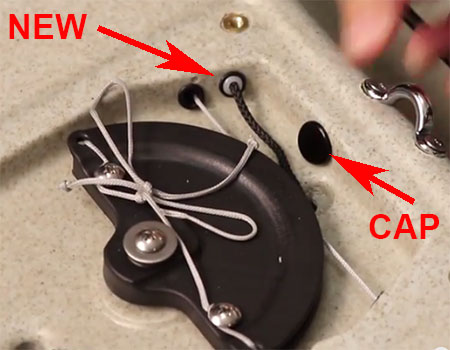
We have discovered a problem with the routing of the tracking skeg's up-control line in some 2015 Pro Angler 12 and 14. The line has excessive friction at it's exit point within the steering drum area, under the black plate. We have received some reports of lines cutting into the exit grommet. This affects 2015 model serial numbers ending in 415 as well as A515, B515, C515 and possibly a few boats in D515. The issue was corrected on the assembly line April 2nd.
If your boat has this issue you will see the grommet forward of the drum as shown:
We have created a kit and instructions for re-routing this line. The video below explains the fix. It should take about 10-15 minutes to complete. Kits should be ordered through warranty.
84610122 PA SKEG LINE KIT The kit contains a 5/16 panel rivet and a short line tube with end grommet.
Has anyone received their repair kit from Hobie or a dealer yet? I called ACK on April 29th and was told my part was ordered. Three phone calls and three months later and I still don't have the part. ***Just got a phone call from ACK after posting this and was told they are mailing out the repair kit today.
I bought my 2015 PA14 from the Tackle Shack in St Pete FL on 7/3/2015. I saw the concern in this thread the day I bought it and realized I had one of the serial numbers that needed to be corrected so I called them up. Three days later I had the warranty kit and had only used my yak once so no real wear in the original grommet.
One thing to be aware of when you drill the hole for the new location I'd recommend disconnecting the rudder line from the drum on that side and dropping it out of the way. It passes right behind where the hole needs to be drilled ang my drill bit caught it and severed it. I was able to tie a knot in the original line that worked for me until I was able to get some new line through ACK and replace it.
Hey ya'll, just got my first hobie Pro Angler 14. Just wanted to share something i did to mine and maybe it will help you all and hobie engineers. After only two uses of my kayak, i noticed i couldnt adjust my tensions very well and they were always tight. Dealer said it will loosen up but it seem to get worse. So, i opened up the rudder panel to inspect and noticed that after only two uses i started to see the grove form in my skeg line and gromet starting to wear down. Being who I am, i decided i wasn't having it despite my dealer saying it isn't going to hurt anything. So after about 4 trial and error experiments and realizing there isn't a glue known to man that adhears a dam to polyethylene i came to my final fix. Its not the prettiest repair but its permanent. I bought two metal pad'eyes that are mounted on other areas of the yak. I dremel cut the screw holes in half and added "teeth" to the ends. I then, using the iron plastic welder from hobie and an air welder i got from harbor freight i carefully heated the pad'eye up as hot as i could and used the iron to keep it hot as i pushed them into the plastic. I then added some plastic around them to smooth them and make sure the feet were covered. My skeg and rudder retraction is smooth and no longer cutting my hull. It also raised the cable up about 1/8th inch slowing the wear on the gromet coming out the hull. Its not the prettiest but its better in the sense it wont be cutting in my hull anytime soon. Hope this helps. Here is some pix of before and after. I know there are probably 20 different ways to fix this. This just happend to be the one i went with.
I bought a Hobie Pro Angler 12 and received it last week. I have been out on the water twice so far . I love this kayak - However, today I noticed it was not able to make a right turn very well. The handle when pulled to the right does not have same range of motion as to left. I placed it up on a bench when I got home and the whole system seemed to be binding up when turning rudder right. I got on line on this forum and found the skeg issue and it appears to be the problem. When I let the skeg down the problem is less but the rudder still does not have full range of motion. I will take it back to California Canoe and Kayak tomorrow and have t fixed. I really don't have a use for the Skeg - and if it is going to be a problem I will ask to have the cables associated with it removed. I also appear to have the issue of the cables cutting into the plastic (no grommets) as mentioned by others - and this Kayak was purchased new and unwrapped in front of me by the dealer. Seems a little wonky for such a high quality boat.
Came up with a solution here. Brass tube with teflon liner bent 90 degrees to follow the hull. Also long enough to keep the grommet in. Works better than new for the time being. Will post if it fails.
Received the repair kit but it only solves half the problem. I still have a groove where the skeg line has cut into the plastic and is binding. My dealer was no help. How do I repair the grooved plastic? Can't seem to be able to attach a picture.
I have the PA12 2015 and do has the issue with the skeg did not deploy and it takes a lot of force to pull the skeg up, Hobie has a solution for the problem. When I review the video, it did not make sense why this will work. it is missing step to install the "Mount the turning block on the port side of the kayak". I think this is the part that make it work better. Does anyone know why the video instruction is different than the paper instruction? Am i missing something here? how hard it is to install the turning block inside the yak? Thanks in advance
Users browsing this forum: No registered users and 2 guests
You cannot post new topics in this forum You cannot reply to topics in this forum You cannot edit your posts in this forum You cannot delete your posts in this forum