The deck between the seat area and the round hatch on my Hobie Quest has been developing a crack for some time now. It started as a small crack and got bigger and bigger. I drilled a small hole at the end of the crack to keep it from getting larger but that just caused another crack to form. Pretty soon it was no longer a crack, but the deck around the hatch had broken into pieces. I tried to repair it a couple times by plastic welding, but the cracks soon returned.
The problem is that the hatch is a hole in the deck. A foot to the rear is the seat, which supports all the weight of the paddler. This area of the deck is unsupported and the hole for the hatch makes it a weak area. Over the years, the constant flexing of the unsupported deck, along with exposure to UV radiation caused cracks to develop around the hatch. While this area of the deck could have used a little more support, this kayak is over ten years old and gets more than average use, so "wearing out from age and use" would be more the reason for this as opposed to a design flaw or defective materials.
Nothing else wrong with the kayak, so I made another effort to plastic weld the cracks and try, one more time, to fix it for good. I held the broken deck pieces together with the lower ring from the kayak hatch, then did the best welding job I could do with an 80w plastic welder from Harbor Freight. This particular welder had been run over by a 40 ton semi truck and still worked, so it is well worth $15. The key to good plastic welding, just like any other welding, is to bond materials to each other, not melt a layer of plastic over the top.
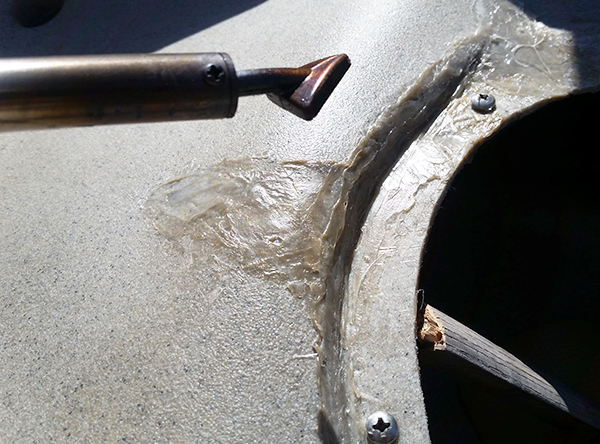
Now, it doesn't look all that great, but there were two three inch cracks from the hatch opening towards the seat and the hatch "lip" was broken in three seperate pieces. The hatch "lip" was broken away from the rest of the deck along a ten inch crack. The welding job seems pretty good even though it looks like crap. As long as it holds, I don't care what it looks like.
After the welding job, the deck and hatch "lip" were not has smooth as they were from the factory, so I used a little bit of JB Weld to fill the gap between the hatch and the deck. I had used Lexel and silicone seal in previous repairs. They were watertight, but were not very strong. I'm hoping the JB Weld will do a little better job.
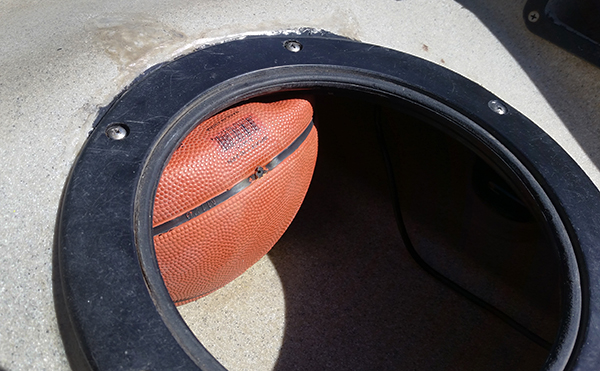
Since the crack was caused by the unsupported deck area flexing, I had to do something to mitigate that or the crack would most likely return, regardless of the quality of the welding job. I got a basketball, deflated it, stuck it through the hatch and placed it between the seat and the hatch with the air valve easily accessible. I filled up the basketball until it supported the deck with me sitting in it, but not so full that it would push up on the deck. This is essentially an air shock or load leveler type air bag for the kayak. I've been using the basketball with the deck completely broken and it supported my weight, so I'm hoping that will continue and prevent the deck crack from reappearing.
_________________
Waterman at Work - Kayak Fishing Photos, Video,Kayak Rigging -
Blog


