Return to Hobie.com
Hobie Forums
It is currently Sun Apr 28, 2024 3:03 pm

All times are UTC - 8 hours [ DST ]


Post new topic Reply to topic  [ 12 posts ] 
Author Message
PostPosted: Tue Jun 08, 2010 1:17 pm 
Offline
Site Rank - Captain

Joined: Tue Jan 05, 2010 9:46 am
Posts: 46
Location: Naples, FL
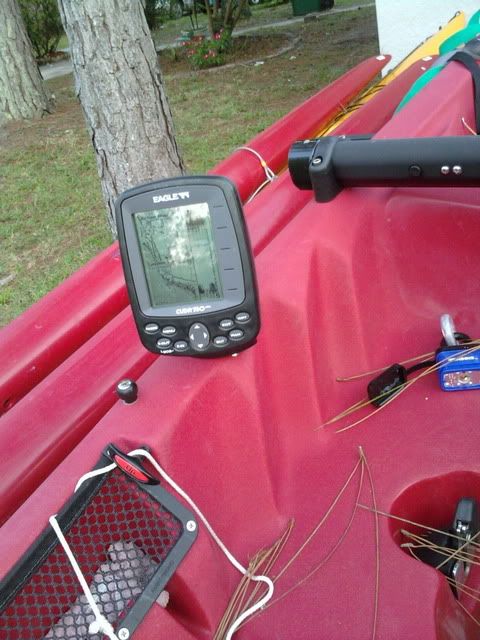
Building a cheap and effective waterproof battery box to supply power for my Eagle CUDA s-map fish finder/GPS.
The fish finder is available at Cabella's
http://www.cabelas.com/cabelas/en/templates/links/link.jsp?id=0065672020560a&type=product&cmCat=froogle&cm_ven=data_feed&cm_cat=froogle&cm_pla=2070102&cm_ite=0065672020560a
for about $199
Image

I needed a cheap battery box that would secure my battery and provide a decent amount of water resistance but yet also be easy to remove and connect. I also wanted to have a box big enough to hold two batteries so I could add lights to my TI at a later date.

I think I have found a good way to do that and am going to share it here now.

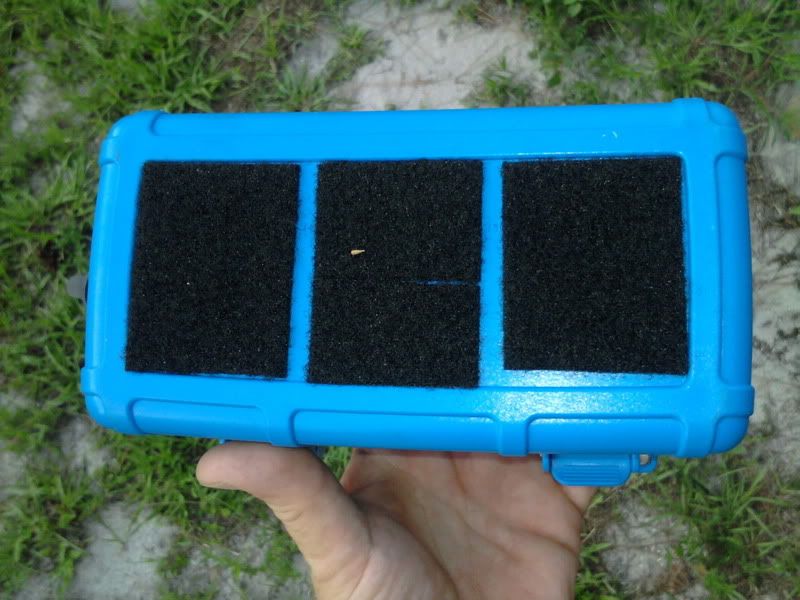
I opted for a Otterbox 3500, about $30
http://www.otterbox.com/waterproof-cases/otterbox-3500/
Image

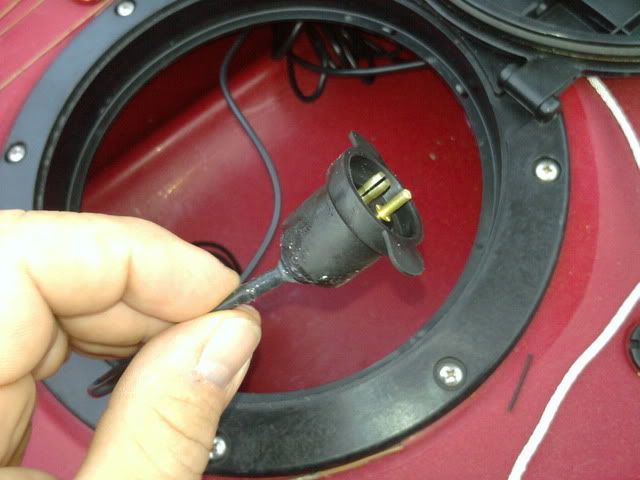
I then added a PERKO two-pole water proof connector found at West Marine
http://www.westmarine.com/webapp/wcs/stores/servlet/ProductDisplay?productId=112199&catalogId=10001&langId=-1&storeId=11151&storeNum=10109&subdeptNum=10611&classNum=10615
about $20,
Image

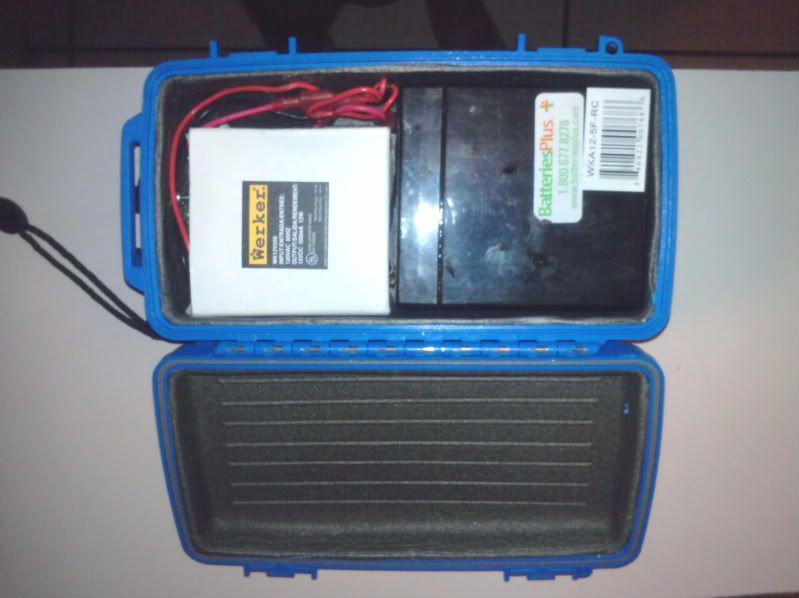
I also purchased a WKA12-5F-RC AGM battery
Image
and a WK12V500 charger
Image
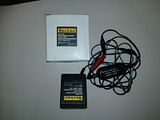
all from Batteries Plus
http://www.batteriesplus.com/product_search/32633-Werker-12V-5AH-AGM-Battery-with--dot187-Terminal-DASH--DASH-WKA12--5F.aspx

I then assembled the connector to the box using stainless steel hardware and nylon lock nuts,
Image
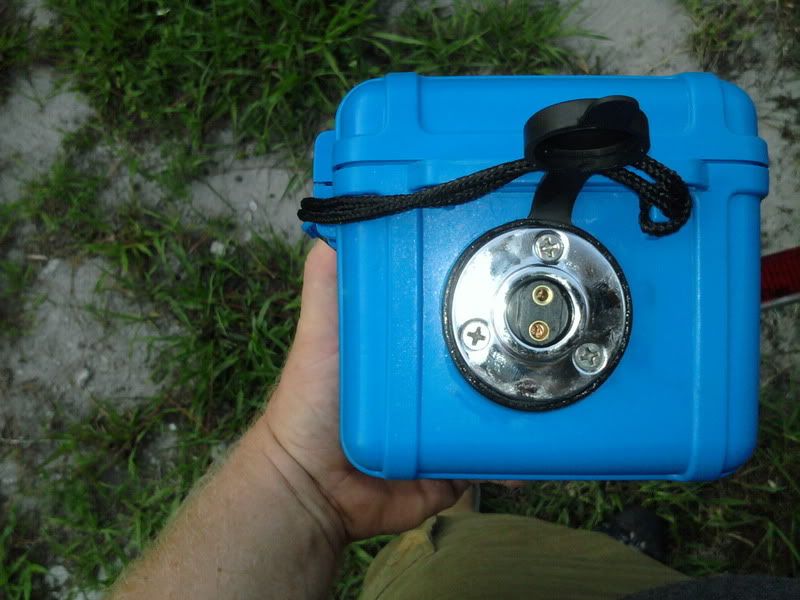
being sure to apply a thin coating of marine grade RTV to all sides of the gasket and connector.

Image
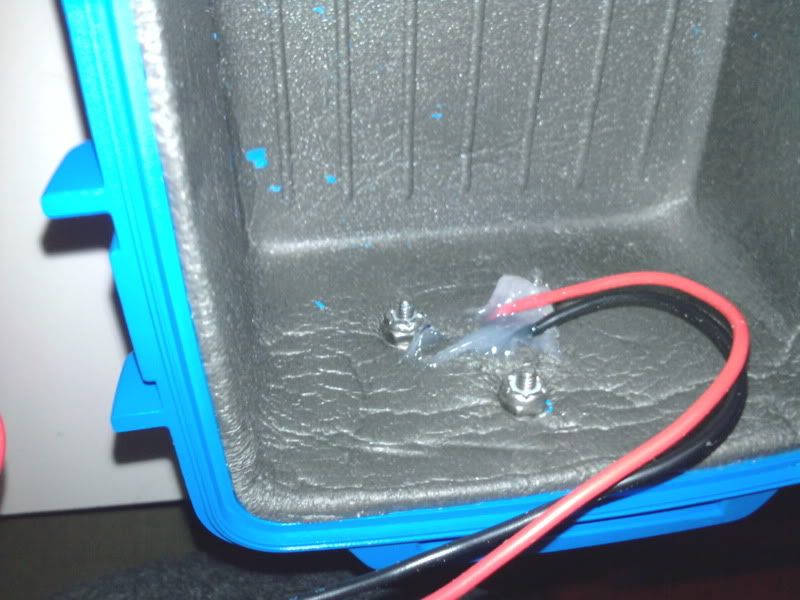
I also sealed the connector from the back with RTV being sure to squeeze a small amount into the bottom of the connector pins.

I then potted the male connector end with RTV so as to protect the cable ends.
Image

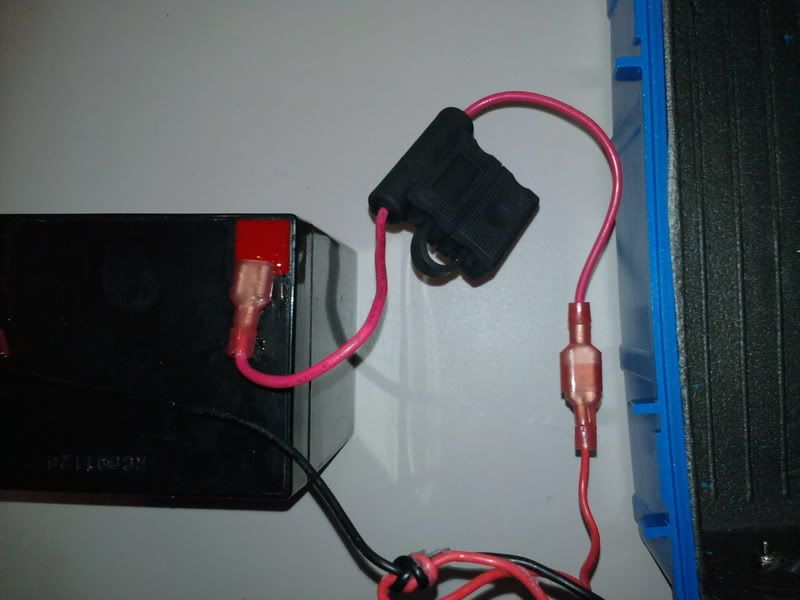
I placed a 3 amp fuse in line on the positive side of the battery, note the spade connectors that allow you to by-pass the fuse in case of emergency.
Image

Save your battery charger box and use it as a perfect spacer for the AGM battery in the otterbox.
Image

Apply industrial strength VELCRO™to the bottom of the otterbox,
Image

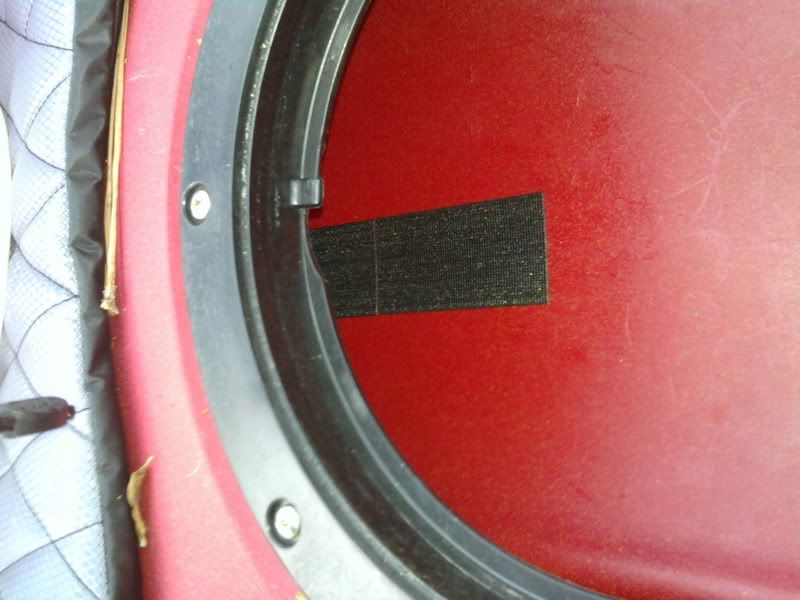
And to the area just under the rear seat in the TI.
Image

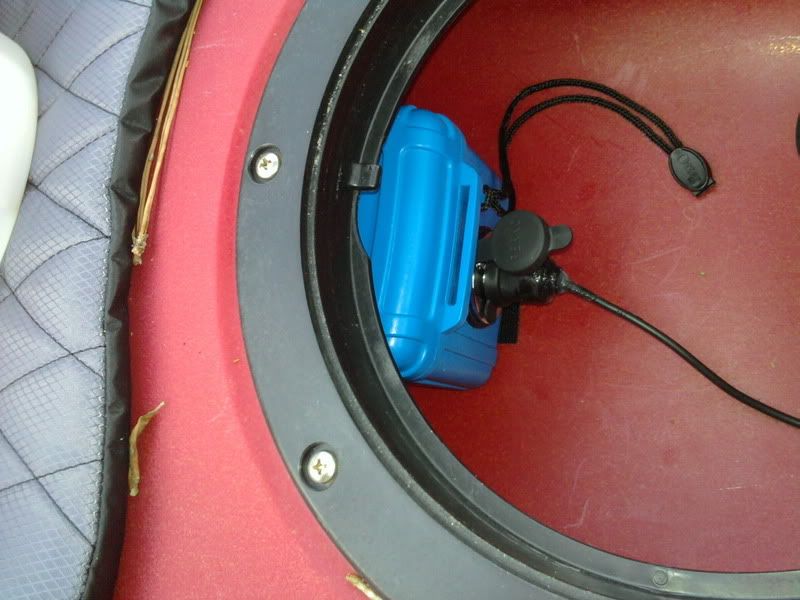
And secure the box and plug it in.
Image


It works very well for the Eagle fish finder and has days of power under normal use. The beauty of buying this unit is that it has a decent set of fish finder function and has a decent GPS with 1000 way points that you can use to describe 100 programable paths. It also has a great compass and digital display with depth, speed, water temp… etc.
I chose to build the battery box and order a second sounder head and mounting device (About $80 from Eagle/Lowrance) and I installed that in my AI. Now I simply take the battery and the fish finder to whatever Kayak I am going to use for the day and saved the cost of having to buy a second $200 fish finder!
Total cost for the battery box, with charger, $97.50.
My total cost to put fish finder/GPS on both Kayaks is somewhere around $400, box included.

I hope this help some of you out.
Peace


Last edited by Anakritis on Thu Jun 10, 2010 4:58 am, edited 2 times in total.

Top
 Profile  
 
PostPosted: Tue Jun 08, 2010 7:01 pm 
Offline
Site Rank - Old Salt

Joined: Fri May 08, 2009 5:06 am
Posts: 1701
Location: Lake Macquarie NSW AUSTRALIA
Nice work Anakritis. Well explained and looks very professional.

_________________
Image

Don't take life too seriously................it ain't permanent.


Top
 Profile  
 
PostPosted: Wed Jun 09, 2010 12:31 pm 
Offline
Site Rank - Captain

Joined: Tue Jan 05, 2010 9:46 am
Posts: 46
Location: Naples, FL
Thanks Slaughter, just trying to be handy!
This box worked out so well I can't wait to add a safety lighting circuit!

Peace


Top
 Profile  
 
PostPosted: Wed Jun 09, 2010 2:54 pm 
Offline
Site Rank - Old Salt

Joined: Fri Dec 05, 2008 2:32 am
Posts: 1807
Location: Terrigal NSW, Australia
Looks very neat! Is it a dumb question to ask how you pass the wires from inside the hull to the fish finder? Also, how do you mount the fish finder?

_________________
Image


Top
 Profile  
 
PostPosted: Wed Jun 09, 2010 7:20 pm 
Offline
Site Rank - Old Salt

Joined: Mon May 04, 2009 5:02 am
Posts: 817
Location: Sydney - Parramatta
Nice job. I need to upgrade my box. I'd like to move it below deck too.

_________________
Image


Top
 Profile  
 
PostPosted: Wed Jun 09, 2010 8:33 pm 
Offline
Site Rank - Captain

Joined: Fri May 07, 2010 12:08 pm
Posts: 66
Location: Michigan
Excellent detail on the batt box!

I dove into the cheap batt box idea quite literally;

$3.68 knock off TupperWare food storage box (Walmart)
$2.99 toggle On\Off switch (auto parts shop)
$2.99 rubber boot that threads onto the above toggle switch (marine shop)
$3.98 two wire Quick Disconnect (auto parts shop)
$2.30 small tube of dielectric grease (for use within the exposed QD mentioned above) (auto parts shop)
$5.00 three sticky back strips of velcro (some better pricing can be found if you buy by the foot @ a fabric shop)
$5.00 tube of Marine goop (just two dabs needed; at the switch and the QD where they leave the box)
$22.25 nine Ah SLA batt (Batteries Plus - commercial price) (same physical size as the 7 Ah SLA batt)
$21.99 500 mA batt charger for the SLA batt (Batteries Plus)
$?.?? 3 Amp fuse (may need to substitue a larger fuse as the electrical load increases)
$?.?? fuse holder
$0.00 closed cell foam (packing foam) to snug up the batt and stop the batt from sliding around within the batt box

Sorry, but some of the pricing above is done from memory (I may be several cents off here or there, but not by much).

The sticky back velcro works a little too good (it can be a struggle when there is an occassional need to remove either batt box for inspection). Two strips may be best?

I have a spare two wire QD half, in order to connect up the batt charger without removing either batt box from the hull.

Ended up saving (not spending) enough on batt box number one to easily pay for a 2nd batt box with all of the goodies and dedicate the 2nd batt box to lighting needs. I currently only have a traditional red\green bow light wired up, but plan on running a traditional wired anchor or stern light (white) once I figure out how best to make the stern light removeable.

Each batt box "lives" inside the hull and either side of the sail mast (Pro Angler) and both On\Off switches are easily accessible on the water by lifting the large front hatch and hatch liner and reaching in a bit.

I suppose the cheap batt box may not end up being as rugged as a dedicated batt box but in my case it works for me, for now.

Noting that with two batt boxes I now have redundant battery source with which to swap simply at the two wire QD if the need arises on the water.

CBull


Last edited by CBull on Fri Jun 11, 2010 8:32 am, edited 1 time in total.

Top
 Profile  
 
PostPosted: Thu Jun 10, 2010 3:54 am 
Offline
Site Rank - Captain

Joined: Tue Jan 05, 2010 9:46 am
Posts: 46
Location: Naples, FL
chrisj wrote:
Looks very neat! Is it a dumb question to ask how you pass the wires from inside the hull to the fish finder? Also, how do you mount the fish finder?

Not so dumb at all...
I went and had my dealer locate and drill the hole. Admittedly it was kind of a pain in the neck because the sounder and end plug were prefabricated and the hole had to be nearly 5/8 inch in diameter. I had been hoping to have something closer to 1/4 inch.
In any case the wire passed through the hull forward of the Aka locking pin.
The wire is secured by a cable grip strain relief that is also liberally slathered in RTV to prevent leaking and the hole is directly under the fish finder mount.
My dealer ordered me the Hobie adjustable mount and I am waiting for this device as it appears to be a great solution for mounting. I will continue to employ the factory mounting bracket as it is a quick disconnect system that allows me to have two mounting brackets and only one fish finder so the device can be swapped out between kayaks.
I think I would have mounted the whole shebang in a different location but my dealer assures me things are better mounted in this position and are well clear of any steering lines.

Here is a picture of the current mount, I am still waiting for the Hobie/Ram mount system.
Image


Top
 Profile  
 
PostPosted: Thu Jun 10, 2010 4:54 am 
Offline
Site Rank - Captain

Joined: Tue Jan 05, 2010 9:46 am
Posts: 46
Location: Naples, FL
CBull wrote:
Excellent detail on the batt box!

I dove into the cheap batt box idea quite literally........

I suppose the cheap batt box may not end up being as rugged as a dedicated batt box but in my case it works for me.

Noting that with two batt boxes I now have redundant battery source with which to swap simply at the two wire QD if the need arises on the water.

CBull


Actually my first plans were with a tupperware box... lol.
I just got the Otterbox for $20 from my Hobie dealer when they were on clearance.

All in all we are very close on the actual price of the box. Yours was near $70 and mine was near $100.
Keep in mind that all the prices I list above are as found on line... they can be had MUCH cheaper if a person does a little homework.
The total price for the box, connector, battery, wires and charger was $97.50.
And I must point out that that price was with a nifty charger, without the charger it would have been much closer to your price....

You should post some pics if you can so we can see your design. It all helps others to make their box designs...


Top
 Profile  
 
PostPosted: Fri Jun 11, 2010 8:33 am 
Offline
Site Rank - Captain

Joined: Fri May 07, 2010 12:08 pm
Posts: 66
Location: Michigan
Anakritis; You really found a much better price for the Outer batt box! Makes me think I could have and may eventually go that way (depending upon how the food storage boxes hold up over time).

Noting that if you were to remove the batt charger from your batt box list, I'd also have to remove the batt charger from my list (we're using the same batt charger).

I'll post pics of my setup, but I'm actually now in the wrong sub-forum (I run a Pro Angler currently).
Once I get some pics up in the correct sub-forum, I suppose I could link to them from this sub-forum (I think?).
Anyone see a better way in which to go about viewing pics of a PA from this AI\TI sub-forum?

CBull


Last edited by CBull on Fri Jun 11, 2010 8:53 am, edited 1 time in total.

Top
 Profile  
 
PostPosted: Fri Jun 11, 2010 8:51 am 
Offline
Site Rank - Captain

Joined: Fri May 07, 2010 12:08 pm
Posts: 66
Location: Michigan
"Yakass" ("Oy Mate") seems to have a very good video going over how he rigged his AI;

http://www.youtube.com/watch?v=CO5gCbqrQ-g

CBull


Top
 Profile  
 
PostPosted: Sun Jun 13, 2010 1:01 pm 
Offline
Site Rank - Captain

Joined: Tue Jan 05, 2010 9:46 am
Posts: 46
Location: Naples, FL
Josh Holmes is the guy responsible for me getting into kayak fishing and for buying an Island.
He is very insightful and practical.
I am slowly equipping my TI to emulate his rig.
I was following him more than a year ago on his original site. His site is better and the content is TOP NOTCH!

I should have the TI very near to his rig by the end of the summer, just in time for adventures in the 10,000 islands area and surrounding water.


Top
 Profile  
 
PostPosted: Mon Jun 14, 2010 3:29 pm 
Offline
Site Rank - Captain

Joined: Tue Dec 01, 2009 4:30 am
Posts: 128
Location: AUS: Sydney midweek - Murrumbateman weekends
Thanks for all the detail. I'm again inspired.


Top
 Profile  
 
Display posts from previous:  Sort by  
Post new topic Reply to topic  [ 12 posts ] 

All times are UTC - 8 hours [ DST ]


Who is online

Users browsing this forum: No registered users and 2 guests


You cannot post new topics in this forum
You cannot reply to topics in this forum
You cannot edit your posts in this forum
You cannot delete your posts in this forum

Jump to:  
© Hobie Cat Company. All rights reserved.
Powered by phpBB® Forum Software © phpBB Group