Return to Hobie.com
Hobie Forums
It is currently Fri Aug 22, 2025 3:02 pm

All times are UTC - 8 hours [ DST ]


Post new topic Reply to topic  [ 34 posts ]  Go to page Previous  1, 2, 3  Next
Author Message
PostPosted: Wed Aug 04, 2010 9:47 am 
Offline
Site Rank - Admiral

Joined: Wed Sep 27, 2006 8:32 am
Posts: 245
Am I getting this right?

- I guess we could just rivet a small padeye at each corner on the crossbars (both front corners, both rear..).
- The oar could have one continuous line connected to it.
- The center of the line is a few inches from the handle section of the oar... maybe going through a hole in the oar, or else a padeye.
- The ends of the line can get stuffed into an under-tramp pocket. When needed, the ends are clipped to the front and rear padeye of the hull that's in the air.

Is the lexan just a sort of "soft, wedge" to jam into the daggarboard trunk...?
Does it get wedged between the daggerboard and the side of the daggarboard trunk?

For use in shallow water... perhaps I could put some floaty foam on the end where I stand... so when the boat comes up, the oar is ensured to float up.. and as the boat is coming over... just PULL on one of the padeye lines to turn the oar parallel to the hull... so the hull doesn't crash down on the oar.

Coming together in my mind...
Thank you for your time and paitence....


Top
 Profile  
 
PostPosted: Wed Aug 04, 2010 9:57 am 
Offline
Site Rank - Admiral

Joined: Thu Aug 18, 2005 9:15 pm
Posts: 216
Location: Sacramento, Ca
I don't even think you need to install a padeye, just tye the line around the crossbar where it attaches to the hull. If you have wings, you can even go around the wing bracket to make sure things dont slip. Take this with a grain of salt, as I'm working this through in my mind too.

Adam


Top
 Profile  
 
PostPosted: Thu Aug 05, 2010 7:50 am 
Offline
Site Rank - Admiral

Joined: Wed Sep 27, 2006 8:32 am
Posts: 245
I could tie the lines there, but I think I need flexibility to put the soloright on either side of the boat, depending which side she's lying on.. ? 4 little padeyes, 1 at each corner... and my two lines from the soloright (front line and back line) just get clipped fore/aft to whichever hull is in the air.... ?


Top
 Profile  
 
PostPosted: Thu Aug 05, 2010 9:03 pm 
Offline
Site Rank - Captain

Joined: Sun Feb 11, 2007 9:25 am
Posts: 46
Location: Phoenix, AZ
4 loops around each corner of the crossbar is a lot cheaper and easier the drilling holes for the pad eyes. I have the loops on mine and they work great.

_________________
Jeff Serene
1984 Hobie 18 Magnum
Phoenix, AZ


Top
 Profile  
 
PostPosted: Sun Aug 15, 2010 1:49 pm 
Offline
Site Rank - Old Salt

Joined: Thu Sep 24, 2009 5:50 am
Posts: 378
I'm going to be making a version of Gary Friesen's (discontinued?) "Solo-Right" myself and I came across a possible option today in Home Depot: the Bully Tools 6" steel floor ripper. The tool costs roughly $25, weighs maybe 8 pounds and comes with a pre-bent (to ~ 30 degrees), flat "shovel" end to fit into your daggerboard well. The shovel end is as skinny as if not skinnier than lexan. The downside is the fiberglass handle probably isn't long enough or strong enough to handle the weight of a grown man. Beefing up the pole would be easy enough to do with fiberglass and carbon wrap but would you get enough lifting leverage from a 57" pole? Possibly not. The other thing to consider is you would need to weld on some type of square pipe to bear the weight/righting force while the devise is resting against the hull. Of course, you would also want to round off the "shovel" corners, add non-skid tape to the pole itself and somehow secure the line that attaches the pole to your crossbars (or tramp center line?) in position at the end of the pole. Below a photo with crude MS Paint illustrations. Please let me know your thoughts. I've seen references to Gary's original pole saying the oar length is 77", but the one shown in the Youtube in the video doesn't look that long. Doesn't really look like an oar, either, but it's hard to tell for sure. Anybody know how long a H18 tramp is front to back?

Image


Last edited by BrianCT on Sun Aug 15, 2010 2:42 pm, edited 1 time in total.

Top
 Profile  
 
PostPosted: Sun Aug 15, 2010 2:39 pm 
Offline
Site Rank - Admiral

Joined: Thu Aug 18, 2005 9:15 pm
Posts: 216
Location: Sacramento, Ca
That might work, I would imagine that the secret to this device working is the leverage and length of the pole. I'd also take steps to make the pole so that you can walk out on it as well as modify the end of it so that it doesn't chew the heck out of your boat, which is why I'm sure people used the lexicon rather than sheet metal.

Good luck,

Adam


Top
 Profile  
 
PostPosted: Sun Aug 15, 2010 3:01 pm 
Offline
Site Rank - Old Salt

Joined: Thu Sep 24, 2009 5:50 am
Posts: 378
Hobie Dude wrote:
That might work, I would imagine that the secret to this device working is the leverage and length of the pole. I'd also take steps to make the pole so that you can walk out on it as well as modify the end of it so that it doesn't chew the heck out of your boat, which is why I'm sure people used the lexicon rather than sheet metal.

Good luck,

Adam


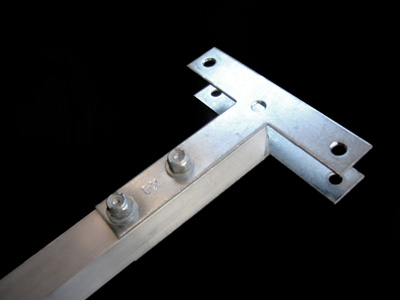
Right, exactly. It was just something I came across today. For what it's worth, I'm seriously considering using a 7' length of 2x2 x1/4 wall" aluminum square tubing for the pole (with non-skid glued on) and having an iron worker weld on maybe a 6" "T" lengh of the same material at the bottom to bare the righting weight against the hull. This stuff is light and strong. http://www.metalsdepot.com/products/alum2.phtml?page=tube&LimAcc=$LimAcc.

Once the pole part is built I would use a stainless steel hinge to connect a fold-able dagger well insert to the "T". This "T" is what really bares all of the weight, and you want it wide enough to eliminate any side to side movement. Glue some neoprene padding on the bottom of the "T" section where it contacts the hull. A hole for the cross beam line could be drilled through the upper end of pole and you could epoxy in nylon bushings like you have on the rudder assembly to keep the line from fraying on the bare aluminum holes. The question is would I need 1/4" wall aluminum for the pole or would 1/8" be enough to support a 220# man? This is the direction I'm currently going in. The end that rests on the boat (once welded) would look something like this, only solid boxed in all the way around. Dagger insert Hinge would be screwed into the bottom...

http://www.ghost-songs.com/props/SuspensionBeam.jpg


Last edited by BrianCT on Sun Aug 15, 2010 4:24 pm, edited 2 times in total.

Top
 Profile  
 
PostPosted: Sun Aug 15, 2010 3:30 pm 
Offline
Site Rank - Admiral

Joined: Wed Sep 27, 2006 8:32 am
Posts: 245
we've got collective genius going behind this thing...

... I don't think the pole needs to support someone's entire weight, per se.... just enough weight to leverage the boat over...

As you lean out.. walk out... on the soloright...the thing pulls on the lines to the crossbar... so only need to support the weight until the boat starts to come over....

I'd guess at 220lbs you can almost right the boat yourself ?

I'm working a soloright in my yard, I got a scrap Hobie 18 to practice on (well, I really needed the mast, but got a great set of EPOs, beautiful Blue Hawaii sails... nice daggarboads, etc out of the deal..)... one hull broke, so that's my prototype and it's up against the back fence....

I fell back to only using 2 loops(one at each corner) tied across the front crossbar and I just tied a little pigtail in the rear of my righting line, as it connects at the rear crossbar. Soloright lines clip at the rear to the loop/pig tail in the rear righting line points...

Rather than make a lexan or any other daggerboard insert... I've just padded the tip of an oar real well... and about 1.5 inches from the paddle end, drilled out a hole and put a 1.5 inch PVC pipe through it.... so the oar can't slide into the well and damage the side of the trunk.

I'll post pix when the weather lets up and it's daylight.... great having a spare boat to mess with and not have to go flopping mine around on and off the trailer, beach, etc....

regards,
Rob


Top
 Profile  
 
PostPosted: Sun Aug 15, 2010 3:55 pm 
Offline
Site Rank - Old Salt

Joined: Thu Sep 24, 2009 5:50 am
Posts: 378
RobPatt wrote:
I'd guess at 220lbs you can almost right the boat yourself?


I honestly don't know the answer to that, Rob. I've only gone over once and all I know is I couldn't manage to right the old girl. I fought with it for maybe 10 minutes, had the mast pointed in the right direction, and even had the jib flopping free out of the water but I eventually ran out of steam and needed to have a powerboat pull me up. The experience kind of "took the wind out of my sails" as I am no longer comfortable pushing the boat hard while sailing solo. I really need a solution. It's either the "Solo-Right" or Rick White's pole (which I really like even though it is rather expensive at ~$300). viewtopic.php?f=15&t=6558&hilit=righting+pole

The thing I like about Friesen's design is he solo righted his boat in what appeared to be low wind conditions. He doesn't look like a very big guy, either.


Top
 Profile  
 
PostPosted: Mon Aug 16, 2010 10:16 am 
Offline
Site Rank - Admiral

Joined: Thu Aug 18, 2005 9:15 pm
Posts: 216
Location: Sacramento, Ca
Sorry to beat this one to death, but how thick is the Lexan plate?

Thanks,

Adam


Top
 Profile  
 
PostPosted: Mon Aug 16, 2010 11:51 am 
Offline
Site Rank - Old Salt

Joined: Thu Sep 24, 2009 5:50 am
Posts: 378
Dude, See picture #3 in the album linked below. It's skinny. Everything I've read says it's just there to hold the system in place.....

http://www.thebeachcats.com/index.php?module=pictures&g2_itemId=62995


Top
 Profile  
 
PostPosted: Mon Aug 16, 2010 6:08 pm 
Offline
Site Rank - Admiral

Joined: Thu Aug 18, 2005 9:15 pm
Posts: 216
Location: Sacramento, Ca
Thanks for the link, I haven't seen those pics yet. There is a plastic shop I was hoping to hit up on my way home from work, but I guess that will wait until tomorrow.

I also just took another look at that you tube video and it looks like he has the rig tied to the dolphin striker and the deadeye, no need to drill holes for pad eyes or tie loops.

Adam


Top
 Profile  
 
PostPosted: Tue Aug 17, 2010 5:00 am 
Offline
Site Rank - Old Salt

Joined: Sat Jun 21, 2003 7:14 pm
Posts: 461
Location: West MI
Ok, I will weigh in on this. I have made my own version of righting pole. The problem that I had is on a Hobie 18 you have to mount the pole lower due to the tramp curve. The mount at the bottom of the dolfin striker and crossbar rods throw up a lot of water. Unless you can mount the pole to the crossbar you will throw up a lot of water.

I will make a Soloright this winter. I will make it out of 1/8" thick wall aluminum or similar as the lines to the crossbar corners hold much of the weight.

Every time I have gone over on the 18 I needed help getting it back upright, even with two people. Yes I have checked the mast every year for leaks.

_________________
1989 Hobie 18 Worlds Boat, Magnum Wings & Spinnaker
1987 Hobie Holder 20 #273

dale.vanlopik"at"att"dot"net


Top
 Profile  
 
PostPosted: Sun Aug 22, 2010 6:35 am 
Offline
Site Rank - Old Salt

Joined: Thu Sep 24, 2009 5:50 am
Posts: 378
DVL wrote:
Ok, I will weigh in on this. I have made my own version of righting pole. The problem that I had is on a Hobie 18 you have to mount the pole lower due to the tramp curve. The mount at the bottom of the dolfin striker and crossbar rods throw up a lot of water. Unless you can mount the pole to the crossbar you will throw up a lot of water.

I will make a Soloright this winter. I will make it out of 1/8" thick wall aluminum or similar as the lines to the crossbar corners hold much of the weight.

Every time I have gone over on the 18 I needed help getting it back upright, even with two people. Yes I have checked the mast every year for leaks.


For what it's worth, the manufacturer of Laser dollies, Seitech Marine, sells the square anodized aluminum tubing they use for their frames online for what to me seems like a reasonable price ($47 plus shipping for a 6'6" length). I'm guessing a high strength wooden oar plus a fiberglass and/or carbon fiber reinforcing kit would cost at least that much, would it not? Anyways, I inspected one of the Sietech dollies at my beach yesterday and I'm pretty sure it is 1 1/2" square with 1/8" wall thickness. Easily strong enough I would think.....

http://shopna.laserperformance.com/templates/group.aspx?GroupGuid=2871


Top
 Profile  
 
PostPosted: Sun Aug 22, 2010 6:51 am 
Offline
Site Rank - Old Salt

Joined: Thu Sep 24, 2009 5:50 am
Posts: 378
Hobie Dude wrote:
Thanks for the link, I haven't seen those pics yet. There is a plastic shop I was hoping to hit up on my way home from work, but I guess that will wait until tomorrow.

I also just took another look at that you tube video and it looks like he has the rig tied to the dolphin striker and the deadeye, no need to drill holes for pad eyes or tie loops.

Adam


I wouldn't be at all comfortable attaching the righting lines to the dolphin striker - too much righting force pulling the striker aft. Same goes for the deadeye and center tramp lacing. I prefer the idea of tieing four lines around the cross bar corners and simply clipping the righting line in place with "fast-attach" aluminum mountain climbing carabiners.


Top
 Profile  
 
Display posts from previous:  Sort by  
Post new topic Reply to topic  [ 34 posts ]  Go to page Previous  1, 2, 3  Next

All times are UTC - 8 hours [ DST ]


Who is online

Users browsing this forum: No registered users and 2 guests


You cannot post new topics in this forum
You cannot reply to topics in this forum
You cannot edit your posts in this forum
You cannot delete your posts in this forum

Jump to:  
© Hobie Cat Company. All rights reserved.
Powered by phpBB® Forum Software © phpBB Group