Return to Hobie.com
Hobie Forums
It is currently Thu Sep 11, 2025 1:38 pm

All times are UTC - 8 hours [ DST ]


Post new topic Reply to topic  [ 22 posts ]  Go to page 1, 2  Next
Author Message
 Post subject: Old 16 project
PostPosted: Mon Oct 09, 2006 11:35 am 
Offline
Site Rank - Captain

Joined: Sun Sep 04, 2005 9:47 pm
Posts: 133
Location: Spokane, WA
Hello All,
I wanted to share my project with you. In follow-on messages I'll discuss the re-finish paint-job, the storage-tube project, and my tramp-repair. t. I hope you'll enjoy it as much as I have.

Wind and water for you all,
Eric

P.S.
Do I insert the hard-drive path to my boat pic(s) via the HTML code or is there another way to post a pic?


Top
 Profile  
 
 Post subject:
PostPosted: Mon Oct 09, 2006 12:46 pm 
Offline
Site Rank - Old Salt

Joined: Sat Aug 05, 2006 5:44 pm
Posts: 439
Location: Oshkosh, WI
You need to host your pictures online and post a path to the online location. There are lots of places that allow free picture hosting.

Try www.imageshack.com or www.photobucket.com


Top
 Profile  
 
 Post subject: 16 project
PostPosted: Mon Oct 09, 2006 3:05 pm 
Offline
Site Rank - Captain

Joined: Sun Sep 04, 2005 9:47 pm
Posts: 133
Location: Spokane, WA
OK,
Here are the pics:

Image

Image

Image

Image

Hope these are visible for you all.

eric


Top
 Profile  
 
 Post subject: Wow!
PostPosted: Mon Oct 09, 2006 7:59 pm 
Offline
Site Rank - Deck Hand

Joined: Sun May 07, 2006 9:54 pm
Posts: 10
Location: San Marcos, Texas
That is beautiful! Mind if I ask a few questions?

Where did you get the tramp?

What did you make the sail storage/carrier out of? Looks like tubing. Was it inexpensive?

OK, I'll quit. Thanks.


Top
 Profile  
 
 Post subject:
PostPosted: Tue Oct 10, 2006 3:01 am 
Offline
Site Rank - Old Salt

Joined: Thu Nov 18, 2004 1:36 pm
Posts: 302
Location: San Diego, CA
Forget the tramp!!!

I want the all alluminum mast :)


Top
 Profile  
 
 Post subject: 16 project
PostPosted: Tue Oct 10, 2006 9:39 am 
Offline
Site Rank - Captain

Joined: Sun Sep 04, 2005 9:47 pm
Posts: 133
Location: Spokane, WA
Hobie Dog,
The tramp is a regular factory tramp. The only modification I made was to replace a panel with a polyester mesh. This was sewed-in then stitch sealed with a polyester solvent. I did the "bounce test" with no adverse results. This is only a temporary tramp until my prototype full-mesh tramp is ready. (Details on this to interested parties).

The sail tube was constructed of smooth-wall air duct supplied from a local A/C subcontractor. They also supplied the end-caps. I used pop rivets and regular hardware from the local Ace hardware store. I fabricated the mounting brackets in our sheet metal shop from 16 GA (54 MIL thickness). (Details on this to interested parties). Cost was about $110 and some of my personal time.

Cheers,
e


Top
 Profile  
 
 Post subject:
PostPosted: Tue Oct 10, 2006 10:35 am 
Offline
Site Rank - Captain

Joined: Sat Aug 12, 2006 9:20 am
Posts: 64
Location: Sacramento/Lake Tahoe
Awesome. That is a beautiful Hobie. Love the storage tube idea.
I learned something about "storage boxes" a couple weekends ago. I backed the boat down the ramp a little further this time so the boat would be a little closer to floating off the trailer. Worked fine. Then I went to put things back in the storage box, which was now full of water. :shock: :oops: I drilled drain holes in bottom and sealed them with clear epoxy.


Top
 Profile  
 
 Post subject: old 16 project
PostPosted: Tue Oct 10, 2006 11:28 am 
Offline
Site Rank - Captain

Joined: Sun Sep 04, 2005 9:47 pm
Posts: 133
Location: Spokane, WA
bphendri12,
I know a Gentleman here in Spokane, WA that has an old 16 mast if you're interested.

Regards,

Eric


Top
 Profile  
 
PostPosted: Thu Oct 12, 2006 12:30 pm 
Offline
Site Rank - Captain

Joined: Sun Sep 04, 2005 9:47 pm
Posts: 133
Location: Spokane, WA
Hi All,
The sailtube was made from 14" diameter, smooth-wall duct from a local A/C contractor. The endcaps were also obtained there. Banding to secure the tube is common 1/2" strap banding used in many warehouses. Steel rivets secure all the hardware. I used portions of a 6" hose clamp (for dryer duct) to fasten the banding to the clamps. (I now recommend using a heavier gauge clamp just for piece of mind - the metal in the current clamps is "soft"). The brackets I had bent-up in our sheet steel press at work. I allowed about 2" clearance for the tube diameter and used a metal-blade scroll saw to make the relief cut. I also used edge dressing from a local electrical supply shop so the bracket edge would not chew into the tube. Brackets are fastened to the trailer with (2) 1/4" diameter bolts each. I mounted the hatch hinge off-horizontal so the hatch would hang out of the way when I'm moving items in and out. The 14" diameter allows me to store the mainsail, jib, paddle, rudders w/tillers, tiller cross-bar, extra life jackets and other collateral gear. The hatch is self-draining by fit. There is plenty of clearance between the tube and the boat. The whole assembly is rigid during travel and should prove durable over time. I expect some oxidation but for me that's OK. You might want to cover the rivet tips inside with some type of plastic/rubber cap at the hinge and lock bracket to avoid marring any items inside whilst moving them in and out. This is a fairly general description, for details please contact me at skipper08022000 at yahoo dot com. In the message to follow I'll discuss the re-paint portion of the project.

Cheers,
Eric


Top
 Profile  
 
PostPosted: Fri Oct 13, 2006 8:51 am 
Offline
Site Rank - Captain

Joined: Sun Sep 04, 2005 9:47 pm
Posts: 133
Location: Spokane, WA
Hello All,
The deck plate (or inspection ports) were purchased from "West Marine", (
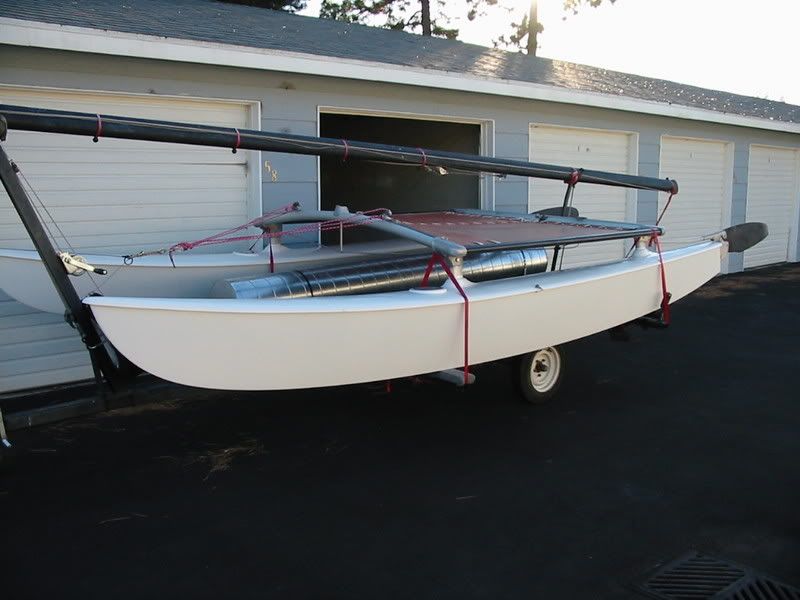
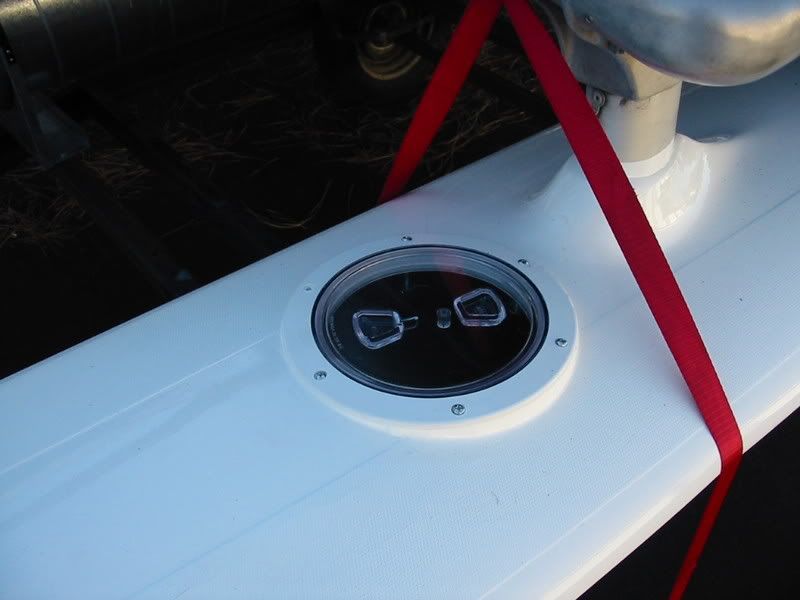
www.westmarine.com). The instructions called for a 6-1/2" rough opening; so I routed my old openings to the appropriate fit. These plate do not have a flange surface which is designed for a curved hull mount so I used marine grade white silicon to form, seal, and fill the gap. Hobie hulls have an inner and outer surface of fiberglass with foam in between. I applied the silicon then fitted the port. I used a wetted finger to form the fillet between the flange and the hull; this turned-out OK as you can see in the picture. After the silicon had dried I used the correct drill size to open bolt holes through the sealant. I was careful not to disturb the silicon's integrity. The through-hull mounting bolts will not provide much of a structural benefit as they would just crush the foam as the nut/bolt is tightened. I used SS parts with a 5/8" plate washer and a nut with a nylon thread lock. I tightened them just enough to start compression on the hull. After installation was complete, I greased the o-ring and the port-cover threads with petroleum jelly per the instructions. The whole assembly feels solid and should provide many seasons of service. I plan to add port bags (also available from West Marine), in the future. I hope this was helpful.

Cheers,

Eric


Top
 Profile  
 
PostPosted: Fri Oct 20, 2006 12:45 pm 
Offline
Site Rank - Captain

Joined: Sun Sep 04, 2005 9:47 pm
Posts: 133
Location: Spokane, WA
Hello All,
West Marine Seagloss Single-part Polyurethane Topside Paint was used in the re-finish. Sand paper grit sequence was: 80, 120, 180, 220 and then a wet-sand 600. Between grit changes were find-and-fill actions for scratches, dings, etc. that were not found before. Wipe-downs were accomplished with tack-cloths after major sanding events and usually after a wash down with mild dish soap. I avoided touching the hull surface with bare hands as much as possible. This paint was applied via spray gun (high volume/low pressure) using my small compressor. The primer was XIM Sealer/Bonder 400 White chosen for it's single-componency and ability to shoot right out of the container. I added about 10% spraying thinner to the topside paint for three coats. 600 grit wet sanding preceeded the final coat. (Note: I did use a two-part glazing compound that complimented the primer but do not readily remember the item information at the time of this post). Milestone pictures can be added to this post if requested. I'll follow-up with the glazing info soon.

Cheers,
Eric


Top
 Profile  
 
 Post subject:
PostPosted: Wed Oct 25, 2006 8:27 am 
Offline
Site Rank - Captain

Joined: Sun Sep 04, 2005 9:47 pm
Posts: 133
Location: Spokane, WA
Hello All,
The 2-part glazing compound I used was Evercoat Maxum (product number 100242). It is well-worth the cost (~$20.00) and flexible in its cure time depending on the amount of hardener used. It sands extremely well and was compatible with the paint and primer I chose to use. I enthusiastically recommend it.

I hope all the previous information was beneficial.

Cheers,

Eric


Top
 Profile  
 
 Post subject:
PostPosted: Thu Sep 13, 2007 2:19 pm 
Offline
Site Rank - Deck Hand

Joined: Thu Aug 23, 2007 2:08 pm
Posts: 9
My 1976 hobie has a all aluminum mast on it is that good? Also do the newer boats not have that is theres not aluminum? sorry for the question just trying to learn...


Top
 Profile  
 
 Post subject:
PostPosted: Thu Sep 13, 2007 8:29 pm 
Offline
Site Rank - Captain

Joined: Sun Sep 04, 2005 9:47 pm
Posts: 133
Location: Spokane, WA
FC,
The newer boats have a non-metallic section at the top (about 3'-4' long maybe) that was instituted for safety purposes. I'm not sure what year this was done and I hope someone will shed some light on this.

Regards,

_________________
Eric
H16
Sail# 11500


Top
 Profile  
 
 Post subject:
PostPosted: Fri Sep 14, 2007 4:35 am 
Offline
Hobie Approved Guru

Joined: Mon Jul 14, 2003 7:11 pm
Posts: 5198
Location: Detroit, MI
We ought to put this in the FAQ:

Almost from the beginning, Hobie Cat has led the industry in the prevention of accidental electrocution of sailors by masts coming in contact with power lines.

It's the reason your boat has a fiberglass tiller and a big, orange warning sticker on the mast.

However, it did not prevent individuals from filing wrongful death lawsuits against the company, especially when it was owed by Coleman (the lantern people), who were percieved to have deep pockets.

In 1984, Hobie Cat reached a settlement in a lawsuit that resulted in the development of the Comptip (Composite Mast Tip). The upper mast section from the hounds up on 14's, 16's and 18's (the only models manufactured at the time) was replaced with a non-conductive fiberglass section.

As a result of its action, Hobie Cat was awared several industry honors and received a special award from USYRU (now US SAILING) for innovation in safety.

A free retrofit program was offered for about 15 years and all Hobie Cats made in North America since 1985 have had Comptips. Even now, Hobie Cat strongly encourages dealers to sell Comptips first time retrofits (not replacements) at cost + frieght.

Some boats, like the 17, 21, 20, Wave and Getaway were originally designed with the Comptip and this is not an issue with them.

Despite this happening nearly 25 years ago, debate rages on regarding the Comptip. They are not as durable as aluminum. They shouldn't be left in the sun for long periods of time (years). It's another joint in the mast that can leak. They aren't as stiff as aluminum and believed to be slower in morderate winds.

However, they are required for racing and more importantly, there are documented cases of where they have saved lives from electrocution.

Personally, I have sailed a boat with a Comptip for nearly 20 years and have never had any significant problems with them. I do keep my mast covered when I'm not using the boat. I keep it clean.

And I know people that have died from hitting powerlines.


Top
 Profile  
 
Display posts from previous:  Sort by  
Post new topic Reply to topic  [ 22 posts ]  Go to page 1, 2  Next

All times are UTC - 8 hours [ DST ]


Who is online

Users browsing this forum: No registered users and 2 guests


You cannot post new topics in this forum
You cannot reply to topics in this forum
You cannot edit your posts in this forum
You cannot delete your posts in this forum

Jump to:  
© Hobie Cat Company. All rights reserved.
Powered by phpBB® Forum Software © phpBB Group