Return to Hobie.com
Hobie Forums
It is currently Thu Aug 21, 2025 10:00 am

All times are UTC - 8 hours [ DST ]


Post new topic Reply to topic  [ 69 posts ]  Go to page 1, 2, 3, 4, 5  Next
Author Message
 Post subject: Invested in a Hobie 18
PostPosted: Sun Nov 15, 2015 1:36 pm 
Offline
Site Rank - Captain

Joined: Sat Nov 14, 2015 1:42 pm
Posts: 26
Hi! Thanks for a great forum!
Posted some pictures of the H 18 maybe SE? i just bought. It has been imported from US by the previous owner to Sweden.The idea is to make this a nice family-boat with wings and storage possibilities. Maybe a genaker. My biggest concern is if we will be freezing by the spray of cold water we might get? Dont want to stay all day in neoprene on a longer trip.

Thanks!
Christer /Sweden

Image

Image

This is the locking mechanism for the mainsail? Is there something missing?

Image

should this nut be tightened?

Image

Image

Image

It is quite soft at these "things" on the hull-side. A problem?

Image

Image

Image

Image

Image


Top
 Profile  
 
PostPosted: Mon Nov 16, 2015 8:15 am 
Offline
Site Rank - Old Salt

Joined: Mon May 09, 2005 10:25 am
Posts: 4267
Location: Jersey Shore
Quote:
It is quite soft at these "things" on the hull-side. A problem?


Yes, it is a big problem. I'm sorry to say that you may have invested in a lemon. From the picture, the sides of the hulls look really bad and if you're saying they're soft, that is a real problem. The front area of the hull sees a lot of stress and must be structurally sound or it could fail completely (a concern for sure, especially if you're sailing in freezing spray conditions). You could potentially repair the hull by injecting epoxy resin, but the damage may be beyond the point that will work. Cutting open the hull and adding structural reinforcement or replacing the hull may be the only options.

Regarding your other questions, yes, the nut on the end of the dolphin striker rod needs to be tight or the front crossbar could fail.

The locking mechanism is complete assuming you have the ring for the halyard (the ring attaches to the head board on the mainsail). Your mast has the old styel locking mechanism (non-comptip). You may want to consider removing the pivoting metal flap that is riveted to the hook on the mast. Most people find it to be more of a hinderence than a help and the new mast design does not use the flap.

I would also be concerned about the rudders on that boat. Keep in mind that this boat is over 30 years old and I wouldn't be surprised if it is actually pushing 40 years old (based on the sail number, mast configuration, rudder system). Those are likely the original lexan rudders and they look like they have been left out in the weather for quite some time. They have a tendency to snap off at the base of the rudder casting which will leave you stranded out on the water if both of them break (which could easily happen).

sm


Top
 Profile  
 
PostPosted: Mon Nov 16, 2015 3:20 pm 
Offline
Site Rank - Deck Hand

Joined: Thu Aug 06, 2015 12:01 pm
Posts: 14
Location: Omaha, Nebraska
Fun! Congratulations on your new boat!
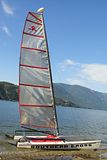
Looks like a 1981, not an "SE". I have one just like it, sail colors and all, except your sails appear to be in better shape. :D
Yes, the squishy hull is a concern. Sail it close to shore with help nearby the first few times out, like you would any boat. You'll be able to tell if it's seaworthy.
Sailing an 18 is like water-skiing: fast and splashy. If the water is too cold to water-ski, it's too cold to sail.
I'm not worried about your rudders. That type stains and you can't help that. Buff them smooth and was them, you'll be fine. I've sailed mine very aggressively for 20 years. I've broken a lot of parts, but never the rudders.
Your trampoline is a replacement, which is good. The original was awful. Make sure it is tight, not saggy, and walk on it a bit before raising your mast so you're sure you won't rip through it.
It's an old boat but might still have a lot of fun left in it. I'll sail mine until it disintegrates, and then I'll mourn — there's no other boat like it.


Top
 Profile  
 
PostPosted: Mon Nov 16, 2015 7:27 pm 
Offline
Site Rank - Admiral

Joined: Mon Sep 12, 2011 7:28 pm
Posts: 265
Location: BC, Canada
PrMoon wrote:
Yes, the squishy hull is a concern.


I would definitely NOT to put the boat into the water before addressing this issue. If the hull fractures during sailing, it will not be repairable. You will be stuck on half sinking boat, wet, cold and drifting... you got the picture.

As srm pointed out, a small soft spot can be repaired, but very large is beyond help. Try to estimate the extend of the soft spot. Is this happening on both hulls? Take more pictures and let our forum experts give you their judgement. There is tons of post on injections method, and I believe a full article (Hotline) as well.

Best of luck, and welcome to the community :)

_________________
H17
Image


Top
 Profile  
 
PostPosted: Mon Nov 16, 2015 8:35 pm 
Offline
Site Rank - Admiral

Joined: Mon Apr 29, 2013 1:11 pm
Posts: 151
the "soft spot" once exposed, is almost always bigger than it looks on the surface. something that size needs to be investigated thoroughly. hard to do way up front. you might possibly take the boat to a local sewer inspection company. they have (here at least) a camera that can go deep into pipes and view. this may be an option to get a look at "way up front" from the inside. maybe a case of beer for their time.


Top
 Profile  
 
PostPosted: Tue Nov 17, 2015 6:16 am 
Offline
Site Rank - Old Salt

Joined: Mon May 09, 2005 10:25 am
Posts: 4267
Location: Jersey Shore
This is what happens to Hobie 18 hulls that go soft in the bow and are not repaired.

Image

Based on the warpage/deformation shown in the picture and the fact that the OP said that this area of the hull is quite soft, the hull is severely delaminated. Injecting epoxy into that amount of damage would likely add a significant amount of weight and there is still a good chance doing so won't correct the soft spot.

sm


Top
 Profile  
 
PostPosted: Tue Nov 17, 2015 10:15 am 
Offline
Site Rank - Captain

Joined: Sat Nov 14, 2015 1:42 pm
Posts: 26
Thanks for the feedback, everyone!
I made a short videoclip that will show the level of delamination a little better. There is quite a big force needed to "move the bubbles".


Top
 Profile  
 
PostPosted: Tue Nov 17, 2015 5:39 pm 
Offline
Site Rank - Old Salt

Joined: Mon May 09, 2005 10:25 am
Posts: 4267
Location: Jersey Shore
The bubbles are very large areas of delamination meaning the integrity of the hull is compromised. Your post says it takes quite a big force to move the bubbles, but that's not what I'm seeing in the video - it looks like you are compressing the bubbles easily with your fingers. This indicates to me that the outer skin is fully detached from the foam core and that is the reason the hull has warped. I don't want to say the hulls are toast, but there's no way I would sail that boat, especially in freezing spray conditions and I certainly would not consider adding a gennaker or wings to a boat with hulls in that condition.

The reality is that if you push a little harder on the areas near the bubbles, you will probably hear crunching and observe additional hull flex indicating that the delamination extends even farther than just the bubbles. Could it be repaired? Maybe. But if you read some of the posts from people who have tried to repair hulls with this level of delam, it usually does not end well (i.e., you end up with a very heavy money pit of a boat).

sm


Top
 Profile  
 
PostPosted: Wed Nov 18, 2015 12:15 pm 
Offline
Site Rank - Captain

Joined: Sat Nov 14, 2015 1:42 pm
Posts: 26
Yes, i will probably need to repair the hulls, both have problematic bubbles in the front, most on starboard side. It´s maybe telling a story about the common winddirection at the most frequent sailed sea?

The hull have been repainted sometime. There is no other visible damge to the hulls. Why would someone repair them and paint them without fixing the delaminated front? A little strange.

After searching this forum for repair stories i can´t really find anything that fits repairing hull-front. Anyway the internet is full of instructions about fibrglass repair.
I´m thinking about to put Insulating Foam Sealant inside the front part of the hull, it would give support when opening the bubbles and building a new shell. It would also give additional strength to the hull.

(I gave 800$ for this cat and they are about triple that in a good shape here in Sweden. The budget allows some new parts and repairings.)


Top
 Profile  
 
PostPosted: Wed Nov 18, 2015 5:54 pm 
Offline
Site Rank - Old Salt

Joined: Mon May 09, 2005 10:25 am
Posts: 4267
Location: Jersey Shore
This thread is from a few years ago. Basically a story of a guy who bought a boat without really knowing what he was getting. The boat had some large soft spots. He dumped a ton of resin into the hulls only to find out that the soft spots were worse than he thought and so he ultimately ended up scrapping the hulls and buying a newer boat.

http://www.hobiecat.com/forums/viewtopic.php?f=13&t=43810#p184117

I suggest you make sure you have a very good understanding of the full extent of the delamination before you start putting a lot of time and money into the boat. If the problem is really only isolated to the very bow, then attempting a repair would be worthwhile. If the delam covers a greater extent of the boat, then not likely worth repairing.


sm


Top
 Profile  
 
PostPosted: Sun Nov 22, 2015 2:34 pm 
Offline
Site Rank - Captain

Joined: Sat Nov 14, 2015 1:42 pm
Posts: 26
Made a coupe of small videos that show the inside. the delaminated areas has a black color on the inside of the hull.


Top
 Profile  
 
PostPosted: Sun Nov 22, 2015 6:12 pm 
Offline
Site Rank - Old Salt

Joined: Sat Jul 02, 2005 9:47 pm
Posts: 614
Location: San Diego
First, congratulations on the boat.

The bow looks like it was fire damaged. Melted the internal foam. This will need to be repaired and there is not quick and easy cure for this damage.

Next the tillers off rudders are swapped right to left. The tiller arms should curve in towards the center line of the boat. As rigged, the rudders have a great amount of toe in. Sailing it will be like dragging an anchor.

I'll look again to see if I see more.

Mike


Top
 Profile  
 
PostPosted: Sun Nov 22, 2015 6:25 pm 
Offline
Site Rank - Old Salt

Joined: Sat Jul 02, 2005 9:47 pm
Posts: 614
Location: San Diego
OK, I see more. I think your spreaders are on backwards. The long post in front, the shorter one in back. Ask Matt Miller, Hobie parts guru how I know that. Also, the pintle (rudder Pin) looks short. Make sure the upper casting can not work out or the cotter pin forced down to break. Is there a washer or set of washers below the cotter pin? Maybe that's it. Also, as stated earlier, the dolphin striker nut needs to be tight. This supports the front crossbar. Very important. There is also a cap in this missing. It makes the look cleaner and protects you toes and fingers from unintended damage.

Now, on the bow, The quick and dirty way is to drill holes and inject resin. It will never be smooth and you will need to compress the area while it cures. The right way to do it is to cut the skin, laminate in new foam, and then rebond the skin and repair the cut area. This is a difficult repair and should be done by a professional. It may be less expensive to find a hull in better shape.

One other Note, the mast is solid Aluminum. Be aware of the "risk" aluminum poses (power wires...) Use cation sailing in any area new or launching near any power lines.


Top
 Profile  
 
PostPosted: Sun Nov 22, 2015 6:58 pm 
Offline
Site Rank - Old Salt

Joined: Mon May 09, 2005 10:25 am
Posts: 4267
Location: Jersey Shore
The videos are marked "private" and can not be played.

I agree about the spreaders, it looks like they are on backwards.

sm


Top
 Profile  
 
PostPosted: Mon Nov 23, 2015 9:33 am 
Offline
Site Rank - Captain

Joined: Sat Nov 14, 2015 1:42 pm
Posts: 26
Thanks for the replies!
Does it mean i should just swap the left and right rudder?
There is no washer on the rudder bolt, i check the parts diagram.
Been trying to understand what the "spreaders" mean... after googling i ended up with pictures on the mast spreaders? I don´t really think that is what you were taking about about, but what was it?
Sorry about the wrong video-privacy-settings, i changed it.

100% of the power-lines in Sweden is underground, so that should not be a problem. (Unless the Hobie will go submarine :mrgreen: )


Top
 Profile  
 
Display posts from previous:  Sort by  
Post new topic Reply to topic  [ 69 posts ]  Go to page 1, 2, 3, 4, 5  Next

All times are UTC - 8 hours [ DST ]


Who is online

Users browsing this forum: No registered users and 2 guests


You cannot post new topics in this forum
You cannot reply to topics in this forum
You cannot edit your posts in this forum
You cannot delete your posts in this forum

Jump to:  
© Hobie Cat Company. All rights reserved.
Powered by phpBB® Forum Software © phpBB Group