Return to Hobie.com
Hobie Forums
It is currently Fri Aug 22, 2025 1:46 am

All times are UTC - 8 hours [ DST ]


Post new topic Reply to topic  [ 69 posts ]  Go to page Previous  1, 2, 3, 4, 5  Next
Author Message
PostPosted: Mon Nov 23, 2015 10:25 am 
Offline
Site Rank - Old Salt

Joined: Mon May 09, 2005 10:25 am
Posts: 4267
Location: Jersey Shore
Check the tiller arms. They may have a horizontal bend in them. If so, the bend should be inward, towards the centerline of the boat. I have a boat with the old style rudder system and the tillers are not bent, they are straight, but it's possible some had the bend and some didn't. If the tiller arms are pointing outward, then pull the rudder pins and flip the rudder system around.

The black stuff inside the hull looks like mold. To me, this is a sign that the boat sat for a long time with water in the hulls. The water likely migrated into the fiberglass and that's what caused the delamination in the bows.

He was talking about the mast spreaders, yes. They look like they are installed backwards.

sm


Top
 Profile  
 
PostPosted: Mon Nov 23, 2015 12:27 pm 
Offline
Site Rank - Old Salt

Joined: Wed May 25, 2011 3:15 pm
Posts: 611
Location: Buffalo, NY
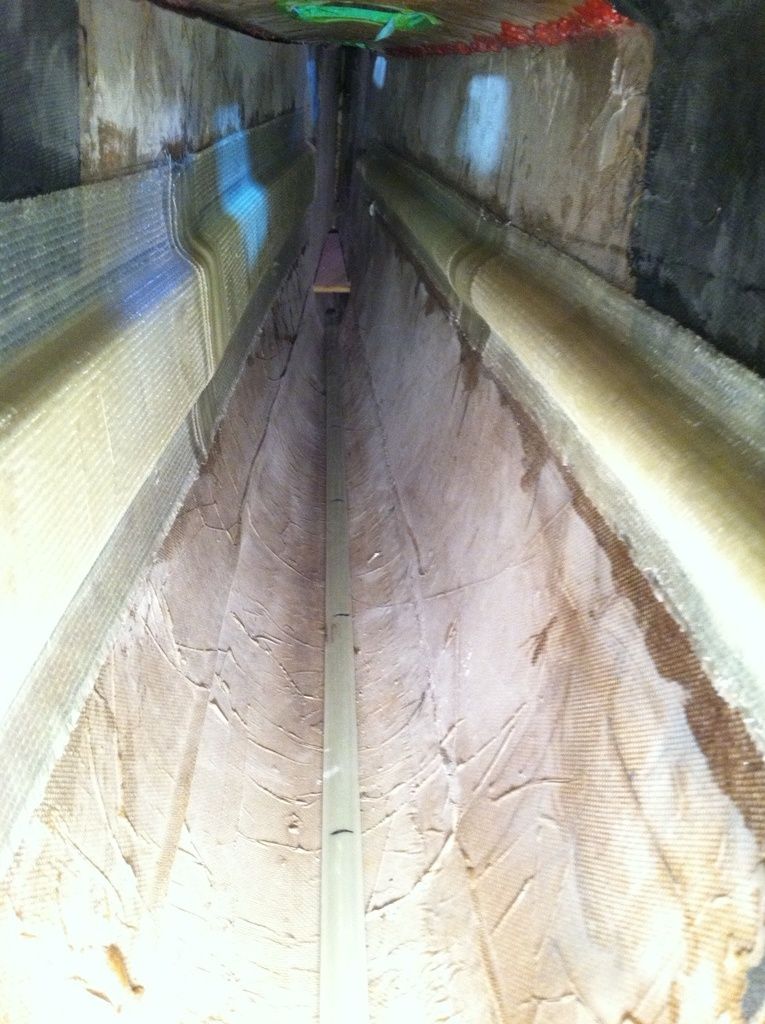
I don't know about fire damage, I don't really see any evidence of that, but definitely some pretty bad delamination. Like srm said, this boat might be nearing the end of it's life. I'd check for soft spots elsewhere (they aren't always visible like the ones at the bow... try pressing on the sides of the hulls and the deck). If it's noticeably soft, that's a soft spot that needs to be repaired. A couple spots here and there are manageable, but if it's pervasive and covers a large portion of the decks or sides, the boat might be beyond saving.

    I also agree with srm on the mold, my boat has it too, to some degree. I imagine most do after a few decades! The glue that holds the deck to the hull at the seams and daggerboard trunk might also be black (mine is).

    The hulls were definitely painted at one time, probably because they were significantly chalky/faded from sun exposure. Colored hulls are tough to restore, so someone probably decided to just paint it instead. They put quite a bit of time into it, and they look really nice, but it belies the actual condition of the hulls underneath.

    Aftermarket (sunrise) sails (or jib at least), not faded noticeably, so they should have some good life left in them. New trampoline, lacing and rigging, all in good shape. Rudder pin looks like it's been chopped down for some reason, doesn't look like it goes all the way up. May want to replace it.

    Rollers on the trailer should be changed out for bunks soon, as the boat is too heavy for rollers and they can cause damage to the bottoms of the hulls over the long term, or when stepping the mast on the trailer.

If this were my boat, I'd concentrate on the serious structural concerns. Check the hull lips to make sure they're not separating, splitting or flexing. The soft spots are a big structural problem. If they can't be fixed, there's no point in going any further. But if there aren't too many and you manage to repair them to the point that they're solid again and don't flex, then I'd rig the boat and try sailing in some light to moderate conditions, close to shore on a warm, calm day with a chase boat. Check the hulls for leaks. If all is good after an hour, check the hulls at the end of the day. If you're lucky, and the bows can be repaired, the boat can still last you a good while!

With regards to the soft spots: Check the sides and deck. You should be able to push HARD without it feeling soft or spongy, or hearing crunching noises. If they're not too large or too many, you can repair them with epoxy. When you find one, cover the area with masking tape and start pressing, see if you can figure out (and trace) the outline of the soft area. Then mark spots for holes ever 1-2" just on the inside of the line. Mark one spot in the center of the soft spot. Drill a hole at each marking, careful only to penetrate the outer layer of fiberglass. twirl the drill bit in the hole with your finger tips and very light pressure to drill through the foam as well. Then mix up a batch of epoxy (or several) and start injecting it into the center hole only. Keep injecting until it starts coming out of the breather holes around the perimeter. Cover each hole in succession when epoxy starts coming out of them, to force it to flow to the next hole. When the entire area is done, let it sit to cure. If the soft spot is large, you may need to "pump" on the soft spot a few times to get the epoxy to flow to the breather holes, but be careful not to let the soft spot suck air through the center hole.

It's worth noting that this repair is technically the "easy fix." A "proper" fiberglass repair involves cutting out the soft spot and laying new fiberglass and new foam, which is very intricate and expensive and should only be done by a professional, as hammond said. The cost of such a repair is likely far more expensive than finding a replacement boat, and it's no guarantee that another part of the boat won't suffer a similar problem in a year or two.

If the soft spots are very large, or there are a lot of them, the hulls are unfortunately shot. However, the parts that came with/on this boat are fortunately in great shape! Save them as spares or replacement parts for the next one you come across with hulls in good shape!

_________________
Mike
Image
'79 H18 standard 'Rocketman II' sail #14921 RIP
'78 H18 (unnamed) sail #14921
'08 H16 sail #114312
'97 H21SC sail #238


Top
 Profile  
 
PostPosted: Tue Nov 24, 2015 2:45 pm 
Offline
Site Rank - Captain

Joined: Sat Nov 14, 2015 1:42 pm
Posts: 26
Ok, thank's! I will try some epoxy fill in a smaller part and se how it work out.

Does it mean i should swap the pipes in this image to correct the mast shrouds?
Image


Top
 Profile  
 
PostPosted: Tue Nov 24, 2015 4:27 pm 
Offline
Site Rank - Old Salt

Joined: Mon May 09, 2005 10:25 am
Posts: 4267
Location: Jersey Shore
christerljung wrote:
Does it mean i should swap the pipes in this image to correct the mast shrouds?


Actually, I think it is set up correctly, but for some reason, at least in the picture from your first post, it looks like the spreaders are raked forward. They should rake back slightly. You can adjust the rake by moving the pin in the outboard bracket to a different hole. Anyway, you can look at the catalog for how it should be setup.

Image

sm


Top
 Profile  
 
PostPosted: Wed Nov 25, 2015 5:13 am 
Offline
Site Rank - Captain

Joined: Sat Nov 14, 2015 1:42 pm
Posts: 26
ok, thanks!
I'm planning for repairing the starboard hull side. Either epoxy fill or replacing foam and glass. In both case i think i would benefit from opening a hole in the deck to be able to support and work from the inside at the same time. Then combining this with installing a deck hatch would be cool and really usefull. Alternativ one seems like the best option. At location 2 the hatch would provide larger storage but get violence from the feets when sailing. Has anyone mounted a larger hatch? (I know this will compromise the hull rigidity, but i don't plan for racing, rather crusing)


Image

A hatch something like this:
http://www.ebay.com/itm/Boat-Access-Hat ... 6d&vxp=mtr


Top
 Profile  
 
PostPosted: Wed Nov 25, 2015 9:26 am 
Offline
Site Rank - Admiral

Joined: Mon Apr 29, 2013 1:11 pm
Posts: 151
if the drawing depicts the actual area needing repair,,,, that seems to be huge. i know you are "way over there" but, i have what is quite possibly going to turn into a spare set of 1981 (or 83) hulls that seem in very good shape. not redlines. i am in Wisconsin.


Top
 Profile  
 
PostPosted: Wed Nov 25, 2015 10:23 am 
Offline
Site Rank - Old Salt

Joined: Mon May 09, 2005 10:25 am
Posts: 4267
Location: Jersey Shore
I agree, if that entire area of the bow is delaminated, then I think you are better off sourcing a new set of hulls, especially if you want to spend your time on the water rather than in a garage repairing a boat.

I am currently in the process of reinforcing the hulls of an older H18 by adding internal stringers. But the hulls on this boat are not actually delaminated, they are just a little more flexible than I'd like and adding the stringers has made the sides of the hulls very rigid. There is a weight penalty of about 10 LB per hull. I purchased them from Jamestown Distributors and have one and a half hulls done (hope to complete the project next Spring). I had to cut two hulls in each deck to install the stringers.

http://www.jamestowndistributors.com/us ... ull+Planks

Image
sm


Top
 Profile  
 
PostPosted: Wed Nov 25, 2015 11:52 am 
Offline
Site Rank - Admiral

Joined: Mon Apr 29, 2013 1:11 pm
Posts: 151
am i missing something here? the spreaders look correct to me.


Top
 Profile  
 
PostPosted: Fri Nov 27, 2015 11:16 am 
Offline
Site Rank - Old Salt

Joined: Wed May 25, 2011 3:15 pm
Posts: 611
Location: Buffalo, NY
Raise hull: no, the spreaders are correct. They just didn't look right in one of the pictures.

Christeriljung, I would advise against the storage hatches. The forward one especially is in a very bad location. Structurally, this area is under the most bending stress of the entire boat. Picture it this way: your rigging is set up to pull the mast down hard on the forward crossbar. The lift on the sails pushes the crossbar forward and to leeward, tightening the mainsheet, windward shroud and the forestay, pushing down even harder on the forward crossbar. In effect, you're pushing down on the forward crossbar and pulling up at the rear crossbar, and up and in at the bows and shrouds. It's like trying to snap a pencil by pulling up and the ends with your thumbs pushing down in the center. Your highest bending stresses are in the deck and bottom of the hull just forward of the forward crossbar, with a moderate-high level of stress in the side walls (especially the outboard side). This is why a large soft spot in this area is such a big problem. A storage hatch adds no structural integrity, and on top of the already compromised side wall, will lead to almost certain failure of the hull.

The aft hatch is in the location the skipper usually sits, so you may be better off moving it aft of the crossbar. Use a 4" or 5" diameter deck port, and you can get bottle ports and fat bags. Also note that there is a block of foam floatation in the area of the aft hatch you've identified.

With the epoxy repair, you're going to want to do each individual soft spot or pocket in one shot. Otherwise, once the epoxy cures, you'll have air pockets that will be nearly impossible to find and fill, and the delamination will continue to spread.

_________________
Mike
Image
'79 H18 standard 'Rocketman II' sail #14921 RIP
'78 H18 (unnamed) sail #14921
'08 H16 sail #114312
'97 H21SC sail #238


Top
 Profile  
 
PostPosted: Fri Nov 27, 2015 2:18 pm 
Offline
Site Rank - Captain

Joined: Sat Nov 14, 2015 1:42 pm
Posts: 26
ok. Thanks for all the replies i really appreciate it!
Tomorrow i'm going to one bigger cat-dealer in Sweden. He has alot of used Hobie parts and the wings is on my list. Unfortunally no spare hull is available at the moment. 400$ for the wings might be fair since they are about 800$ new and quite popular.

But 120$ for a used telescope tiller?
Bowsprit is also 120$

Image

Image

Image

Image


Top
 Profile  
 
PostPosted: Fri Nov 27, 2015 9:07 pm 
Offline
Site Rank - Old Salt

Joined: Wed May 25, 2011 3:15 pm
Posts: 611
Location: Buffalo, NY
I paid $850 for a pair of SX wings last year (used). They usually keep their value because they're so rare, even in the US.

$120 for a telescoping tiller sounds like a pretty good deal if it's in good working order.

For bowsprit, do you mean spinnaker pole? I'd get used to sailing the boat first before investing in something like that, unless you're worried about missing your chance. But I've been sailing mine for 3 years and I would just now entertain the idea of rigging a spinnaker. The boat is quite a handful before you learn the intricacies of sailing an H18 and get a feel for the boat, as a lot of the moves become second nature!

Also, unless you're sure you can repair the boat or find a replacement for the hulls, I would refrain from investing money into replacement parts and upgrades. The repair costs add up quickly, and for the most part, the upgrades and replacements will always be available as a future option.

But while you're at the cat store, ask the dealer about the boat and repairs. Find out if he can make the repairs, recommend a professional repair shop, or even give you a second opinion or some pointers on the repairs. Pictures and videos are no substitute for seeing the boat first hand, especially if he has experience in cat repair.


Top
 Profile  
 
PostPosted: Sat Nov 28, 2015 6:03 am 
Offline
Site Rank - Admiral

Joined: Mon Apr 29, 2013 1:11 pm
Posts: 151
The wings look as though they have been re-enforced with a cross piece. Looks as though an engineer designed the work done, as it looks very well (if not overly) done. just check the welds carefully as the frames themselves go through an "annealing-bending-hardening" process. welding can disrupt the hardening.


Top
 Profile  
 
PostPosted: Sat Nov 28, 2015 6:51 am 
Offline
Site Rank - Old Salt

Joined: Mon May 09, 2005 10:25 am
Posts: 4267
Location: Jersey Shore
I would not even consider putting wings or a spinnaker on that boat until you get the hull issues sorted out. Wings and a spinnaker will just put even more load on the already weakened hulls.

sm


Top
 Profile  
 
PostPosted: Sun Nov 29, 2015 3:07 pm 
Offline
Site Rank - Captain

Joined: Sat Nov 14, 2015 1:42 pm
Posts: 26
When looking at alternative repair-methods for the hull i found the third comment on this page:
http://www.thebeachcats.com/news/400/Soft-Deck-Repair/
He says polyurethane construction adhesive had been successfully used when repairing large delam. spots. Maybe possible?
Also the method with screws seems like a good way to compress from both sides.


Top
 Profile  
 
PostPosted: Sun Nov 29, 2015 9:54 pm 
Offline
Site Rank - Old Salt

Joined: Wed May 25, 2011 3:15 pm
Posts: 611
Location: Buffalo, NY
With the exception of the bit about the screws, this is pretty much the repair process we've been recommending. Personally, I wouldn't use the screws, as I'd be worried about epoxy then leaking into the boat, but that isn't terrible I suppose, just a bit complicated. In fact, in your case, with such large soft spots, a means to hold the layers together and provide a little compression may be a good thing. Anyone else have some thoughts?

I note also that the poster of that article was using the screws to spread the epoxy (and squeeze/compress the layers to make sure it flows throughout the soft spot). You can accomplish the same thing by only drilling breather holes at the perimeter of the soft spot and a single fill hole in the center, and letting/forcing the epoxy to flow from the center out to the perimeter holes, which is the more typical way to go about it, though probably a little less effective than actively "squeezing" the layers back together.


Top
 Profile  
 
Display posts from previous:  Sort by  
Post new topic Reply to topic  [ 69 posts ]  Go to page Previous  1, 2, 3, 4, 5  Next

All times are UTC - 8 hours [ DST ]


Who is online

Users browsing this forum: No registered users and 2 guests


You cannot post new topics in this forum
You cannot reply to topics in this forum
You cannot edit your posts in this forum
You cannot delete your posts in this forum

Jump to:  
© Hobie Cat Company. All rights reserved.
Powered by phpBB® Forum Software © phpBB Group