Return to Hobie.com
Hobie Forums
It is currently Sun Jun 22, 2025 2:08 pm

All times are UTC - 8 hours [ DST ]


Post new topic Reply to topic  [ 22 posts ]  Go to page 1, 2  Next
Author Message
 Post subject: TI Flooding
PostPosted: Tue Aug 02, 2016 1:05 pm 
Offline
Site Rank - Deck Hand

Joined: Wed Mar 30, 2016 12:26 pm
Posts: 4
Experienced severe flooding today with my TI. Two up and sea a bit choppy (2 foot wind chop), wind about 25 knots. Just made it back to the slip. Did not open any hatches at all during the day. Both of us had to move forward to try and get the stern out the water a bit. Stern seat area was totally submerged. Thank goodness I had a 2.5 hp Suzuki pushing the TI, Motor nearly underwater but managed to keep going. Seriously going to look at a proper Bilge Pump that can be used without opening the hatches and adding more floatation in the hull, think I will use bottles. ( we use bottles or foam here in South Africa for floatation) Learned previously that it is not a good idea to open hatches at sea and I store all my equipment on the trampolines. Noticed that one of the sleeves on the Spectra Rudder line had come out. Going to do extensive tests tomorrow to check the hatches. Suspect the Bow hatch as we took a lot of water over the bow and that hatch does not secure very well. Other than that love the TI with all the propulsion options.


Top
 Profile  
 
 Post subject: Re: TI Flooding
PostPosted: Wed Aug 03, 2016 5:36 am 
Offline
Site Rank - Old Salt

Joined: Sun Apr 26, 2015 3:13 pm
Posts: 658
I get around 5-7.5 gallons (19-28 liters) of water inside my 2015 TI on days where the waves break over the front hatch. I know because several times I've emptied it into a 5 gallon bucket and it filled it to the top and then another half. I've never owned a kayak or any boat for that matter that took on water like the TI. I've checked it carefully many times, there are no holes anywhere in the hull and the rudder seals look fine. The only place that much water could be coming in is the front hatch, although the hatch and the seal appear normal. It only happens when water breaks over this hatch.

I asked my Hobie dealer if this could be fixed and he said he would check with Hobie. That was at the end of last season (October). This season he said Hobie told him the front hatch was "water resistant, but not water proof" and that the water incursion was normal and could not be fixed. I was not at all happy with that answer but that's where we left it. I don't think the front hatch is even very water resistant, never mind water proof.

I purchased a hand operated bilge pump and it gets quite a workout every time I go out on choppy waters. I can never get all the water out and I watch as my dry bags float around inside the hull. I'm now considering trying to add an automatic electric bilge pump like they have on powerboats.


Last edited by pro10is on Wed Aug 03, 2016 8:13 pm, edited 1 time in total.

Top
 Profile  
 
 Post subject: Re: TI Flooding
PostPosted: Wed Aug 03, 2016 6:50 am 
Offline
Site Rank - Old Salt

Joined: Sat Nov 05, 2011 1:58 am
Posts: 2893
Location: Forster, NSW, Australia
Try cutting out the shape of the hatch in a 1/2 inch yoga mat and press it inside the hatch lid. Also, Tie a knot in each of the bungees to greatly increase the tension.

See how that goes.

_________________
Tony Stott
2012 Tandem Island "SIC EM" with Hobie spinnaker


Top
 Profile  
 
 Post subject: Re: TI Flooding
PostPosted: Wed Aug 03, 2016 9:59 am 
Offline
Site Rank - Deck Hand

Joined: Wed Mar 30, 2016 12:26 pm
Posts: 4
Considering making a similar cover that is used by kayakers to keep the water out in sit inside kayaks for the front hatch. Obviously without a hole in the middle! Think it will be sufficient, can sew a piece of bungee cord on the bottom of the cover for ease of access.


Top
 Profile  
 
 Post subject: Re: TI Flooding
PostPosted: Wed Aug 03, 2016 11:21 am 
Offline
Site Rank - Old Salt

Joined: Thu Jun 01, 2006 1:16 pm
Posts: 605
Location: Colorado
Just another possibility based on my experience.

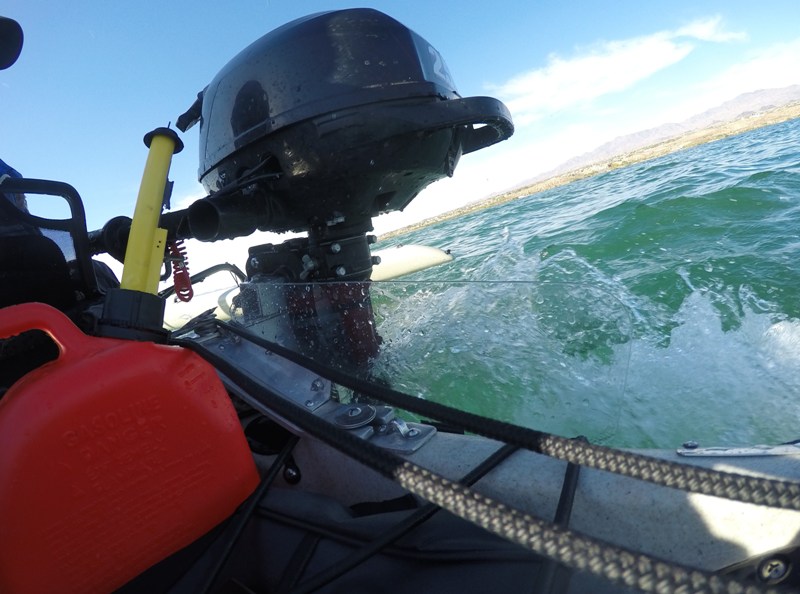
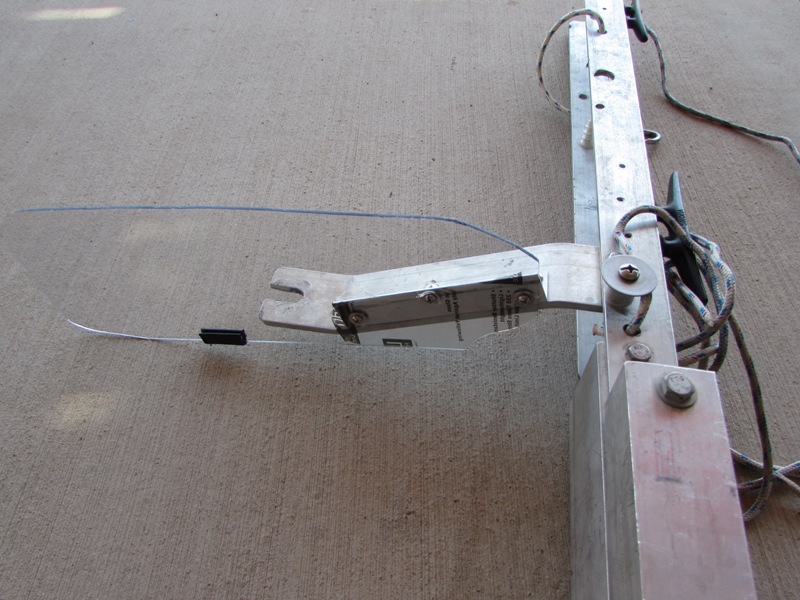
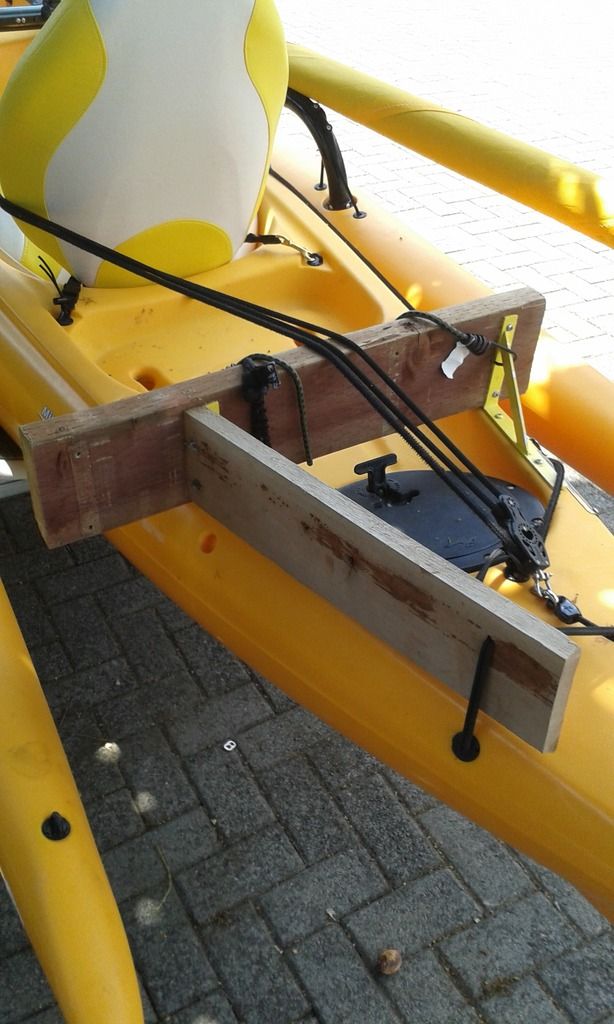
You mentioned using a 2.5 Hp Suzuki so I wanted to bring up one more possibility. I dont know how long you motored but if it was for a long time, this might be applicable. When I first put on my motor mount with the same outboard I did a long motor run of maybe 15 miles into a good headwind and had a fair amount of water in the hull that I normally would not have had if I were using the boat the same amount of time without the outboard. Turns out that the outboard creates a wash over the back of the hull that kept that back round aft hatch under water most of the time. I have heard some say those are water tight - but my aft round hatch is NOT and that is where the water was coming into the hull.

I added a lexan plastic shield on the motor mount that keeps that wash off the hatch. This made a very significant difference in getting water into the hull. Below are a couple pictures from a thread on TI motor mount of what I did. CR Yacker (last picture) also has his motor mount set up to deflect water from the outboard flow.

Image

Image

Image


Top
 Profile  
 
 Post subject: Re: TI Flooding
PostPosted: Fri Aug 05, 2016 11:11 pm 
Offline
Site Rank - Deck Hand

Joined: Wed Mar 30, 2016 12:26 pm
Posts: 4
Yes, motored for quite a while. I tend to push the round hatches down once secured with the latch to ensure a good seal. I am back at sea for 2 months so will have to wait until i get home for testing and implementing safety measures. Will definately be adding bouancy and a bilge pump. 2.5 hp pushes the rig nicely and comforting to have as a back up when the wind picks up or is against sailing home easily. Do you fill your tank at sea? Busy coming up with a plan to connect a small external tank, thinking of using a Yamaha 5 hp fuel cock which has the option of OFF - EXTERNAL TANK AND BUILT IN TANK. Would have to elevate the tank above the motor.


Top
 Profile  
 
 Post subject: Re: TI Flooding
PostPosted: Sat Aug 06, 2016 6:27 am 
Offline
Site Rank - Old Salt

Joined: Sat Nov 05, 2011 1:58 am
Posts: 2893
Location: Forster, NSW, Australia
I am about to buy an outboard, and have been investigating extra fuel supplies. I am working on the "less is more" theory, and plan to buy (initially) one fuel bottle like this
Image
The theory is that such a container would be quite light and easy to handle, with the idea that all the contents get emptied into the outboard at once, saving mucking around with funnels etc. If going away on a camping etc trip, I would also take a bigger (or second litre) container to refill at the end of the day.

I certainly have no plans to motor for a couple of hours at a time - I have sails and pedals if I need to cover big distances.

_________________
Tony Stott
2012 Tandem Island "SIC EM" with Hobie spinnaker


Top
 Profile  
 
 Post subject: Re: TI Flooding
PostPosted: Sat Aug 06, 2016 8:06 am 
Offline
Site Rank - Old Salt

Joined: Sun Apr 26, 2015 3:13 pm
Posts: 658
tonystott wrote:
I am about to buy an outboard, and have been investigating extra fuel supplies. ...I certainly have no plans to motor for a couple of hours at a time - I have sails and pedals if I need to cover big distances.


If that the case you should seriously consider the stern mounted Torqeedo 403 ultra lightweight electric motor option http://www.torqeedo.com/us/en-us/products/outboards/ultralight. I installed one this year and I can't believe how effective it is. It powers my TI up to 5 mph (8 kph) and can run for hours on end. It easily tilts up and out of the way when I'm sailing and I can still use both Mirage drives as normal whenever I wish. I can even use the Mirage drives and motor together. The entire package, including the battery, only weighs 15 pounds so you hardly know it's there. Mounting it to the stern of the TI was ridiculously simple and requires no additional hardware or kludgy mounts like an outboard does. It simply attaches to the back with a simple, small, unobtrusive gimbal mount which is included. There's no gasoline odors, no loud operational noise, no gas storage issues, and no exhaust to breathe. When it's in operation people around me don't even realize I'm using a motor.

I rigged it to steer with the rudder and in fact if the rudder itself broke I can now steer back to shore with the motor alone which adds a safety feature. The throttle control is mounted right by my side for very easy access. It includes a speedometer and an ultra-precise GPS controlled indicator telling me the current charge of the battery and exactly how far I can go on the remaining charge in distance or time. This works incredibly well and gives me the confidence to sail longer, farther, and more aggressively knowing if the winds completely die out 15 miles from the launch I can still get back home in time for supper. In fact this happens quite often.

I thought long and hard about adding a small gas outboard but the Torqeedo 403 does the same job at about the same price ($1650 USD), is far more advanced, and has so many advantages it was impossible to pass up. Electric motors are now at the point where they are replacing gasoline motors. They are the future. Keep in mind that the price includes a lithium battery which replaces all future gas purchases. The motor also requires no lubrication oil and there is virtually no maintenance.

I've been extensively testing both the 403 motor and the way I rigged it all season. So far it has exceeded my expectations. I'll soon include a full report with photos on this forum for anyone who is interested in installing this excellent motor option.


Top
 Profile  
 
 Post subject: Re: TI Flooding
PostPosted: Sat Aug 06, 2016 9:10 am 
Offline
Site Rank - Old Salt

Joined: Sat Nov 05, 2011 1:58 am
Posts: 2893
Location: Forster, NSW, Australia
Sounds great. How can you mount the 403 at the stern without removing the standard rudder.

As I can buy a 3.5 hp motor for 1/8th the price, I cannot afford to go electric, even if I need to add petrol costs.. As electric becomes cheaper I might go that way.

_________________
Tony Stott
2012 Tandem Island "SIC EM" with Hobie spinnaker


Top
 Profile  
 
 Post subject: Re: TI Flooding
PostPosted: Sat Aug 06, 2016 12:10 pm 
Offline
Site Rank - Old Salt

Joined: Sun Apr 20, 2008 6:18 am
Posts: 3062
Location: Sarasota,Key West FL
Of course you guys could do like I do. When I plan to go out hot dogging (ie... Going out in open rough sea at high speed), Before going out I just tape over the hatches and the main hatch. Then when I'm done I just remove the tape. I honestly don't recall going into any hatches ever, once I'm out on the water. Did that once and flooded the boat.
FE


Top
 Profile  
 
 Post subject: Re: TI Flooding
PostPosted: Sat Aug 06, 2016 10:44 pm 
Offline
Site Rank - Old Salt

Joined: Sun Apr 26, 2015 3:13 pm
Posts: 658
tonystott wrote:
Sounds great. How can you mount the 403 at the stern without removing the standard rudder.

As I can buy a 3.5 hp motor for 1/8th the price, I cannot afford to go electric, even if I need to add petrol costs.. As electric becomes cheaper I might go that way.

I mounted the 403 motor very slightly to the left of and behind the existing rudder. In this way it does not interfere with rudder operation in any way. The rudder works as normal and you can still raise and lower it. The motor then easily attaches to the rudder controls and turns precisely with the rudder. This gives great turning control when using the motor and allows you to steer the boat even if the rudder breaks.

You certainly can't buy a 3.5 hp four stroke gas powered motor in the US for around $200 USD unless it is well used, and those are very hard to find, at least where I live. I once tried to find a decent 25 HP used motor for a fair price and looked for two years unsuccessfully. Used four stroke outboards are in huge demand in my area and no one wants a two stroke as they're soon to be banned from many lakes. But if you can get a decent outboard in Australia for cheap and the 403 is not in your budget then of course it's understandable to choose a gas motor.

The only real downside of the 403 is its cost. The battery accounts for a lot of that. But almost everyone I know and read about who made an investment in electrical power is glad they did, including me. I can't imagine going to a gas powered motor for the TI now, at least for me.


Last edited by pro10is on Sat Aug 06, 2016 10:59 pm, edited 1 time in total.

Top
 Profile  
 
 Post subject: Re: TI Flooding
PostPosted: Sat Aug 06, 2016 10:59 pm 
Offline
Site Rank - Old Salt

Joined: Sun Apr 26, 2015 3:13 pm
Posts: 658
fusioneng wrote:
Of course you guys could do like I do. When I plan to go out hot dogging (ie... Going out in open rough sea at high speed), Before going out I just tape over the hatches and the main hatch. Then when I'm done I just remove the tape. I honestly don't recall going into any hatches ever, once I'm out on the water. Did that once and flooded the boat.
FE

I wish that would work for me but I do use the front hatch a lot. My dry bags are too big to fit in any other hatch and that's where I store my weather gear which I need when it gets rough. I'm in and out of the hatch in way under a minute and any water that goes in is minimal compared to the water that leaks in over a full day's sailing. Of course I would never open the hatch in extreme conditions, but generally if I'm not under sail I can get in and out of the hatch with no issues even on fairly rough days. Caution is required for sure.

On Friday I got caught out in three to four foot seas with steady 20-25 mph winds for several hours. Took a lot of water over the front hatch. When I got back it took twenty minutes to get all the water out of the boat. That had to be a record. I estimate 10-15 gallons. I have to find a good solution.


Top
 Profile  
 
 Post subject: Re: TI Flooding
PostPosted: Sun Aug 07, 2016 4:30 am 
Offline
Site Rank - Old Salt

Joined: Sun Apr 20, 2008 6:18 am
Posts: 3062
Location: Sarasota,Key West FL
The problem with the front hatch is when it's sitting static on the ground the rubber seals typically seal pretty well, of course you need to check them and adjust to what is needed to insure both seals are actually in contact with the lid and hull all the way around.
Obviously the lid is injection molded so it will always be very flat and accurate. The problem is the hull itself which is rotomolded and not very accurate or consistant. Resulting in some boats not having a good seal (mostly in the center), on those boats you can typically see a gap as much as 1/8" in the outer seal near the center.
If you lay a flat plate on top of the inner seal (one side only) on the hull you can quickly see if there is a dip in the middle. Alternately you can just spread some margerine or grease on the inner surface of the hatch cover, place the hatch on, press the hatch down, but don't put the bungy on, then remove and look at the underside. If there is a break in the impression in the grease, you have a gap. The ideal fit would be get the gasket to seal all the way around by just putting the hatch on, but not applying the bungy (a perfect fit). The reason for this is the seals have some give designed in (they flex). The problem that comes up is if you bungy the hatch down hard, you bottom out the seals on the ends (front and back) but the center area is barely touching the lid (no adjustment left to compensate for hull flex).
The ideal fit is if you can get the inner and outer seal to mark onto the grease all the way around without applying any downward pressure to the lid. Then when you apply the bungy all the seals flex evenly giving the seals the neccessary give and flex that they need to compensate for the hull flexing. In theory it's a great design and should work flawlessly. However in practice because of the rotomoding inaccuracies, and the flexible loosy goosy nature of rotomolding polyethylene, lets just say the fit coming from the factory is far from perfect on some hulls. It's not a design problem (the design is ok), It's a manufacturing problem.
Pretty much any of us can go in and adjust the seals to make everything work correctly, but it takes a little time effort and patience.
Basically it boils down to seal type selection. There are two basic type seals, you have a compression type seal ( O-rings sealing a flat surface like a pump housing, and cork and bottle seals (like a wine cork).
Hobie probably should have used a cork and bottle type seal initially, but they didn't, so we have to live with what we have, and need to compensate for that.
To get the seals to work correctly you may have to remove some material from the outer edge of the lip on the lid. And also the inner edge of the hull opening so be very careful, once the material is gone it can't be put back.
To actually measure some of these gaps it's pretty easy to just roll up some play dough or clay lay it across the joints in several places press the lid down then remove. You can then clearly see how much material needs to be removed.
Yes it's time consuming and labor intensive and you have to be very careful.
The whole key here is understanding how the sealing system is supposed to operate, then adjust as needed.
In some cases the gaps are so huge it might be easier to add material to the edges vs removing material (actually might be easier in the long run.
To do that you simply remove all the seals. Place a bead of some type of calk or adhesive along the outer edge of both the outer lid and the inner edge of the hull. Of course you have to make sure the caulk or sealant doesn't stick to the opposing surface (result would be you just glued your lid down (that would be bad just sayin). Any kind of mold release spray, vasiline, grease, butter, saran wrap will work, your choice. Then place the lid on and squeeze the calk out by applying pressure to the lid (not enough to flex the lid too much, just enough to get it to bottom out on the hugh spots.
Now let the silicone or caulk dry (a day or so to insure it's completely setup. Now remove the lid carefully (if it doesn't come off, you just screwed up bad). Now just simply knife away the excess material where it bulged out past all the edges (actually pretty easy to do, doesn't have to be fancy. If your using silicone (what I use) a sharp razor cuts thru easily).
Now put your seals back on, being careful not to knock the silicone or caulk off the edge. Once the gaskets are in place the silicone is pretty protected under the gasket seals, so this is a one time fix.
The gasket is always uniform, if your gaskets are deformed, get new gaskets.
Ideally you should now be able to place the lid on, without applying any pressure (ie bungy), it should pass your butter/ grease test, in other words it sould seal all around both surfaces before applying any pressure. Now when you put the bungy on the whole cover should drop down and compress the gaskets about 1/16 inch, that is the cushion needed to compensate for hull flex on the water (pretty nessessary).
If you want it done right this is the way. If you want cheap and fast, just add keiths Roid gaskets (works great), or Tony's Yoga mat, also works great.
The whole key hers is understanding how it's supposed to work first, once you understand that part, there are many ways available to fix the problem.
Keep in mind the additive method of fixing (ie...the caulk trick). Those beads could be well over 1/8" tall and likely very delicate (yea thats how far off some of the hulls are).
The additive method is great, because if you muff it up, just peel it off and do it again. A $3 dollar tube of caulk should last 5-6 tries, try and choose a caulk that sticks to PE fairly well (I use silicone). I find cleaning the surface you want to bond to with Heptane (bestest rubber cement thinner), then spraying on a very light coat of Krylon for plastics clear spray paint onto the surface prior to putting the silicone on, makes the silicone bond to the polyethylene plastic like nobodys business (really hard to get off). (Heptane melts PE so be a little careful (Heptane ( a component in gasoline) is the active ingredient in the Krylon plastic spray paint BTW).
Hope this helps
FE


Top
 Profile  
 
 Post subject: Re: TI Flooding
PostPosted: Sun Aug 07, 2016 5:08 am 
Offline
Site Rank - Old Salt

Joined: Sun Apr 20, 2008 6:18 am
Posts: 3062
Location: Sarasota,Key West FL
Or you can do like I do and just tape a garbage bag over the front hatch when I go out hot dogging in rough seas, your choice. It's only a problem in really rough seas and when the hull is taking a pounding. In my case when I'm out pushing the boat way too hard in rough seas you can actually see the hull flexing 5-6 inches in all directions, like a rubber toy. There is no compression type seal that can withstand that kind of flexure (thus the garbage bag), and all the round hatch seals are taped over or the grooves around the seal filled with vasiline. Who in the heck ever goes into the rear most hatch when out on the water anyway, thats where most of my water comes in. Basically because when you get up over 10 mph all the scupper on the boat become drinking fountains, then over 15 mph they are guisers shooting water a foot in the air. Basically my rear deck is completely underwater all the time, and the rear round hatch leaks like a siv.
Lol the reason I don't sit in the back seat is because when in the back seat I'm always sitting in 6 inches of water. The front seat stays dry.
Also it's a pretty good idea to remove all your round hatches (remove the screws), squirt a bead of silicone around the hole, then screw the hatch back down, water just pours in that joint, (takes all of 5 minutes to do).
I honestly don't recall the last time I put anything in my rear most hatch, so why not just seal it. On my boat that whole part of the boat is underwater (the rear compartment completely filled with water) 100% of the time whenever I'm out (because of the built in drinking fountains), can't do anything about that, so I just adapt, I'm certainly not going to slow down to allow the boat to drain.
Watch any of my 50 or so videos, that rear half of the boat is always full of water.
Fe


Top
 Profile  
 
 Post subject: Re: TI Flooding
PostPosted: Sun Aug 07, 2016 7:12 am 
Offline
Site Rank - Old Salt

Joined: Sun Apr 26, 2015 3:13 pm
Posts: 658
I think it's great that Hobie has such a loyal following that Hobie owners try so diligently to resolve glaring flaws in the design. However the elephant in the room is that Hobie should be the party that provides a solution for their own design flaw. A better compensating front hatch gasket could be fairly easily designed by the manufacturer to fix this ongoing issue once and for all.

If any of us purchased a new car with a sunroof that leaked like a sieve, and the dealer told you the car manufacturer said it was "water resistant not water proof" how many of you would accept that answer and try to fix it yourself with garbage bags and yoga mats?

The most important and implicit design criteria for any modern boat is that it does not take on excessive water in normal operation. How basic is that? The TI fails that criteria and Hobie instructs their dealers to tell their customers that this is "normal" and can't be fixed.

C'mon Hobie, step up to the plate here and stop ignoring the issue. Don't leave your loyal customers to desperately try to solve your design problems. You're better than that. Or at least your customers think you are.


Top
 Profile  
 
Display posts from previous:  Sort by  
Post new topic Reply to topic  [ 22 posts ]  Go to page 1, 2  Next

All times are UTC - 8 hours [ DST ]


Who is online

Users browsing this forum: No registered users and 2 guests


You cannot post new topics in this forum
You cannot reply to topics in this forum
You cannot edit your posts in this forum
You cannot delete your posts in this forum

Jump to:  
© Hobie Cat Company. All rights reserved.
Powered by phpBB® Forum Software © phpBB Group